Outlook
Overview
For faculty, staff, and students, the KU online ID also acts as the permanent KU email address; for example, a123b456@ku.edu. There are also email aliases which are nicknames for the permanent email address. To manage you email aliases and password, login in to MyIdentity Services.
How to Access Outlook
- Install Microsoft Outlook on your computer.
- Go to outlook.office.com to access through the browser.
- Sign in to the Outlook Web app from any device with internet access.
- Download the Outlook app on your mobile device. See Mobile Access for more information.
Calendar
Share a Calendar
Sharing a calendar allows others to see the details of your calendar but they cannot make changes to it.
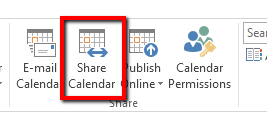
- Open your calendar and select Share Calendar.
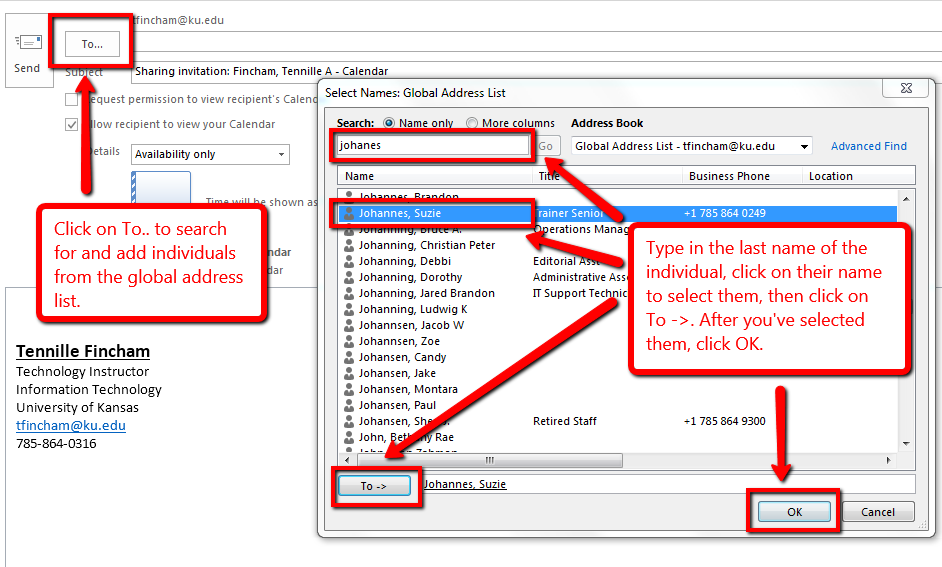
View ScreenshotSelect Share Calendar icon in the top menu ribbon. - Add recipients from the KU Directory by choosing the To field. Find the recipient, select their name, and select the To -> button followed by Ok.
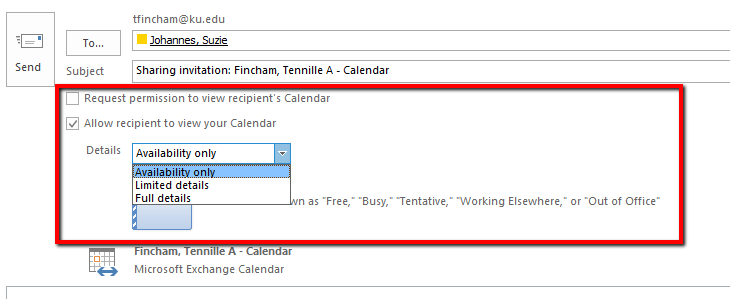
View ScreenshotSearch by last name, select name, select To button at bottom, then OK. - Choose your sharing options.
View ScreenshotChoose your sharing options. - Add any additional info needed to the email body and send.
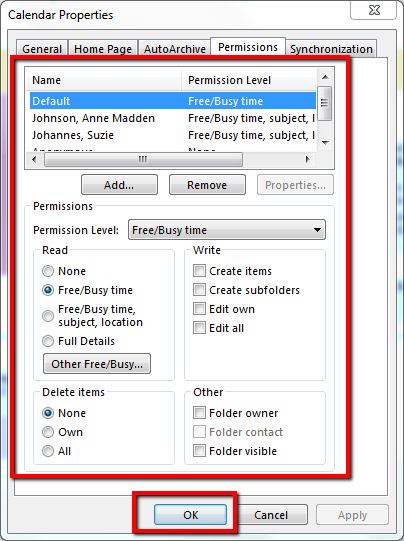
Manage Calendar Permissions
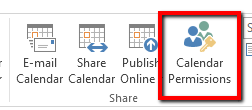
- Open your calendar and select Calendar Permissions.
View ScreenshotSelect Calendar Permission from top menu ribbon. - Select a person from the list that has access or add someone new by choosing Add....
- Edit the permissions with the options below the person's name.
View ScreenshotSet your permission options. - Select Ok.
Add a Delegate
Adding a delegate is different than sharing a calendar. A delegate is able to manage your calendar and email on your behalf, making any necessary changes.
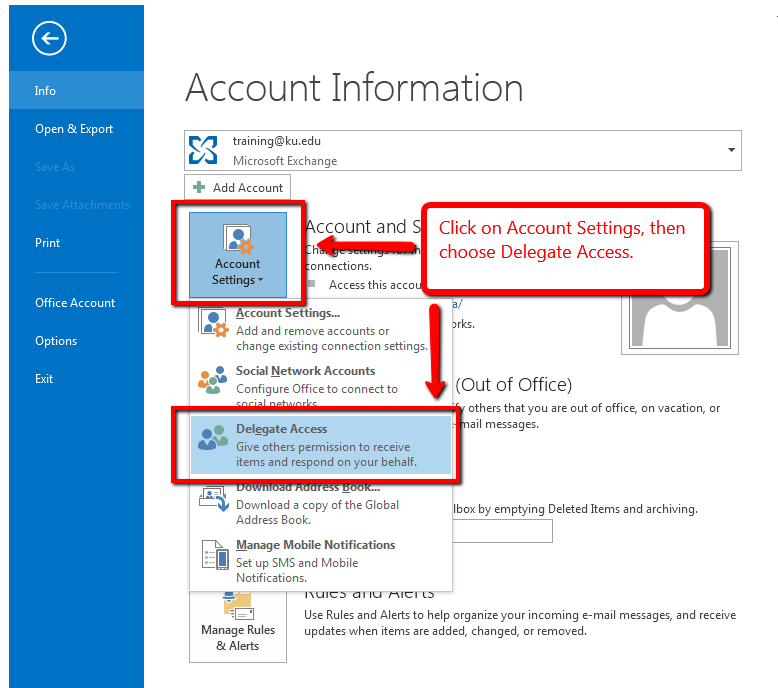
- Open Outlook and choose File.
- Choose Account Settings and select Delegate Access.
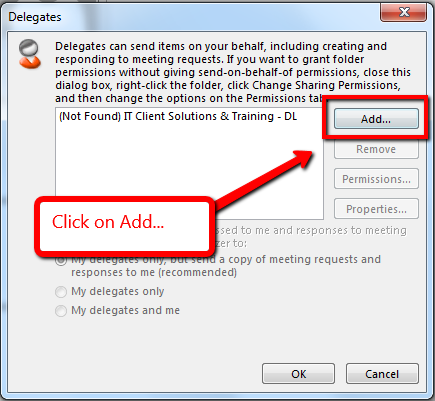
View ScreenshotSelect Account Settings, then Delegate Access. - In the pop-up window, select Add....
View ScreenshotSelect Add button. - Search for the delegate and add them.
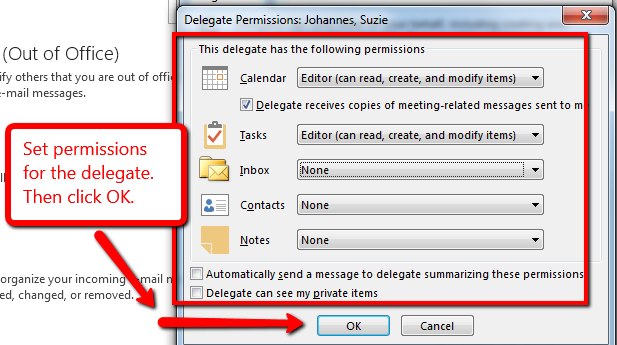
View ScreenshotSearch by last name, select name, select To button at bottom, then OK. - Choose the desired permissions for the delegate and select Ok.
View ScreenshotSelect Permissions, then OK. - Select Ok.
Create a Meeting or Appointment
Meetings involve multiple people, appointments do not include anyone else.
Create a Meeting
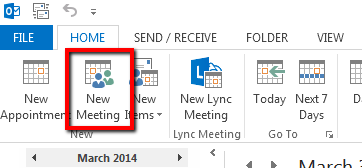
- Open your calendar and choose New Meeting.
View ScreenshotSelect New Meeting from top menu ribbon. - Select the To... field to open the address book.
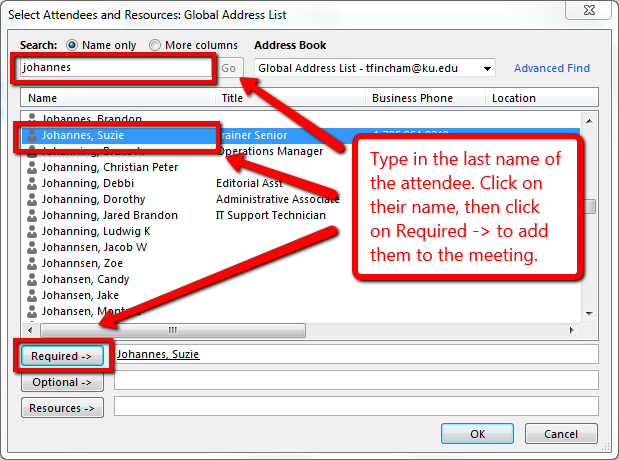
- Find an attendee, select their name and select if they are required or optional to attend.
View ScreenshotSearch by last name, select name, select Required button at bottom, then OK. - Choose Ok.
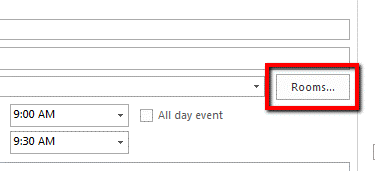
- If you need to book a room, select the Rooms... button.
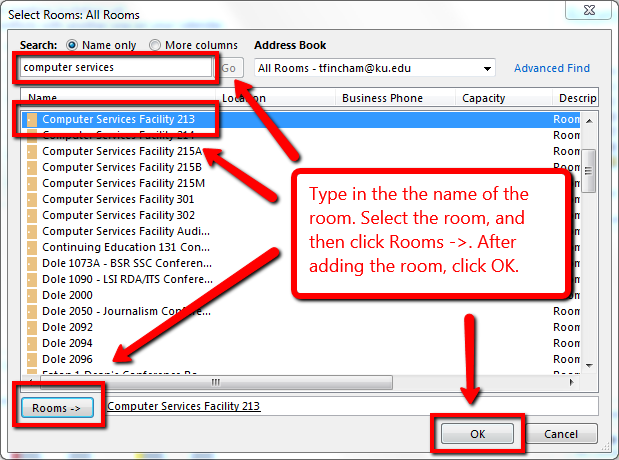
View ScreenshotTo reserve a room, select the Rooms button. - Find the room, select the name and select Rooms ->.
View ScreenshotSearch name of room, select room, select room button at bottom-left, then OK. - Choose Ok.
- Enter the rest of the details of the meeting and choose Send.
Create an Appointment
- Open your calendar and select New Appointment.
- Enter in the subject, location, date and time, and any details.
- Choose Private if you want to hide the details from others with access to your calendar.
- Select Save & Close when finished.
With the global address list, you can email anyone at KU without knowing their email address; you just need to know their name.
Send an Email to KU User
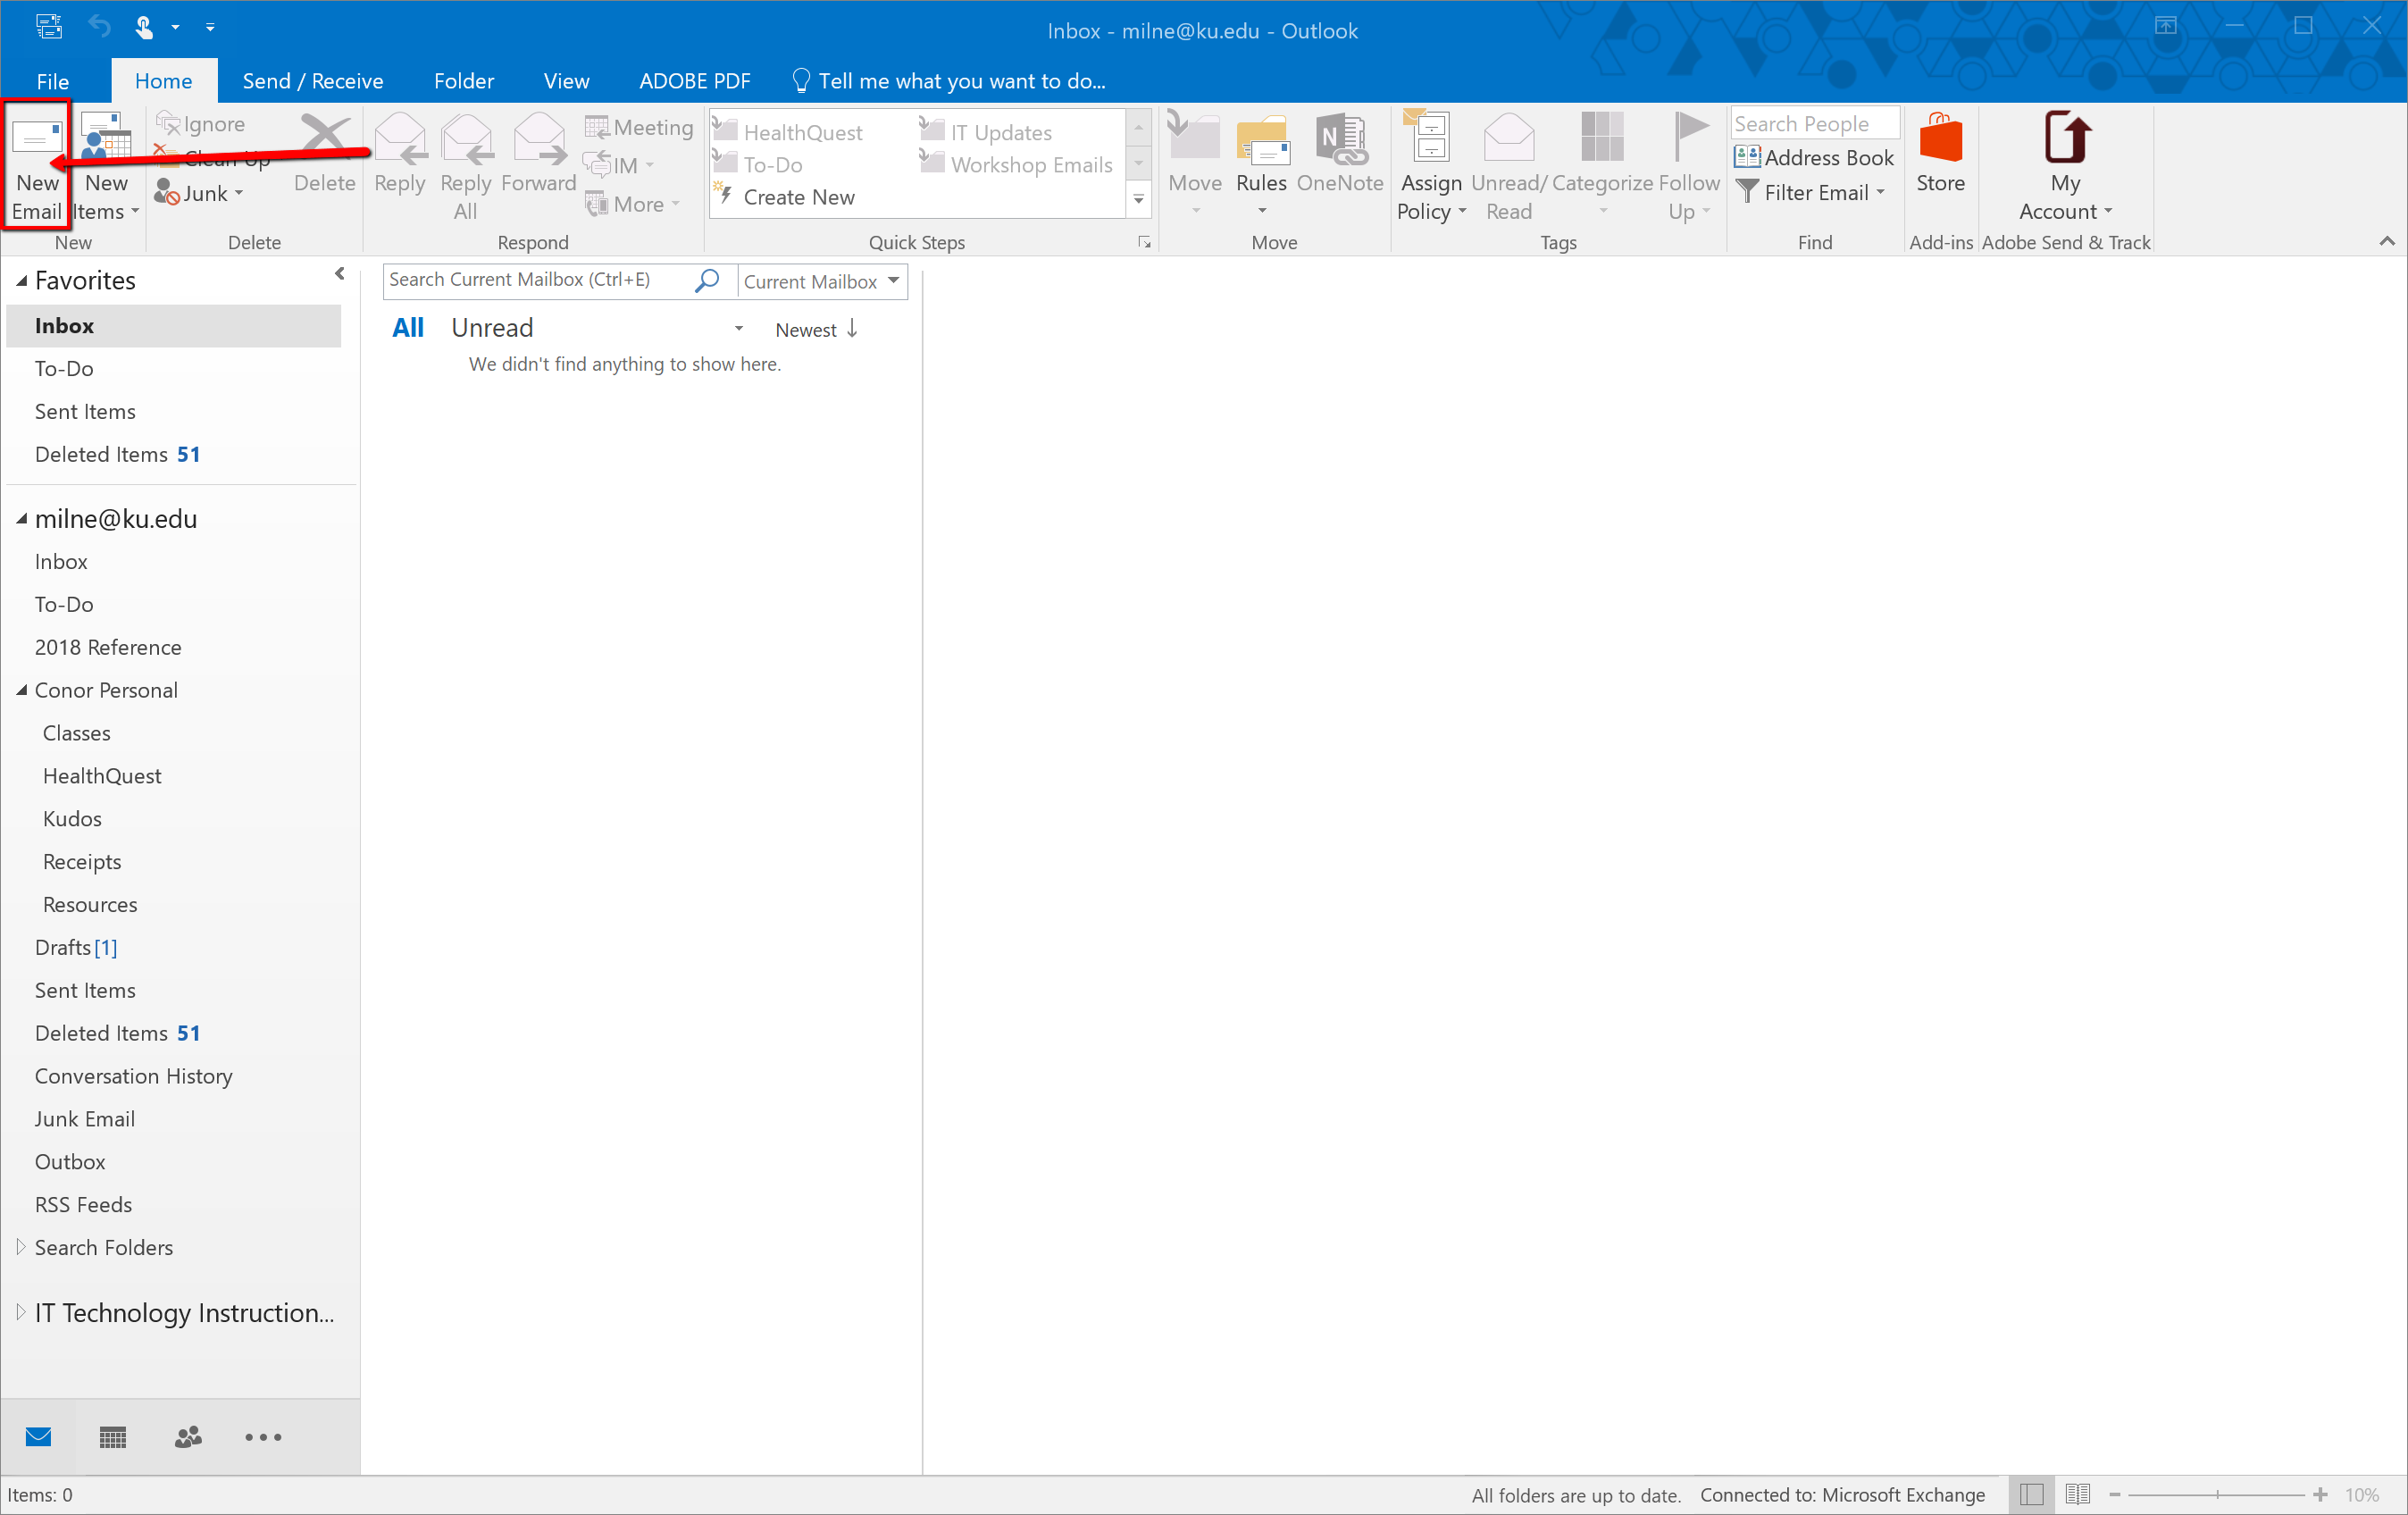
Open Outlook and select New Email.
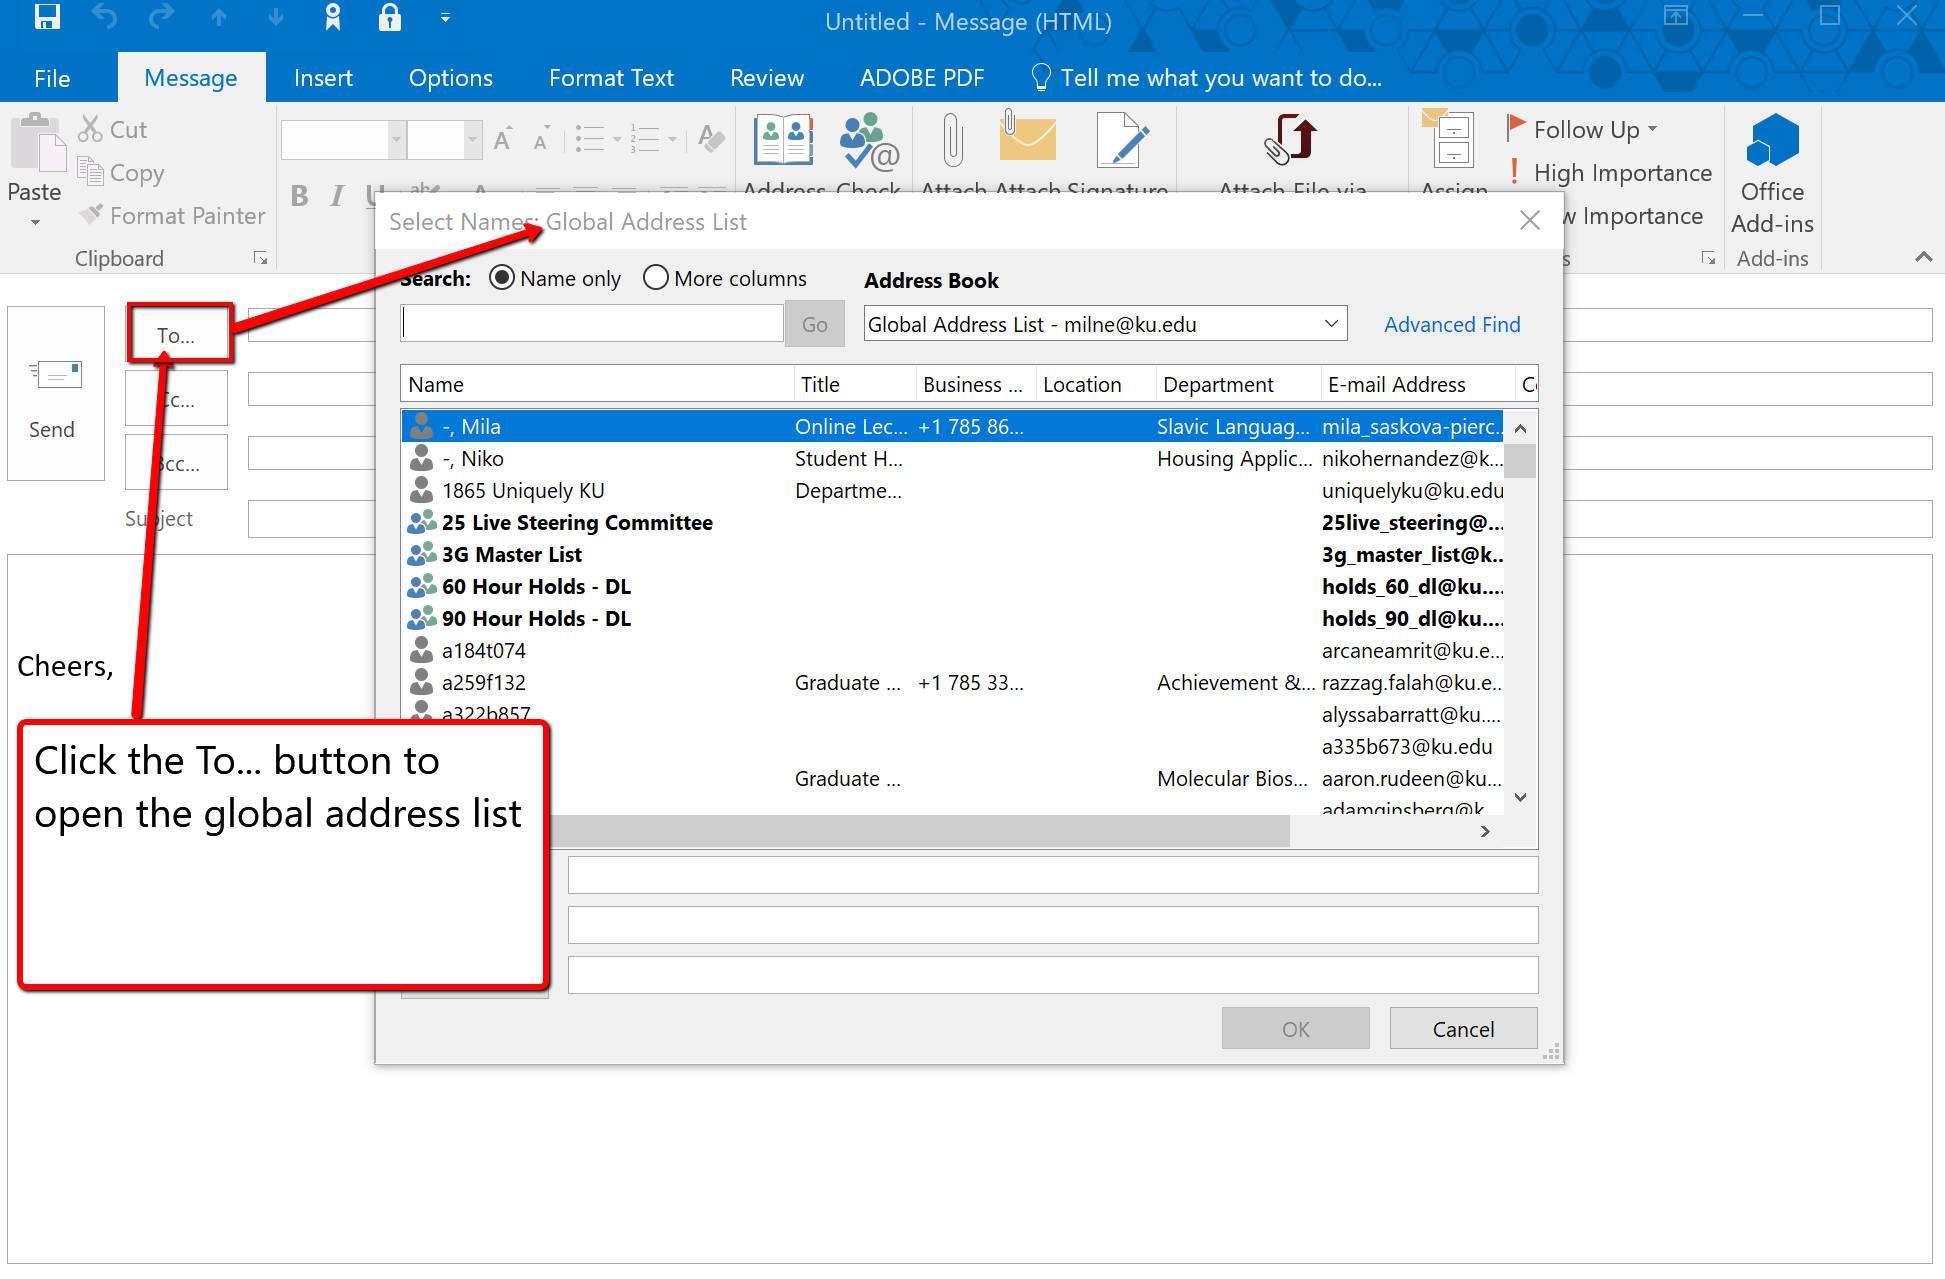
Select the To... button to open the global address list.
View ScreenshotSelect New Email icon to the far-left in the ribbon.
Search by last name, first name to find the contact. Select the name and then choose the To -> button to add the person to the email. Repeat for any additional contacts as needed. Select Ok. Type your email and choose Send.
View ScreenshotSelect the To button to open the global address list.
Create an Email Alias
- Login in to MyIdentity Services.
- Select Email Services > Manage Your Aliases > Add an Alias.
- Type your new alias.
- Select Add Alias button.
Mail Merge
See Microsoft's instructions to set up mail merge.
Department Account
Departmental email accounts are owned by the department or team, for example training@ku.edu.
Benefits of Department Email Accounts
- A departmental account email address can be used on brochures, web pages, letterhead, etc. If staff changes, you won't have to reprint this material.
- People who want to contact an office don't need to know the name of the person doing a particular task in order to send email to your office.
- Messages in the departmental account are available year-after-year, which eases transition issues as staffing changes occur.
- Messages can be answered in a timely manner because multiple individuals will have access to the account.
- Email sent to the departmental account will not count against personal mailbox limits. The departmental account mailbox has its own 2 GB storage limit.
Add a Department Mailbox to Outlook
The KU Knowledgebase article below will guide you through adding your department account inbox to your Outlook.
Contacts
All students, faculty, and staff at KU are listed in the Global Address List and do not need to be added as a contact. You would add a contact in Outlook for someone that is external to KU.
Create an External Contact
- Open Outlook and select the People tab in the bottom left.
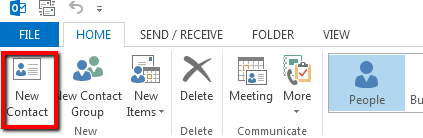
- Choose New Contact.
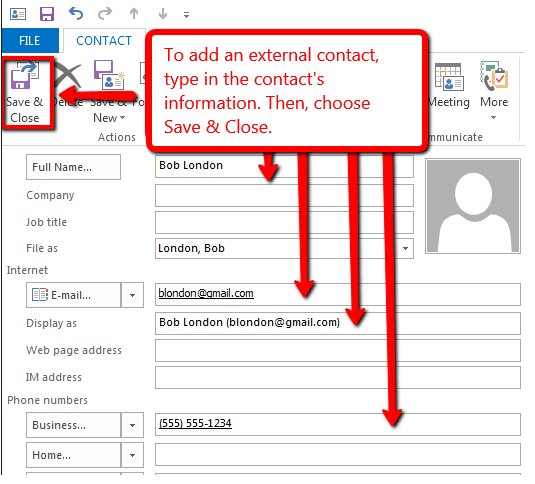
View ScreenshotSelect New Contact from top menu ribbon. - Enter in the contact's details and select Save & Close when finished.
View ScreenshotType in contact information, then Save & Close.
Contact Groups
Using contact groups saves time in creating emails and meetings with the same group of people. Contact groups can include KU members and people external to KU.
Create a Group
- Open Outlook and select the People button in the bottom left.
- Select New Contact Group.
View ScreenshotSelect New Contact Group from top menu ribbon. - Choose Add Members.
- Choose From Outlook Contacts to add existing contacts, or choose From Address Book to select from members of KU.
- After adding members, select Save & Close.
Contact a Group
- Open Outlook and go to the People tab.
- Double click on the contact group to open it.
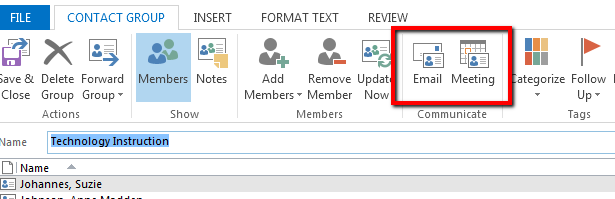
- Select either Email or Meeting.
View ScreenshotSelect Email or Meeting from the top menu ribbon. - A message will open with the group added to the To field already.
- Enter in the details and select Send.
Mobile Access
You can access your KU email account on mobile with the Microsoft Outlook app. Download on Google Play and the Apple Store. You may also be able to add your account to your preferred email application.
iOS Set Up
- Go to the App Store and search for and download the Microsoft Office app.
- Open the app after it is installed.
- Add your KU email address (for example, a123b456@ku.edu) and choose Add Account.
- You will be prompted to sign in to KU's system using your KU Online ID and password.
- Choose Maybe Later when prompted to Add Another Account.
- Choose whether you would like to Enable Notifications.
- If you chose to get notified, a message will pop up that Outlook would like to send you notifications. Select Allow.
Android Set Up
- Go to the Google Play Store and search for and download the Microsoft Outlook app.
- Open the app after it is installed.
- Select Get Started.
- Add your KU email address (for example, a123b456@ku.edu) and tap Continue.
- You will be prompted to sign in to KU's system using your KU Online ID and password.
- Select Skip when prompted to Add Another Account.
- Select Skip if you want to bypass the app overview.
Outlook Web App (OWA)
You can sign in to the OWA from your mobile browser which does not require an email app. Go to Outlook Web App and login with your KU Online ID and Password.
Out of Office Message
Create an automatic reply (out of office message) that will be automatically sent to anyone who emails you while you are out of the office.
Set Up Out of Office Reply
- Open Outlook and select File.
- Select Automatic Replies (Out of Office).
- Choose Send automatic replies and select the start and end dates and times that you will be out of office. Type the message that will be sent when you are out.
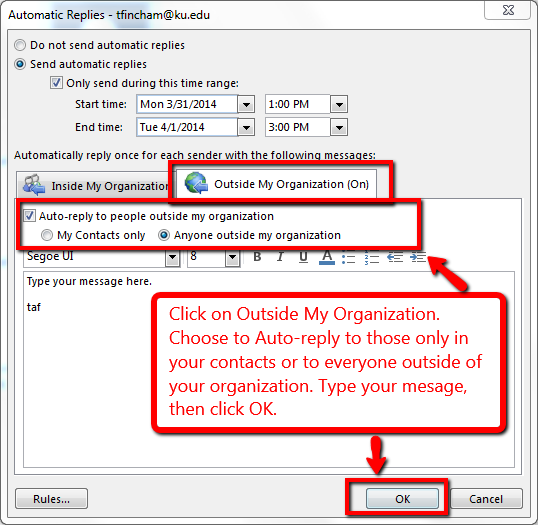
View ScreenshotSelect Send automatic replies radio button, then type your message. - Select Outside my Organization.
- Select the box for Auto-reply to people outside my organization.
View ScreenshotSelect Outside My Organization tab, choose auto-reply checkbox, then OK. - Select Ok.
Your automatic replies will shut off after the "end time" you scheduled when setting up your message.
Signatures
Multiple signatures can be created in Outlook and can be automatically added to any emails or meeting invites being sent.
Create a New Signature
- Open Outlook and choose New Email.
View ScreenshotSelect New Email icon in the ribbon on the far-left. - In the new email window, select the Signatures button and select signatures.
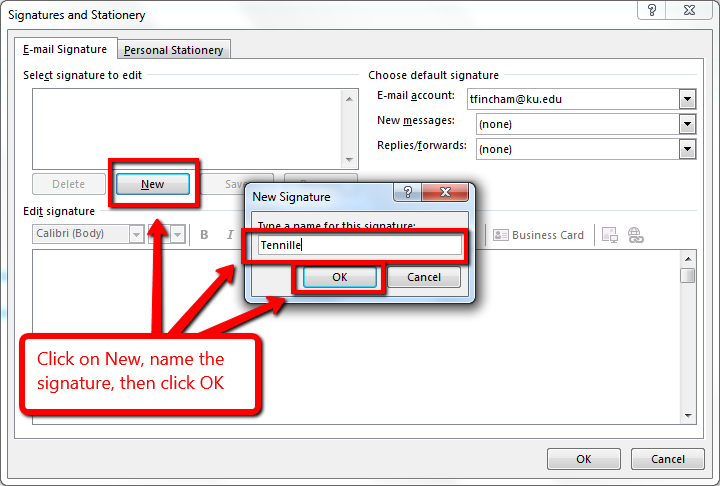
View ScreenshotFrom an open message, select Signature from the ribbon, then Signatures from the panel. - Select New, type in a name for the signature, and select Ok.
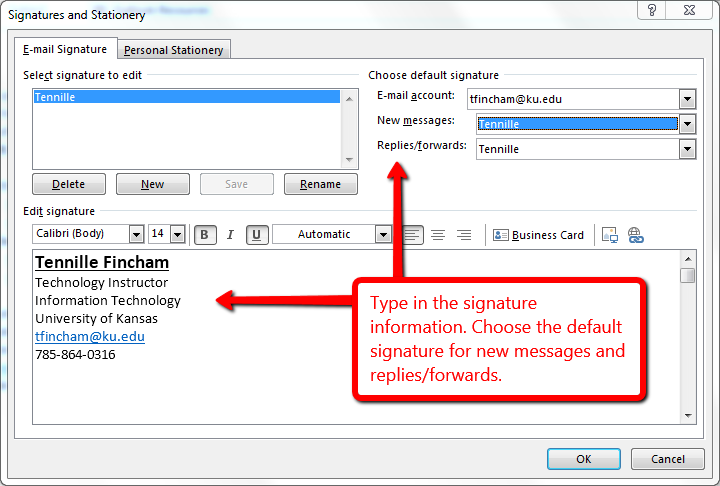
View ScreenshotSelect Select the New button, name your signature, select OK. - Enter the signature in the Edit Signature field.
- Select Save and then under the Choose default signature section, select whether you want your signature to be added to the bottom of new messages and/or replies and forwards.
View ScreenshotType signature then choose default signature options. - Select Ok.
Report Message
A Report Message featured was added to KU Outlook accounts in December 2020. It can be found on the right side of the Home ribbon of Outlook Mail.
View ScreenshotReport message on right part of ribbon.
A junk message is one that comes from an unsolicited vendor, listserv, etc. A phishing message is one that is designed to obtain your personal information to steal from you, usually done by impersonating popular websites or including malicious links in the body of the message.
If you receive an email that you know is a phishing message, please follow the steps below to automatically report it. If you receive an email that is suspicious but you're not sure if it's a phishing message or if the message contains threatening language, please forward it to abuse@ku.edu as an Outlook item attachment so that KU IT can investigate.
Send to Junk Mail
If you receive a junk message:
1. Select the message, but do not open it.
2. Click on the Report Message button.
3. Select the Junk option.
4. A window will pop up asking if you'd like to report the message as junk to Microsoft. Select whether to file a report or not.
This will move the message to your Junk folder and add the sender to your Blocked Senders list.
Phishing Messages
If you receive a phishing message:
1. Select the message, but do not open it.
2. Click on the Report Message button.
3. Select the Phishing option.
4. A window will pop up asking if you'd like to report the message as phishing to Microsoft. Select whether to file a report or not.
Outlook will mark the message as phishing and move it to the Deleted Items folder. KU IT Security will be notified that this message has been marked as phishing.
Move from Junk E-Mail
If you see a message in your Junk E-Mail folder that is not actually a junk message:
1. Select the message.
2. Click on the Report Message button.
3. Select the Not Junk option.
4. A window will pop up asking if you'd like to report the message as Not Junk to Microsoft. Select whether to file a report or not.
Outlook will move the message to your Inbox.
Update Outlook
Updating Outlook will ensure you have access to the full features Microsoft offers. The newest version gives you access to a variety of apps, including a fully integrated To Do app with Outlook, which was previously only available in the web client of Outlook or To Do.
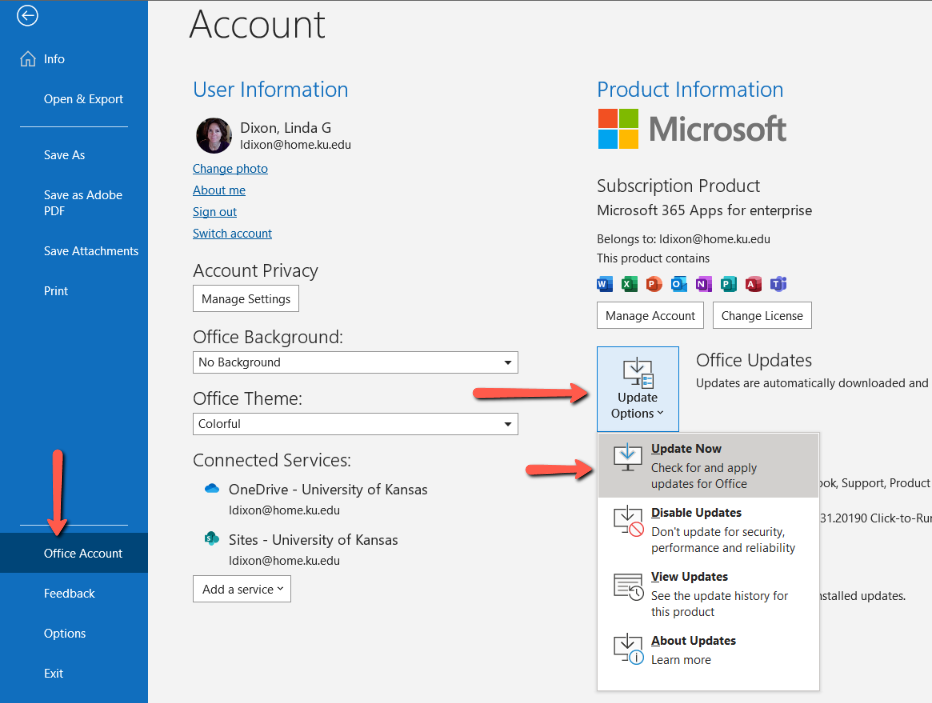
Update Outlook Desktop App (PC)
- Select File from top menu
- Select Office Account
- Select Update Options
- Update Now
View ScreenshotSelect File to get to the update options.
Update Outlook Desktop App (Mac)
Mac users should already have the updated version. The tools will still be located at the bottom of the left panel. If not, go to Microsoft's Support page for more information.
Microsoft Updates & tips
Support
Join Teams for Microsoft 365 Updates & New Features
Updates and new features for Microsoft 365 apps can be found in our public team, KU Teams User Group. A channel in this team is dedicated to Microsoft 365 apps. Members are invited to ask questions and share information.
To join:
- Go to Teams
- Select Join or Create a Team
- All public teams will be listed in the interface
- Select KU Teams User Group
If you need assistance joining the team, reach out to us at training@ku.edu and we will add you to this team.
Additional Email Resources: See KU Email
Technical Support: ithelpdesk@ku.edu | 785-864-8080
Training Support: training@ku.edu | 785-864-5155