Zoom at KU
Overview
Zoom combines video conferencing, online meetings, and in-conference group chat into one easy-to-use tool that is ideal for KU conference rooms and online meetings with external partners.
Teams meetings is another application with similar capabilities. If you are already using Teams, this may be a good option for you. For a comparison, go to our Video Conferencing Recommendations comparison chart.
Meeting Security Settings
- Passwords will automatically be created for each scheduled meeting.
- If you change the password for the meeting, use numerical values instead of text
- Do not reuse passwords for multiple meeting URLs.
- Don’t post Zoom meeting links on publicly available websites, such as in an online class syllabus (even if it’s a PDF).
- Emailing Zoom passwords or posting them to Canvas is the safest way to share them.
Remember to never share your KU account password with anyone including KU IT - For public webinars or trainings, add registration to meetings for attendees to register instead of posting a generic Zoom URL.
- For meetings with all KU attendees, consider choosing the option to only allow authenticated users to enter.
- Turn on the Waiting room option for smaller meetings to grant entry to each participant.
- By default, screen sharing is available to hosts only.
- When sharing content, disable annotations.
Install the Zoom App
The Zoom app must be installed on each participant’s computer or mobile device. You will be prompted to install the app when you enter a meeting for the first time on a computer.
Go to KU's Zoom page for instructions for installing the Zoom app on Windows, Mac and mobile devices.
Create a Meeting
- Go to KU's Zoom page.
- Click Sign In and sign in with your KU Online ID and Password.
- Title the meeting.
- Set the meeting time and duration.
Note: Select Recurring Meeting > Recurrence > No Fixed Time to create a meeting room you can use any time.
Optional: Select Required next to registration to enable meeting registration and create a roster of attendees. - Best practice: Select Mute Participants Upon Entry so late participants won’t disrupt the meeting.
- Best practice: Select Enable join before host to allow meeting participants to join before the host arrives.
- Optional: Select additional meeting options.
- Optional: Give host permissions to additional KU participants who have previously signed in to kansas.zoom.us.
Note: you may give host permissions to any participant once they have joined the meeting. - Click Save.
- Optional: Add the meeting to your calendar.
- Select Copy the invitation to copy and paste the meeting information to send to participants.
Notes:- Include the Zoom app download link (https://zoom.us/download) with your meeting invitation
- You can install an Outlook plug-in to create Zoom meetings from within Outlook, or from the Zoom desktop app.
- Scheduling meetings through the browser is the recommended method to see the most options available.
- If you are ready to meet, select Start this meeting.
Recordings
Enable Cloud Recording
Before you schedule a meeting, use Zoom settings to streamline the process of saving and sharing your recordings. The recording file will automatically appear in your MediaHub account and My Media in Canvas.
- Go to KU's Zoom page.
- Select Sign In.
- Log in using your KU Online ID and Password.
- In Meeting Settings, Recording tab, select Cloud recording. This only needs to be done once.
- Manually stop/start cloud recording from meeting.
Add Media to Canvas
Kaltura is our suggested hosting option for videos within Canvas. Please review the different ways of adding videos to a course in Canvas.
Additional information can be found on large files and more.
Join a Meeting
From a Meeting Invitation, Email, or Canvas:
- Double-click on the link from the invitation, email or Canvas. (Note: May be next to Join from PC, Mac, Linux, iOS or Android.)
- Install the Zoom app if prompted.
- Enter the meeting password.
- If you have a microphone, choose Join Audio Conference by Computer, otherwise, choose Phone Call.
From Zoom Desktop App:
- Select the Start menu.
- Search for and open Zoom.
- Select Sign in > Sign in with SSO.
- Enter kansas.zoom.us and click Continue.
- You will be directed to the KU log in screen where you can sign in with your KU Online ID and password.
- Select Join.
- Enter the Meeting ID or select a meeting you’ve attended previously.
- If you have a headset or want to use your computer’s built-in microphone and speakers, choose Join audio.
Manage a Meeting
Turn Off Annotations
- Go to KU's Zoom page.
- Select Sign In.
- Log in using your KU Online ID and Password.
- Select Settings from left panel, under Meetings tab, toggle Annotations button and or off.
Control Chat Access
Control whether participants can chat to everyone, to the host only, or not at all.
- Select the Chat icon from a meeting.
- Select the … icon.
- Choose the appropriate option.
View ScreenshotSelect chat options for attendees
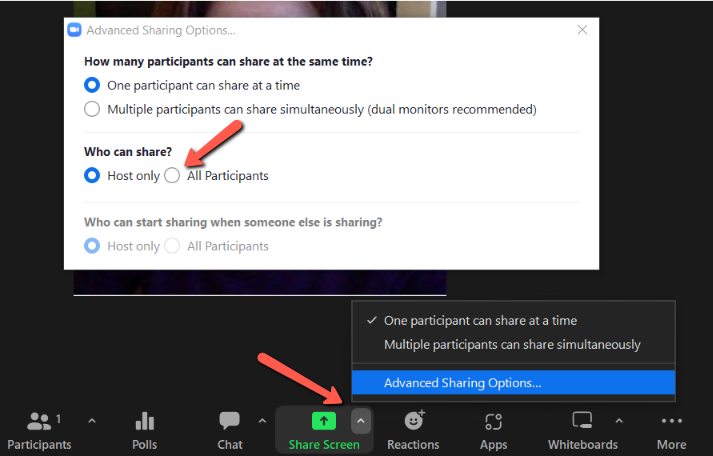
Allow Screen Sharing for Participants
By default, screen sharing is only accessible by hosts, but you can allow participants to share their screen.
- Select the arrow next to Share Screen.
- Select Advanced Meeting Options.
- Under Who can share, select All Participants.
View ScreenshotAdvanced Sharing
Remove a Participant from a Meeting
- Select Manage Participants.
- Select More next to the participant you want to remove, then choose Remove.
Put an attendee on hold during meeting: This allows the host to stop video and audio transmission to a participant(s).
- Open the Manage Participants panel.
- Hover over the name of an attendee.
- Choose More then select Put on hold.
- Select Take off Hold from the participants’ list when you’re ready to allow them back into the meeting.
Disable Audio/Video for Participant
- Select the Manage Participants panel.
- Hover over the participant and select Mute.
- For video, select More, then disable video.
Toolbar Icons


View full size image of toolbar.
View ScreenshotZoom toolbar icons
- Mute - Select the mic icon to mute/unmute yourself. You are on mute if there is a red slash over the icon. For technical issues, select up arrow to change device settings and test your sound.
- Start video - A red slash through your camera means you are not projecting your video. Select the icon to stop or start your webcam. Select up arrow to see settings and choose a background.
- Security - (Windows only) Make meeting changes on the fly, such as enabling a waiting room, locking the meeting or changing participant privileges. Manage Participants allows actions, such as muting microphone, turning off video, or promoting attendees to a host, etc.
Participants - Host can view participants and allows actions, such as muting microphone, turning off video, or promoting attendees to a host, etc.
- Polls - Create polls during the session.
- Chat - Select the Chat icon to open/close chat panel. You can chat with everyone or select the To: dropdown to speak privately with an individual attendee.
- Share Screen to present your desktop or specific windows. If sharing, the icon will change to stop share, which you can select when you want to stop sharing. Hosts may have disabled attendees’ privilege to share screen. To enable, host must select the down arrow > Advanced Options.
- Reactions - Participants can send a reaction, such as clapping, thumbs up, etc. Reactions allow you to communicate issues or feedback to the host or presenter without disrupting the meeting.
- Apps - Open the Zoom Apps panel to use Marketplace Apps directly in the meeting.
- Whiteboard - The classic whiteboard feature allows you to share a whiteboard that you and other participants create annotations.
- Record the meeting on your computer or the cloud.
- Live Transcript - Enables speech to text transcription in real-time. Participants can choose to turn on or not. Host must enable Live Transcript before the meeting or participants can request that it be enabled.
- Breakout rooms - Allow the participants to meet in smaller groups and are completely isolated in terms of audio and video from the main session.
- More - When your screen isn't fully expanded, some of your tools will be consolidated under More.
Breakout Rooms
Breakout rooms allow the participants to meet in smaller groups and are completely isolated in terms of audio and video from the main session.
Enable Breakout Rooms
Make sure you have enabled breakout rooms in Settings.
- Go to KU's Zoom page and sign in.
- Select Settings from left panel.
- Scroll to Breakout room and toggle button on to Allow host to split meeting participants into separate, smaller rooms.
Set Up Breakout Rooms
- Go to KU's Zoom page and sign in.
- Open the meeting and select the Breakout rooms icon in your toolbar.
- Determine number of rooms you will need. Based on your selection, Zoom will ask you to choose one of the following:
- Allow Zoom to randomly assign rooms.
- You assign rooms manually.
- Let the participants choose their room. This selection allows participants to freely move in and out of breakout rooms.
- Create.
- You can now rename rooms, reassign participants, etc. The Settings icon in this panel gives you more advanced options, such as countdown clocks, allow participants to choose rooms, etc.
- Open All Rooms.
Accessibility & Other Resources
Support
Lawrence Campus
Technical Support: ithelpdesk@ku.edu | 785-864-8080
Training Support: training@ku.edu | 785-864-5155
Edwards Campus
Technical Support: kuec_support@ku.edu | 913-626-9619