Teams Calls
Overview
Stay connected with voice calling using Teams Phone on your computer, tablet, mobile device, or desk phone. If you have no experience with Teams, the video below will provide an overview of the basic features or you can register for a workshop that provides an overview of Teams features.
Getting Started
Access Teams
If you are accessing Teams for the first time, go to our Accessing Teams and Desktop App instructions.
Desktop App vs Browser
We strongly encourage you to download the Desktop app to access Teams to ensure you have access to all of the calling features. If you are accessing Teams via the browser, use Edge or Chrome.
All features are the same using a PC or Mac.
Settings
There are two ways to get to navigate to your call features settings.
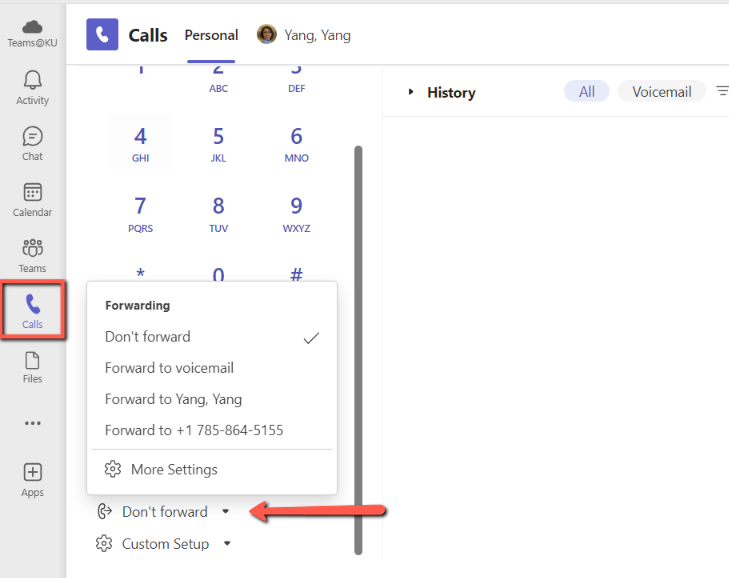
From Calls interface:
- Go to Calls icon in the left app bar.
- Select Forward to from the controls at the bottom left of the Calls interface. This could also read Don't Forward, depending on how you have set your preferences.
- Select More Settings.
View Screenshot
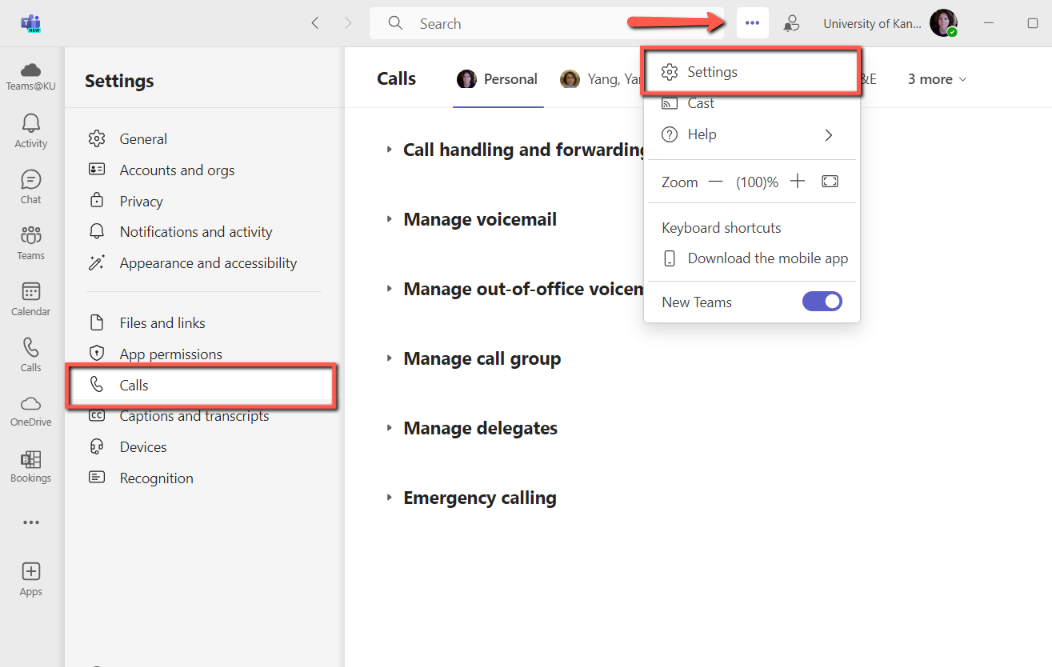
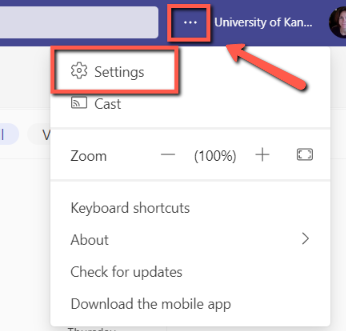
From the Settings icon:
- Go to the Settings icon […] to the left of your profile image > Settings.
- Select Calls from the left pane.
View Screenshot
All instructions below will refer to the navigation from the Settings icon, but feel free to use either navigation you prefer.
Set Up Audio
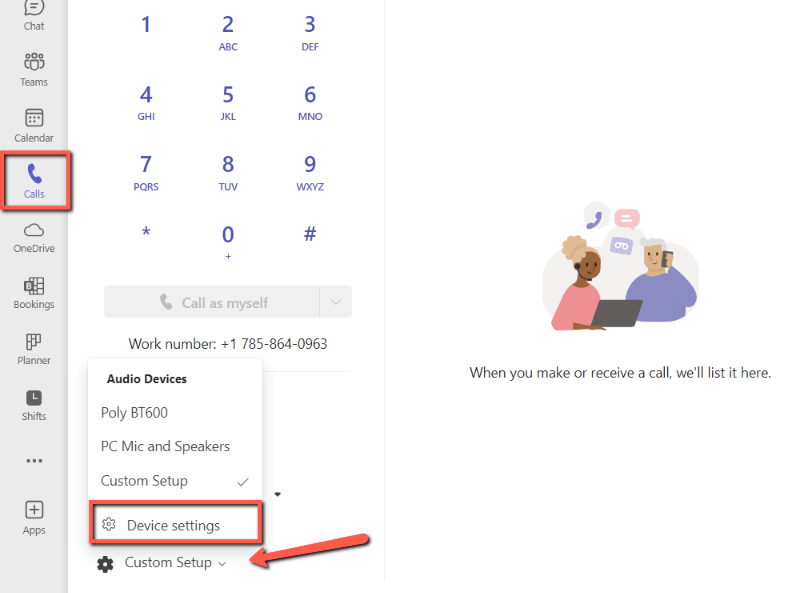
You can customize your audio settings to the devices you are using, which includes microphones, headsets, etc. You will need to select your audio device within Teams in order to use it. Note that the default may be set to "Custom Audio Device," which will use your built-in default audio devices.
- Go to the Settings icon […] to the left of your profile image > Settings.
- Select Devices from the left pane.
View Screenshot
Alternatively, start from the Calls interface: Custom Setup > Device Settings.
View Screenshot
From this interface, you can:
- Customize your device settings.
- Make a test call.
- Manage noise suppression.
- Set camera controls.
Call Forwarding & Call Groups
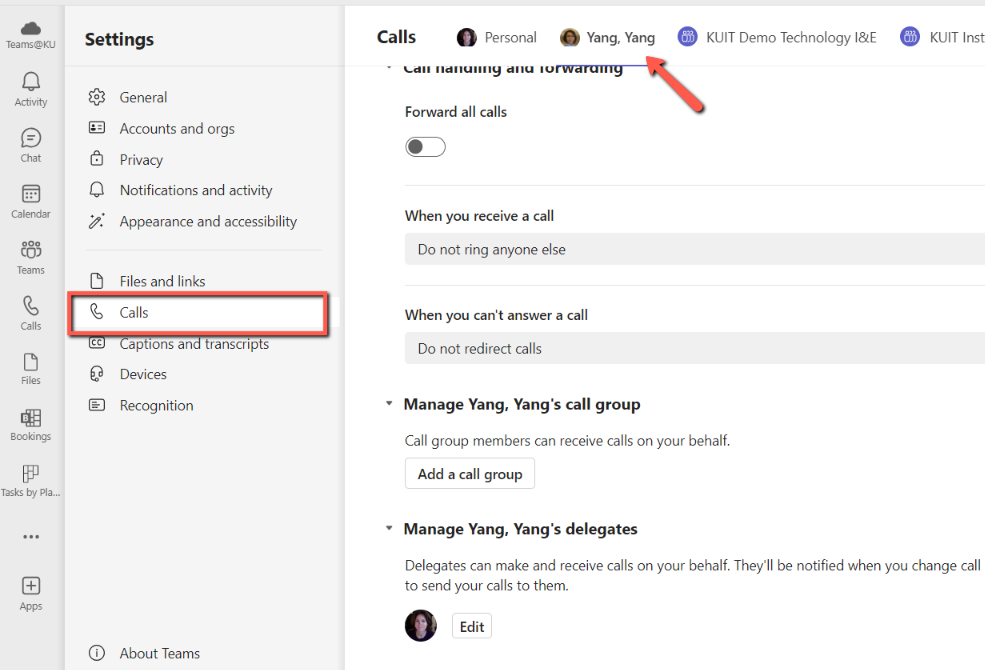
Call Handling Options
Customize the behavior of your incoming calls.
- Go to the Settings icon […] to the left of your profile image > Settings.
- Select Calls from the left pane.
View Screenshot
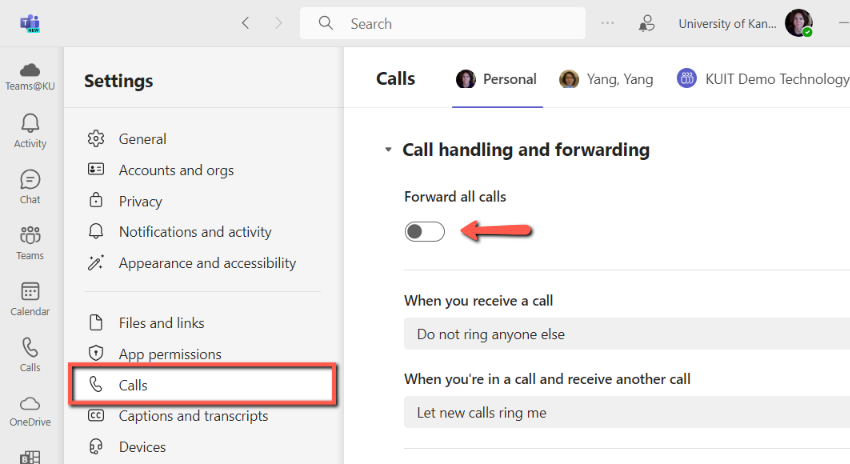
To Pick Up Your Calls
Under Call handling and forwarding > Forward all calls, leave toggle switch off.
View Screenshot
Customize the following options:
- When you receive a call
- Do not ring anyone else
- Also ring a new number or contact
- When you’re in a call and receive another call
- Let new calls ring me
- Play a busy signal
- Redirect as if call is unanswered
- When you can’t answer a call
- Do not redirect calls
- Redirect to voicemail
- Redirect to a new number or contact
- Ring for this many seconds: choose seconds from dropdown list
- Choose a ringtone for each type of call: Calls for you, Forwarded calls, delegated calls.
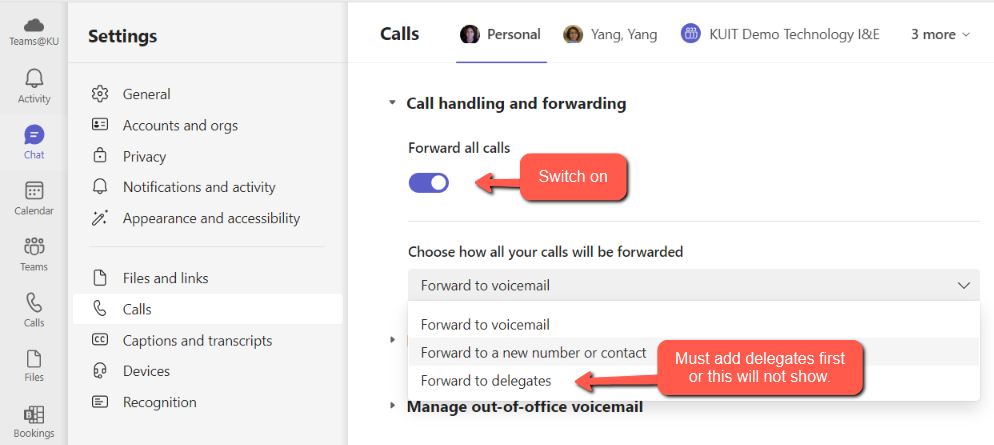
Forward Calls Automatically
You can set your preferences to forward your calls directly to voicemail, another person, a delegate, or call group.
Call handling and forwarding:
- Under Forward all calls, click toggle switch to turn on.
- Under Choose how all calls will be forwarded, click down arrow and select Forward to voicemail or Forward to a new number or contact.
View Screenshot
The delegate option will not show until you have designated a delegate. Go to the delegate section to learn more and make assignment, if applicable.
If forwarding the call to another person:
- Type the name or number of a contact, then select their name.
- Remove contact by clicking the X to the right of their name.
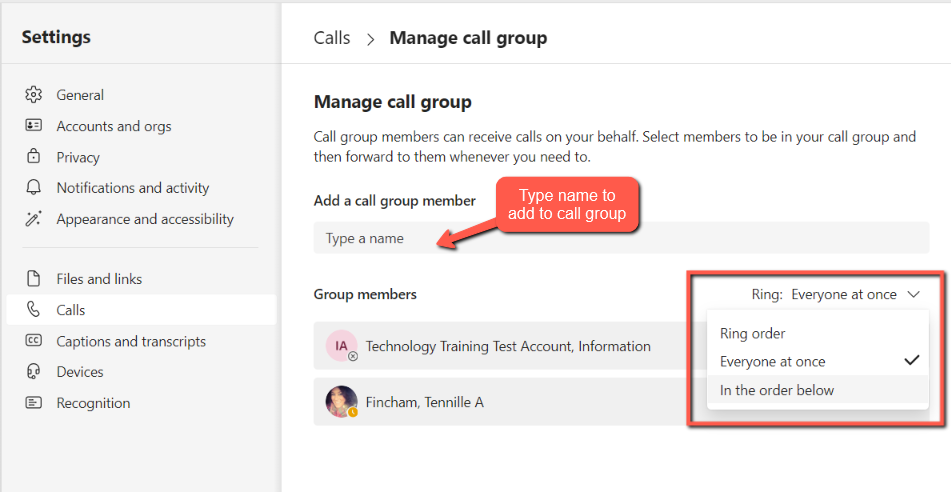
Create a Call Group
Call groups allow you to have your calls forwarded automatically to more than one person.
- Go to the Settings icon […] to the left of your profile image > Settings.
- Select Calls from the left pane.
View Screenshot - Select Manage call group.
- Select the Add a call group or Edit button.
- Add people to your contact group. By default everyone in group will receive the call at the same time.
If you want people in your call group to receive the call one at a time in a certain order, you must add people in the order you want them to receive calls, then select the Everyone at once drop down to designate the order.
View Screenshot
Voicemail
You will receive a notification of voicemail messages in your Activity icon and an email notification in Outlook with an attached audio file and transcription, if available.
Set Voicemail Greetings
- Go to the Settings icon […] to the left of your profile image > Settings.
- Select Calls from the left pane.
View Screenshot - Scroll past Call Handling and go to Manage Voicemail.
Manage Voicemail options include:
- Manage options when calls are redirected voicemail.
- Record your greeting verbally.
- Use the Text-to-speech to write out the greeting to be spoken for you.
- Choose a language for default greeting.
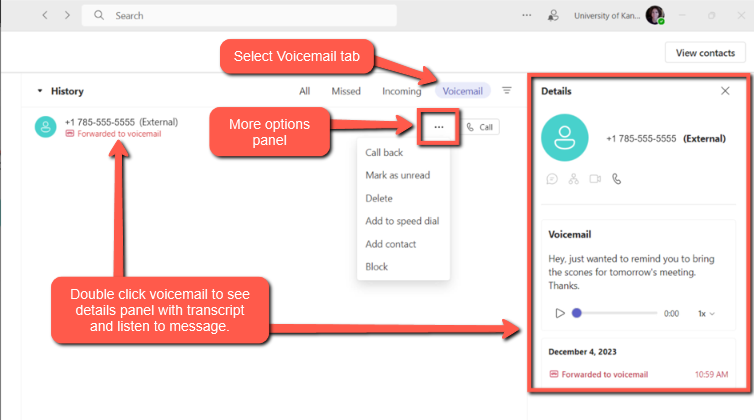
View and Manage Voicemails
- Select the Calls icon in left app bar.
- Select the Voicemail tab from the top of the interface showing your call History.
- Hover over caller and select the ellipsis icon [...] on the right to manage additional options.
- Click on the voicemail to open transcript and recording.
View Screenshot
Calls
From the desktop app or browser, Teams Calls can be found by selecting the phone icon in the app bar on the left edge of the Teams interface.
Use the Teams number pad or on your keyboard to type numbers or type the name of an individual or groups of people to make the call.
Incoming Calls
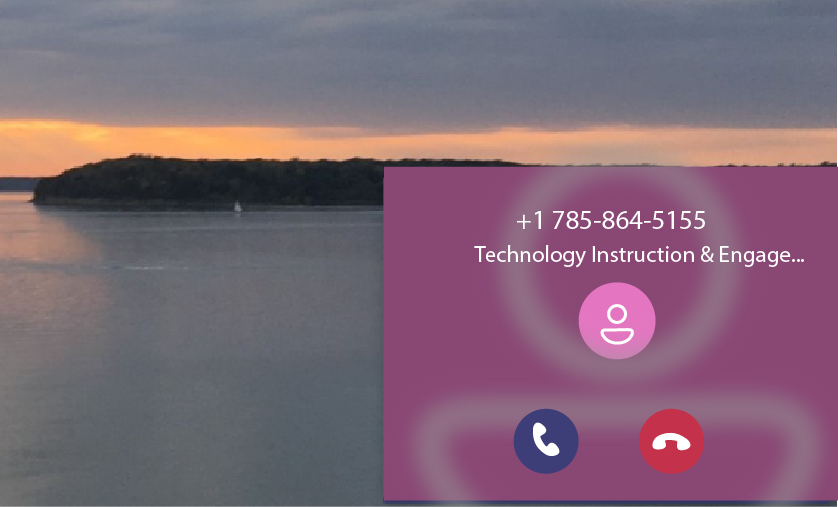
A notification window will pop up on your screen showing their name or number along with rings or vibration, depending on the preferences you selected in Device Settings.
Microsoft's support page: Answer Call Options instructions
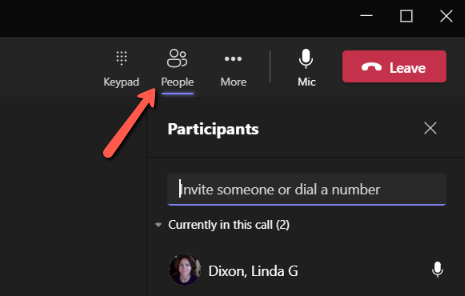
Add Someone to a Call in Progress
To add someone new to a group call, select People in your call controls, then type their name or phone number in the search box.
View Screenshot
Multiple Calls Simultaneously
Put a Call on Hold
While on a call, place call on hold by selecting the Hold icon to the top menu of tools and start a new call or answer incoming call.
View Screenshot
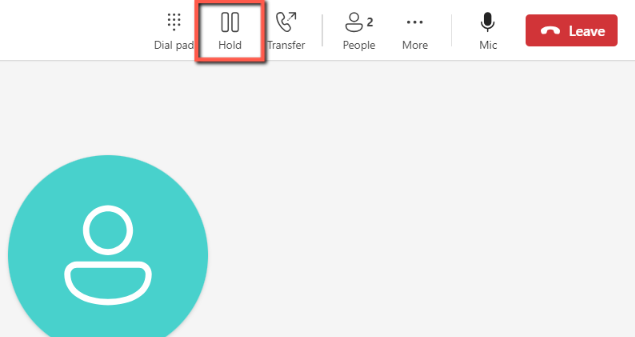
- Everyone in the call will be notified that they've been put on hold.
- They won't be able to see or hear anyone else on the call.
- Screen sharing is suspended temporarily .
- Continue your call by clicking Resume. Everything will return to normal once you resume your call.
Calling from Chat
Type name in search field to have a private conversation with an individual or groups of people. You can start a call or video conversation, select the video or call icons.
- You can have up to 20 people on a group call.
- Entries for these calls stay in Chat.
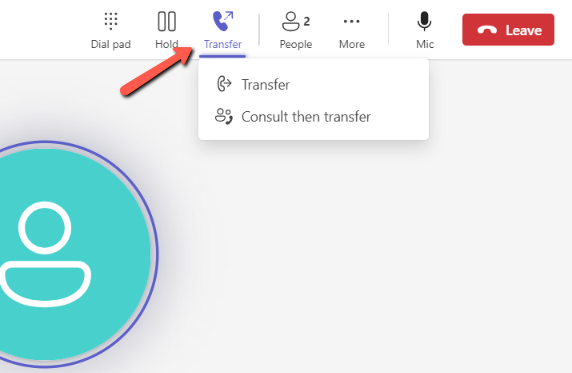
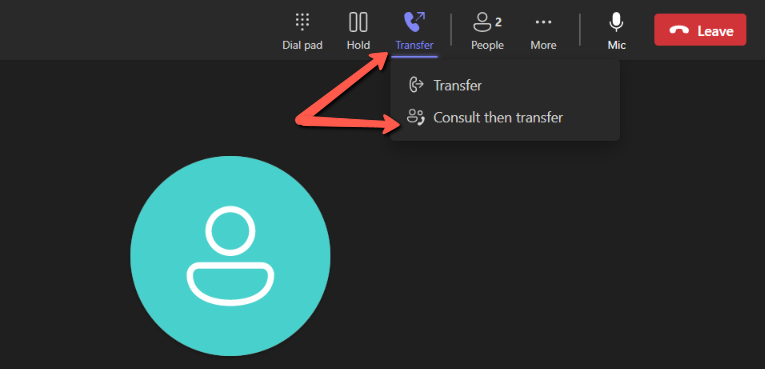
Transfer Calls
Transfer Calls
You can transfer calls directly or use the Consult then transfer.
Immediate Transfer
Consult Then Transfer
When you use Consult then transfer, you can speak with the recipient and then manually complete the transfer.
If Call is Accepted
Select the Transfer button in the top menu to complete the transfer. This will end the call for you.
If Call is Declined
Video: Transfer Calls
- Select the Transfer icon in the top menu of your call.
- Select Transfer.
View Screenshot - Type name or transfer number.
- Select Transfer button.
- Select the Transfer icon in the top menu of your call.
- Select Consult then transfer, which places the original caller on hold.
View Screenshot - Type name or number of person/department receiving transfer.
- When the recipient answers, provide the information, and confirm that they would like to take the call.
- Select the Leave button to disconnect from the recipient.
- Select Resume to speak to original caller.
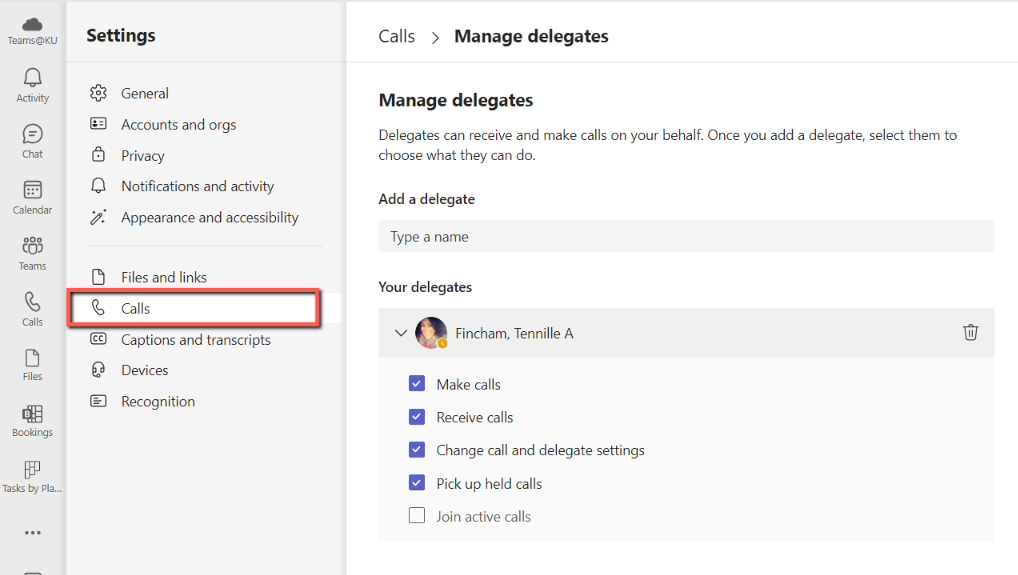
Delegates
You can assign delegates to receive and place calls on your behalf.
This is a two-step process: 1) Assign a delegate, 2) Select delegate under Forwarding calls.
Assign a Delegate
- Go to the Settings icon […] to the left of your profile image > Settings.
- Select Calls from the left pane.
View Screenshot - Scroll to and select Manage delegates.
- Select the Add a delegate/Edit button.
- Type name of delegate and select.
- Select or deselect options.
View Screenshot - Be sure to assign the Forward calls to your new delegate. [see below]
Your delegate gets notified about their new status.
Remove or Edit Delegate Permissions
- Go to the Settings icon […] to the left of your profile image > Settings.
- Select Calls from the left panel.
View Screenshot - Scroll to and select Manage delegates button.
- Select Add a delegate/Edit button.
- Select the Delete icon to remove.
Forward Calls to Delegates
- Go to the Settings icon […] to the left of your profile image > Settings.
- Select Calls from the left panel.
View Screenshot - Under Call handling and forwarding, switch Forward all calls toggle on.
- Select Choose how all your calls will be forwarded.
- Select My delegates.
View Screenshot
If you did not assign a delegate first, this option will not appear.
Delegate Role
Receive Calls
When you have been assigned the delegate role and calls are forwarded to you, calls that you receive for the person for which you are a delegate will show their name at the top of the pop-up on your screen.
View Screenshot
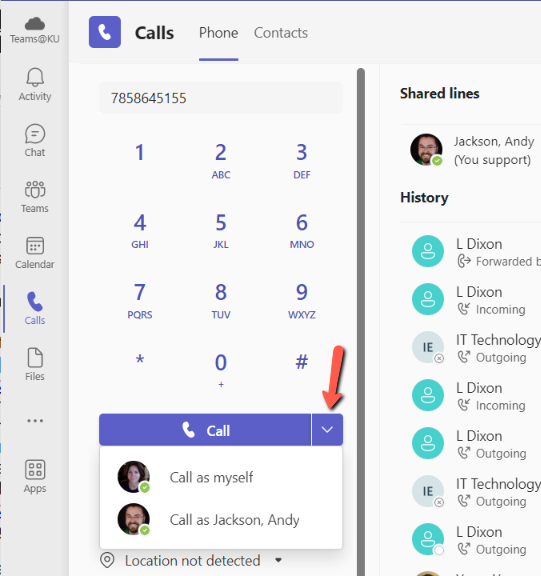
Place Calls
To make a call on their behalf:
- Go to the calls interface and type the name or number of the person just as you would to place a call for yourself.
- Select the down arrow on the Call button to open options.
- Select Call as [name of person you’re representing]
View Screenshot
If Unanswered
If you, as the delegate, cannot answer the call, the phone rules set by the person you are representing will apply. For example, if that person has ‘If unanswered’ forward to voicemail, the call will go to their voicemail.
Manage Other Delegates
If you have been given permission to change call and delegate settings of the person you support,you can manage the settings and remove other delegates, as well as the call settings of the person you support.
- Go to the Settings icon […] to the left of your profile image > Settings.
- Select Calls from the left panel.
View Screenshot - Select the name of the person you support at the top of the interface.
- Click Edit button to find person to manage their settings.
View Screenshot
Contacts
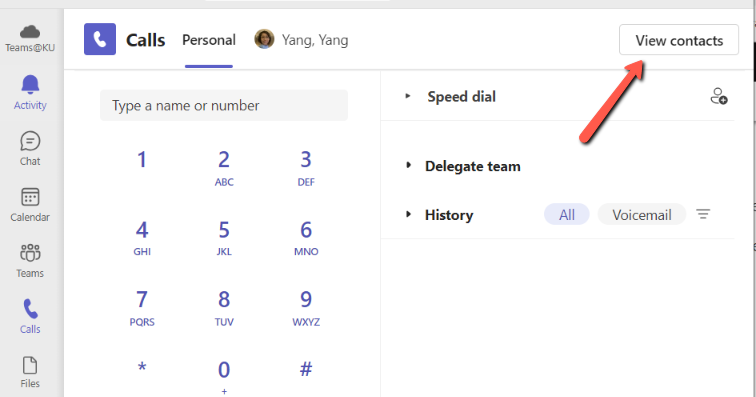
To add a new contact to your list, start from your Calls interface:
- Go to Calls icon in the left app bar.
- Select the View Contacts button at the top-right.
View Screenshot - Select the person icon in the top-left panel to add the contact.
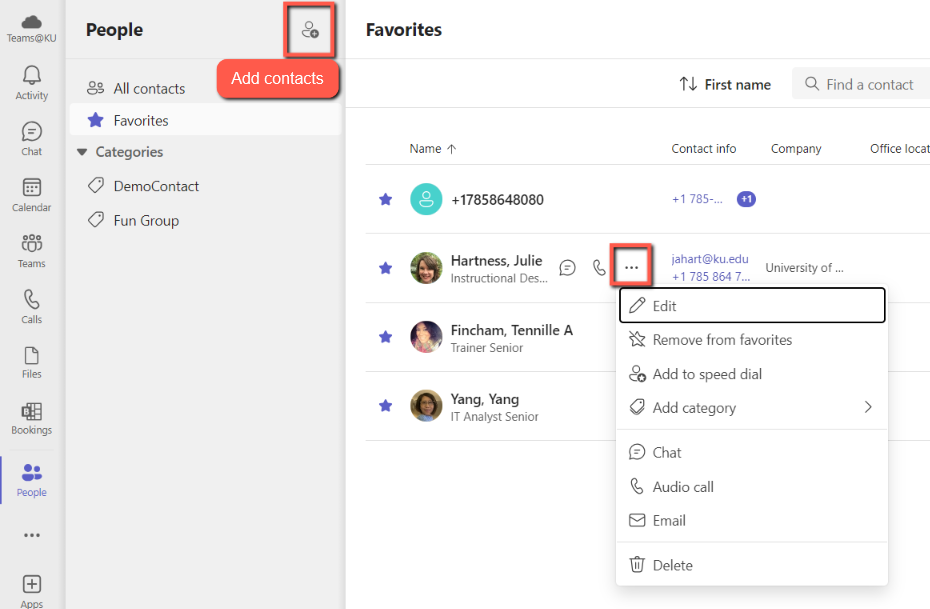
To Edit individual contacts, hover over the contact and select the ellipsis icon to bring up the menu panel.
View Screenshot
Manage Notifications
When you receive an incoming call, you will get a banner notification pop upon your screen and a notification on your desktop app.
View Screenshot
If you are presenting your screen or otherwise need to this temporarily disabled, make sure you change your status to Do Not Disturb.
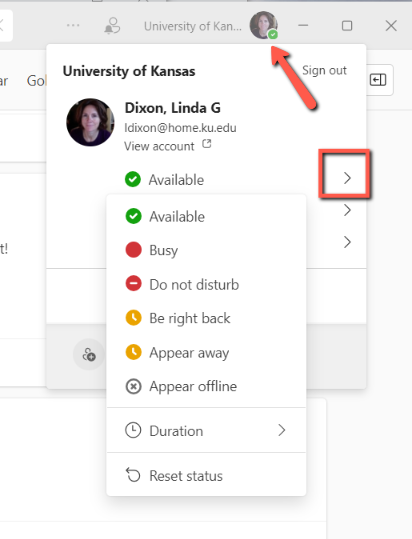
Two ways to change your Teams status:
- From your Teams app, select your Profile image > Select current status > Select Do not disturb.
View Screenshot
Call Queues/Attendants (New)
Teams Call Attendants and Call Queues route calls to people and departments based on user prompts and keep users on hold while waiting for agents to answer.
If you want to set up the calling attendants and call queuing services, submit a TDX ticket to KU's Microsoft 365 Admins. Once received, they will schedule a consultation to set up your new attendant services.
Auto Attendant Features
Auto attendants provide a menu of options to better direct callers to an appropriate person or department based on the caller's input to the provided menu options. Attendants can be created for business hours, after business hours, and holidays. Menus include 0-9, # and * that can direct calls to:
- Operator
- A specific person
- External phone number
- Another Auto Attendant / Call Queue
- Voicemail
- Play an audio file or text to speech message
Auto Attendant Features:
| Feature | Description |
|---|---|
| Operator | The operator feature is designed to allow callers to talk to a designated person people who can help them. Defining an operator is optional, but recommended. Auto attendants redirect calls to the operator if there is an error or if the caller doesn't make any selection after listening to the menu three consecutive times. Without a designated operator, the Auto attendant will drop the call. |
| Person in the organization | Any person in your organization who can receive voice calls. |
| Voice app | Another Auto attendant or a Call queue. |
| Voicemail | The voice mailbox associated with a Microsoft 365 group that you specify. You can choose if you want voicemail transcriptions and the "Please leave a message after the tone." system prompt. In Microsoft 365 admin center, enable Let people outside the organization email this team for the Microsoft 365 group that you specify. |
| External phone number | Directed to any phone number. |
| Announcement | This is an informational message, such as listing office hours, location, etc.
|
Calls redirected out of a queue can be sent to any of the call routing destinations listed above except for an operator. (Call queues don't have operators, but you can redirect callers to the same destination as an operator that you've configured for an Auto attendant.)
The example below shows an example of call routing using Auto attendants and Call queues.
Manage Auto Attendant
Greetings Personalization
Personalize your greetings by using Text to Speech or create and upload an audio file.
To manage your greetings:
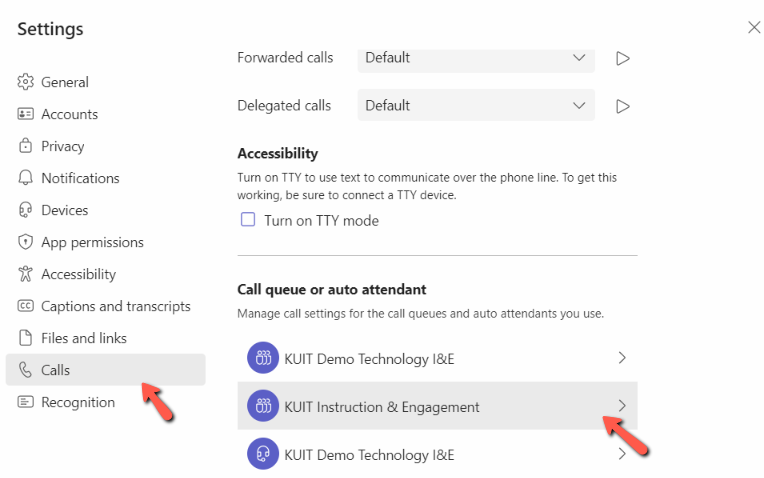
- Go to the Settings icon […] to the left of your profile image > Settings.
- Select Calls from the left navigation.
- Scroll to the bottom and find the Calls Team you want to manage.
- Select the down arrow under the Greeting options field.
- Select Add a greeting message to have text to speech system read the greeting for you or upload an audio file you have created.
- Accepted audio file formats are MP3, WAV, and WMA. Files must be less than 5MB.
Manage Hold Music
You can keep the default music or upload an audio file.
- Select Play an audio file.
- Important: Hover over the Encircled i next the Upload audio file button.
- Select Upload audio file.
- Accepted audio file formats are MP3, WAV, and WMA. Files must be less than 5MB.
Call Queue Features
Incoming calls can be directed to set users (agents) to receive calls from a queue, with hold music while they wait. Options for how the agents should receive calls, as well as logic about how to handle too many people waiting in the queue, or people waiting too long in the queue.
Options to request:
- Greeting
- No greeting
- Audio file (MP3, WAV or WMA less than 5MB)
- Hold music
- Default
- Custom audio file (MP3, WAV or WMA less than 5MB)
- Call Agents
- List of users who are agents for this call queue (must be Enterprise Voice enabled)
- Routing method
- Attendant routing: Rings all agents, first to pick up gets call
- Serial routing: Rings first agent in list, then next, so on
- Round robin: each agent will get the same number of calls from the queue
- Longest idle: next call in the queue will ring the agent that has been in the presence state "available" for the longest
- Agents can opt out of taking calls
- On/Off
- Agent alert time (minimum of 20 seconds)
- Default 30
- Max calls in the queue
- Default 50 (up to 200)
- What to do when max number is reached
- Disconnect
- Redirect
- Person
- Phone number
- Another Auto Attendant / Call Queue
- Voicemail
- Maximum wait time in the queue
- What to do when max time is reached
- Disconnect
- Redirect
- Person
- Phone number
- Another Auto Attendant / Call Queue
- Voicemail
Setup Call Queues
At this time, you can submit a TDX ticket for our Microsoft 365 admins to set-up your call queues.
Call Queue Greetings
- Go to the Settings icon […] to the left of your profile image > Settings.
View Screenshot - Select Calls from left navigation.
- Scroll to the bottom of the page and select the name of your call queue.
View Screenshot - Change No greeting to Add a greeting message or Play an audio file.
- Type greeting to be read by the text to speech or upload a pre-recorded audio file to be played.
Support
Technical Support: ithelpdesk@ku.edu | 785-864-8080
Training Support: training@ku.edu | 785-864-5155