To Do
Overview
Microsoft To Do is a task management app that helps you stay organized. Task by Planner and flagged emails can also be viewed and managed from the To Do app, so with To Do, you can create your personal tasks and manage other task apps all in one place.
To Do vs Planner
What’s the difference between To Do and Planner? How do I know which one to use?
To Do is for Personal Tasks
- Create daily and/or ongoing tasks
- Organize tasks in list and categories
- Integrates with Outlook and Teams
- Attach files to task
- Can view flagged emails as tasks
- Can also view Planner tasks in To Do app
- Can share list with others to have them items
Planner is for Group Work
- Create tasks and assign to those who are members of the Plan
- Can organize into buckets (categories)
- Card view, calendar view, and progress status
- Attach files to tasks
- Task reminders are emailed to the assigned member
- Integrates with Outlook and Teams
Access To Do
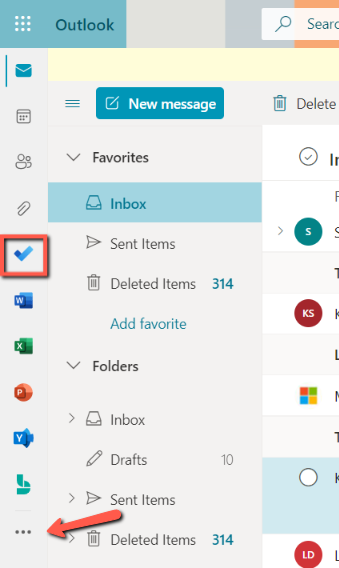
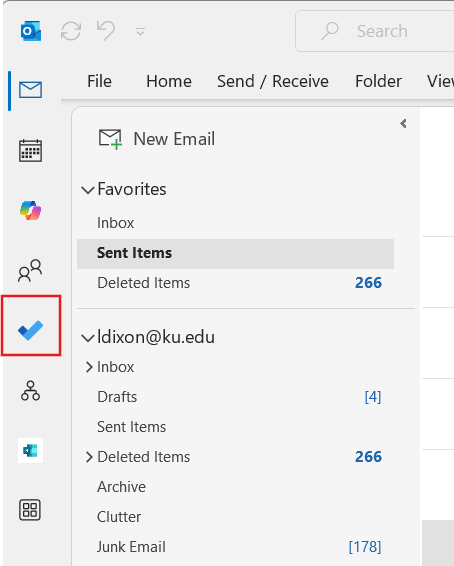
To access To Do:To open To Do, select the 3 dots in the bottom-left panel, then To Do.
- Select the To Do icon in your Outlook app var.
View Screenshot
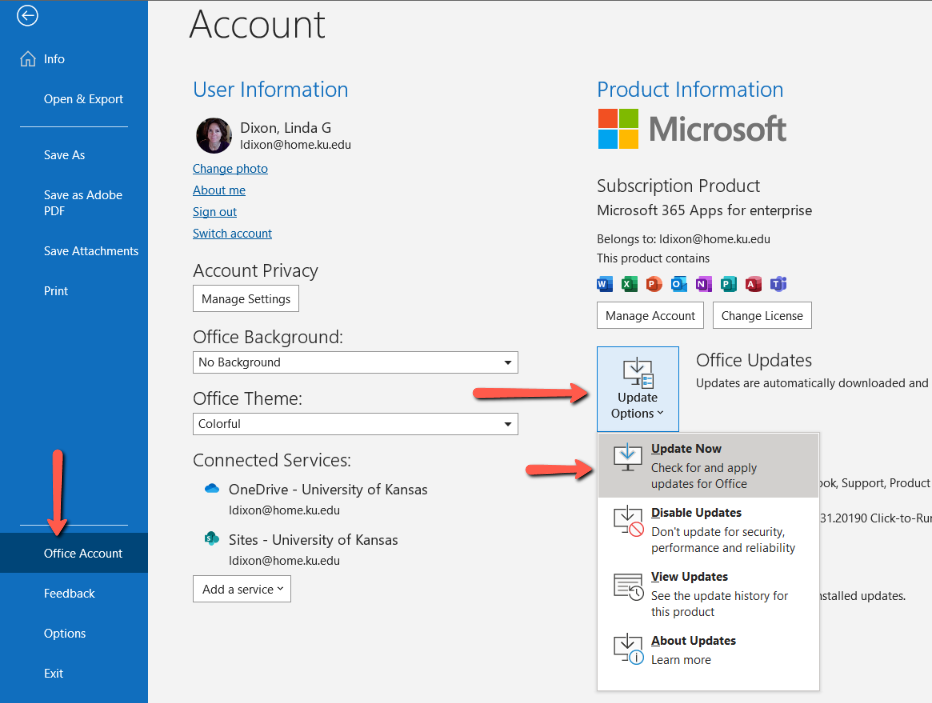
If the app is not showing on the left bar, you can manually update the app. Go to Outlook app > File > Office Account > Update Options > Update Now.
View ScreenshotGo to File, Office account, Update options, Update now.
Create New Tasks
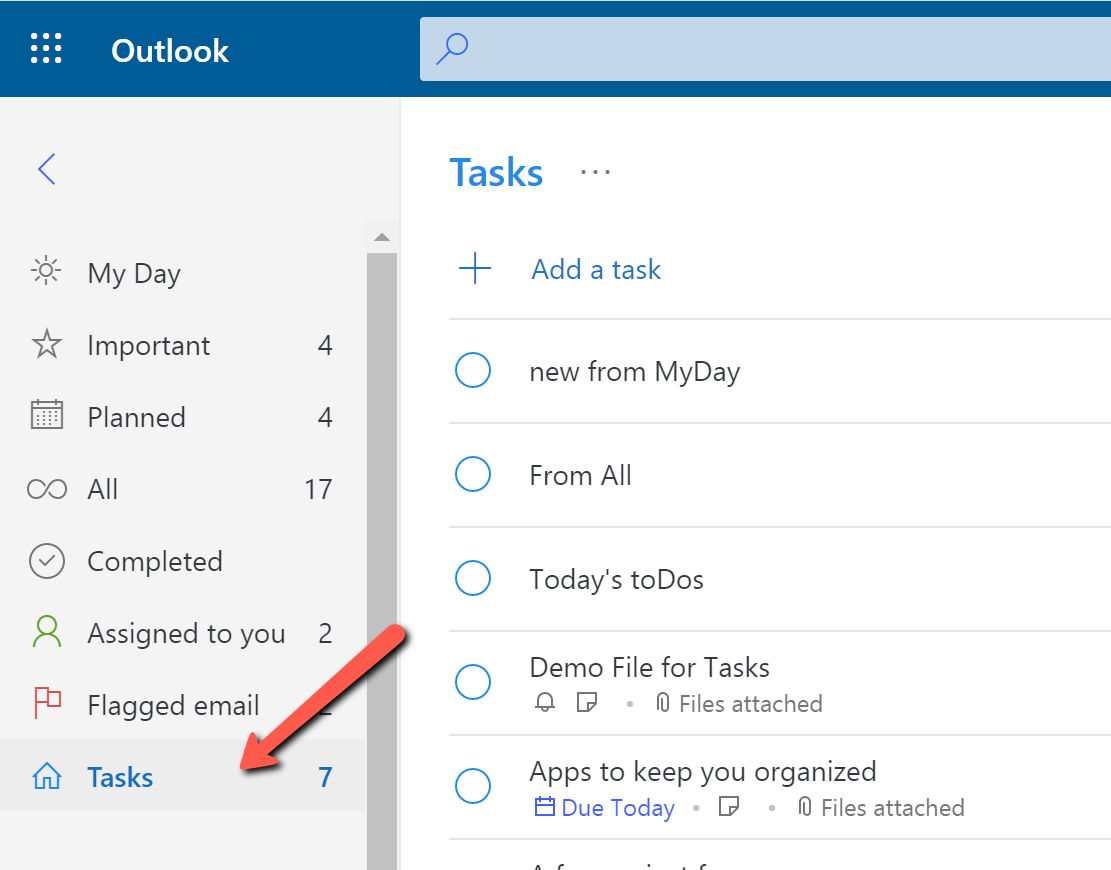
- From the left panel in To Do or Outlook for the web, select Tasks.
View ScreenshotSelect Tasks from the left panel. - Name your task > Enter.
- Click on your task to open a panel on your right to view more options.
- Add steps creates a checklist under your task.
- Select Add to My Day to list it under your My Day tasks.
- Set reminders.
- Adding a due date will add the task to the Planned category in the left panel.
Organizational Tools
The left panel helps you organize your tasks.
My Day: View all of the tasks you assign for the current day. All tasks will need to be reassigned daily.
- Select +Add a task in the main interface
- Name your task > Enter
- Click on your task to open a panel on your right to view more options
- Add steps creates a checklist under your task
- Select Add to My Day to list it under your My Day tasks
- Set reminders
- Adding a due date will add the task to the Planned category in the left panel
Important: View all tasks you have tagged as important. You can mark any task as important by select the star to the far right of the task.
Planned: All tasks that have been assigned a due date will populate under Planned. This includes all tasks created in To Do as well ask Task by Planner.
Completed: All tasks you have already completed. If you want to remove these, right-click the task and choose Delete task at the bottom of the panel.
Assigned to you: All Tasks by Planner tasks and list tasks assigned to you can be viewed in this category. See more information about adding people to your list tasks under Create Lists below.
Flagged email: All Outlook emails you flag will become a task in this area.
Create Lists
Lists are categories for your tasks and, once created, can be viewed at the bottom of your left panel. To create a list:
- In the left panel, select the + New List option.
- Type a title for your list and press Enter.
- The interface will change to have the title of your list at the top with the option to add a task.
You can move previously created tasks into lists.
- Right-click the task you want to move.
- Choose Move task to... from the panel.
- Choose the list from the options.
Alternately, if you decide you want to create a list starting from the task, right-click the task and select +Create new list from this task.
Create a Shared List
- Open the list you want to share.
- Select the share icon in the top-right of the interface.
View ScreenshotSelect share icon at the top-right of interface. - Send an email to invite someone to your list.
- Choose the list from the options.
- Once they accept, you will see them in your view.
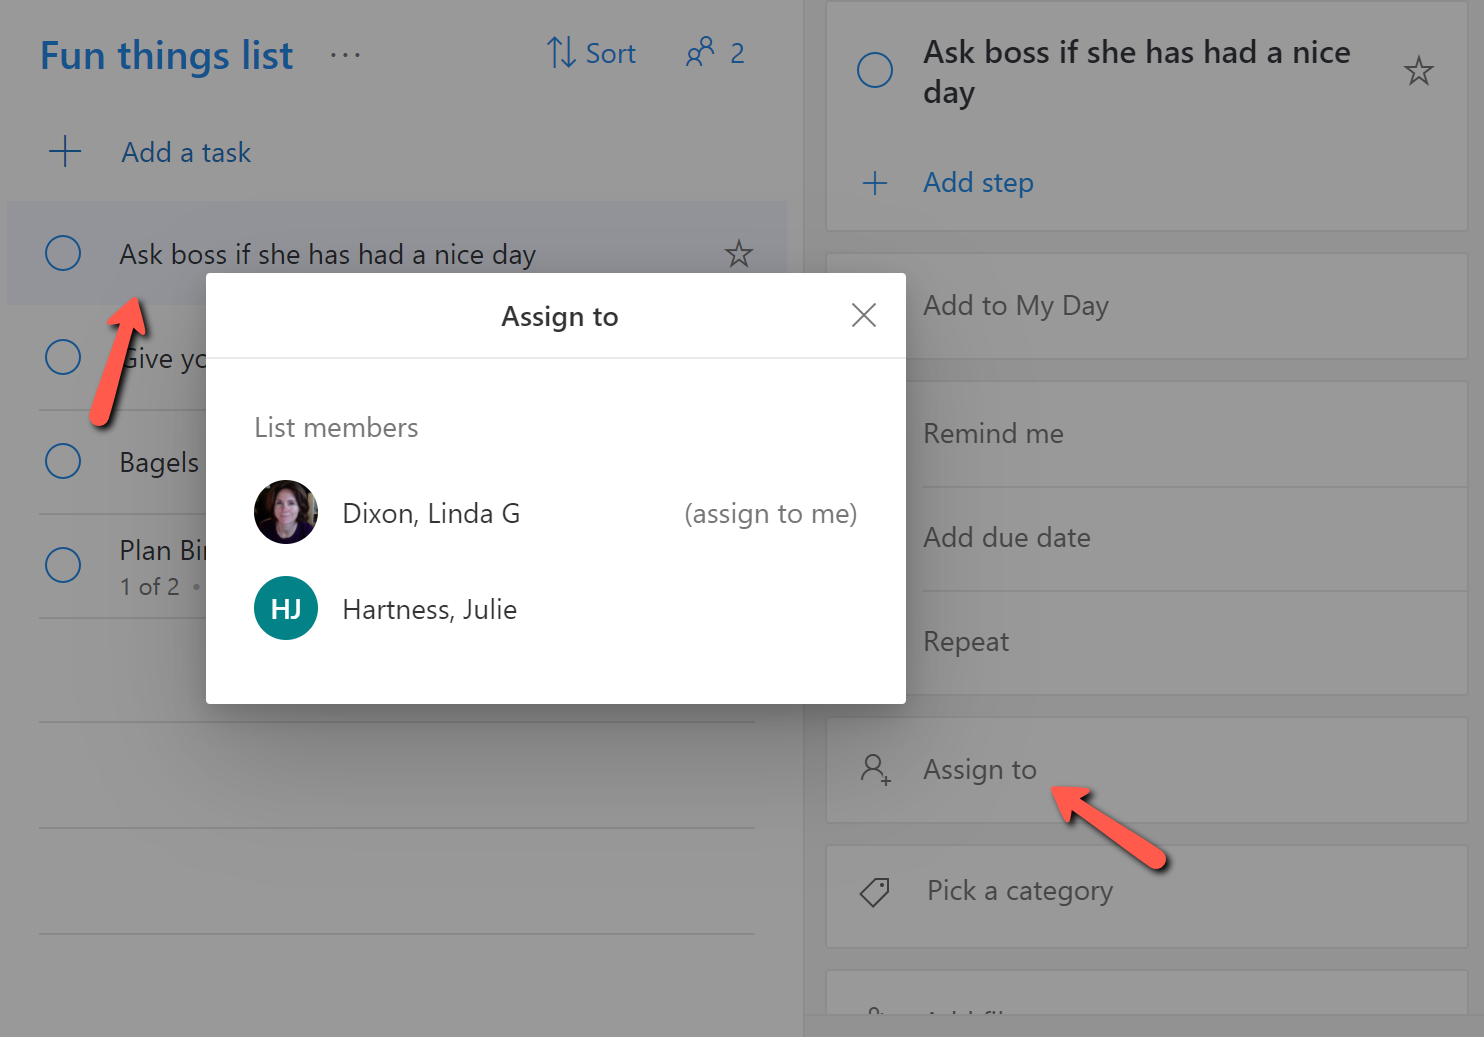
- To assign a task, select the task, then select Assign a task from the right panel.
View ScreenshotSelect task, then choose Assign to in the right panel.
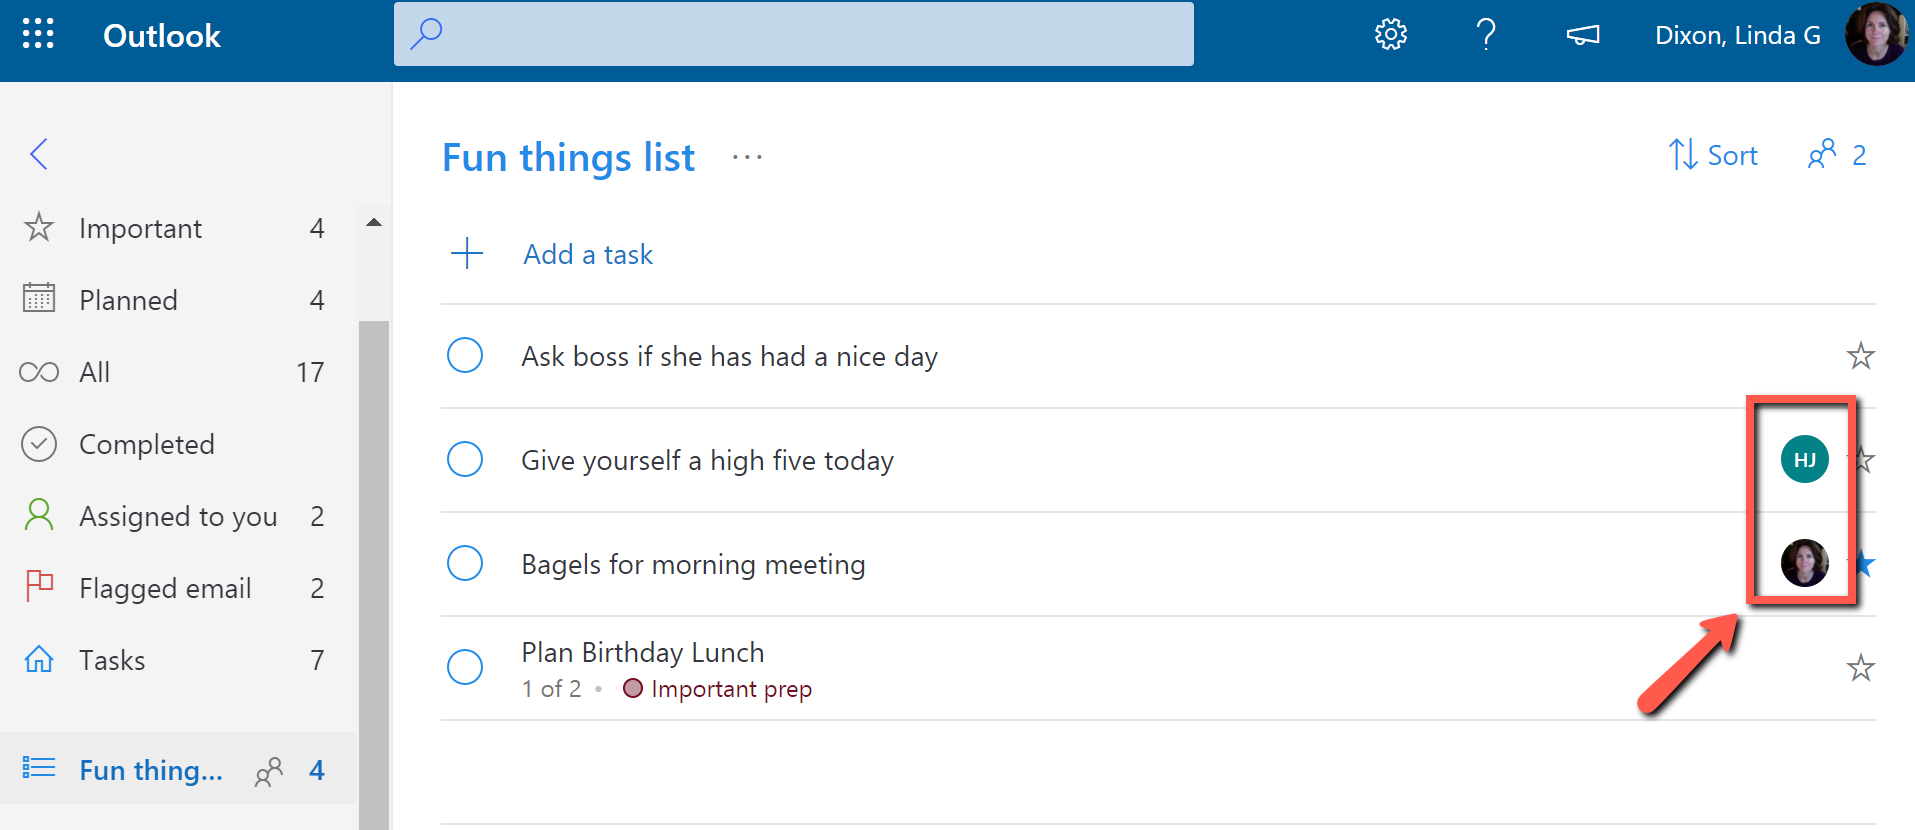
You can view who has been assigned a task from the list view.
View ScreenshotIcons to the right of the tasks shows who has been assigned the task.
All tasks assign to you can be found in the Assigned to you category in the left panel.
Create Groups
Groups help keep your lists organized under a theme. If I have multiple lists that pertain to tasks related to an upcoming event, you might organize these together in one group.
View ScreenshotTo create a group, select the Create group icon at the bottom of the left panel to the right of New list.
- Select the group icon at the bottom of the left navigation to the right of New List.
View ScreenshotSelect task, then choose Assign to in the right panel. - Name your group.
- Drag and drop the lists you already created into the new group's interface.
Integration with Other Apps
Outlook Integration
To Dos is available in Outlook for the web. Although you can view some tasks and flagged emails from the Outlook desktop client, for the full To Do features, use Outlook for the web.
Microsoft Teams
You can view all of our To Do tasks and Planner tasks via Microsoft Teams.
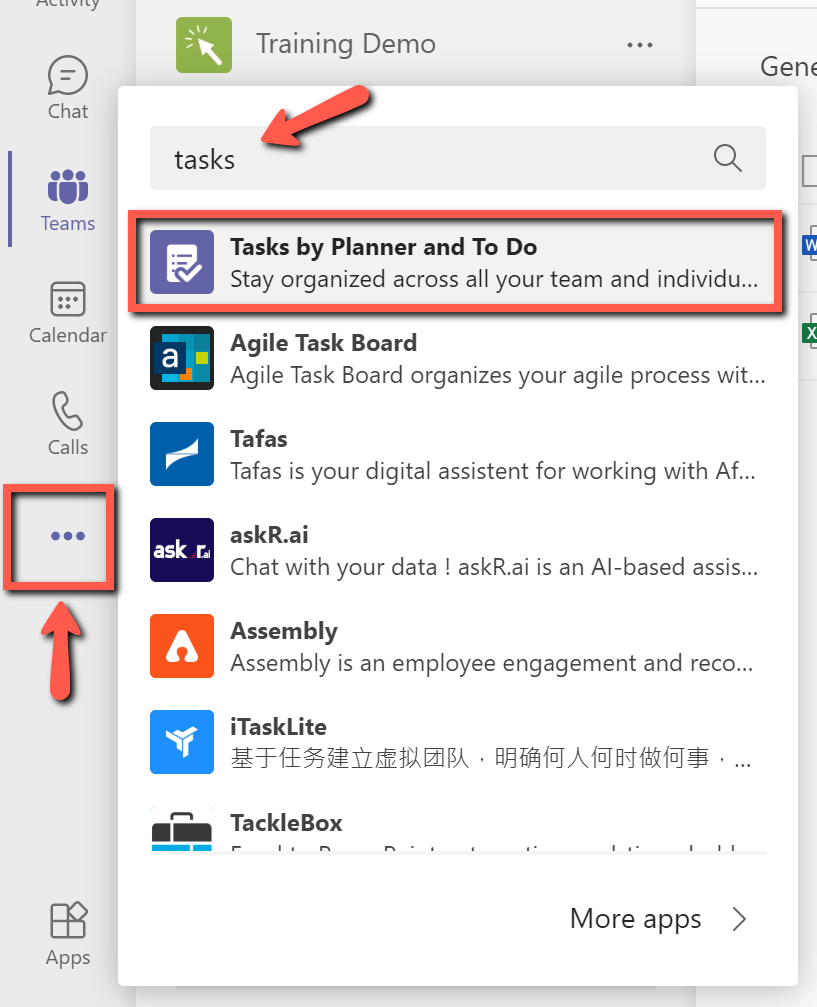
- While in Teams, select the 3 dots ... at the bottom of the app bar.
View ScreenshotSelect the 3 dots on the left app bar, select Tasks by Planner. - Search for Tasks by Planner in your list of options.
Tasks by Planner will provide a variety of views of all To Do and Planner tasks in one place.
View ScreenshotView all of your tasks and to dos in one place.
To pin this app to your app bar, right-click on the icon and select Pin.
Create Task from Comments
You can create tasks from comments that will populate in your To Do app. This works for both Chat and Posts comments.
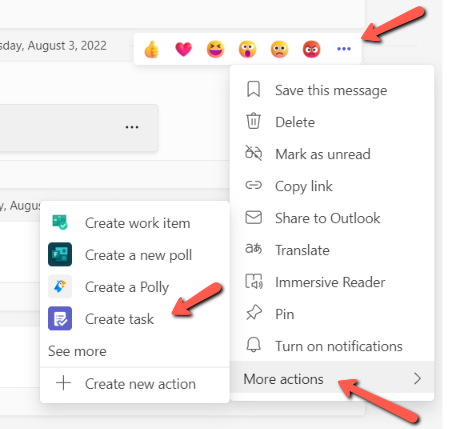
- Hover mouse over comment to make emoji responses and More icon (3 dots) visible.
- Select the 3 dots to open Options panel.
- More Actions.
- Create Task.
View ScreenshotSelect the 3 dots, more actions, create task.
The task will appear in your To Do list in Outlook as well as Teams Tasks by Planner.
Support
Technical Support: ithelpdesk@ku.edu | 785-864-8080
Schedule an Overview or Training Support: training@ku.edu | 785-864-5155