Microsoft Forms and Polls
Overview
Microsoft Forms is an application that allows you to collect information through shareable surveys, quizzes.
Quizzes allow the creator to assign correct answers and values for correct answers.
Polls are like surveys, but they allow only one question. Polls can easily be added to Outlook, Teams Posts, Chat, and Meetings.
Forms can be created and managed by an individual or by an Microsoft 365 group, meaning all team members of that group can view and edit the form. You can set these options by creating the form in either My forms or My group.
Forms can be created from the Forms app, Teams, SharePoint, Excel, PowerPoint, and Outlook.
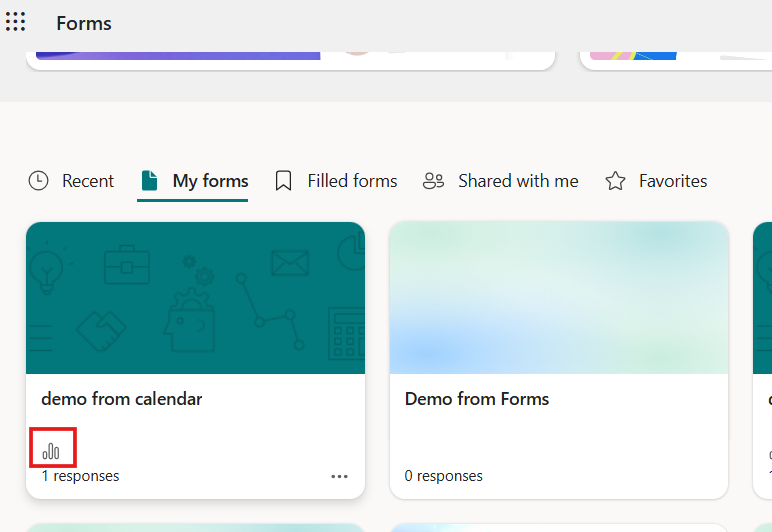
Polls can be created in Outlook, Teams meetings, Chat, and Posts. You can find all created polls in the Forms app and will have a 3 bar icon to mark it as a poll vs. no icon for a form.
View Screenshot
Access Forms
You can create a new form from different starting points, including the Microsoft 365 app, SharePoint, and Teams. You can view and edit all forms where they were created or view all of your forms from the Microsoft 365 app.
Microsoft 365 Landing Page
This is where you will find all of your forms, regardless of which app you used to create the form.
- Go to Microsoft 365 landing page and log-in using your user ID an password.
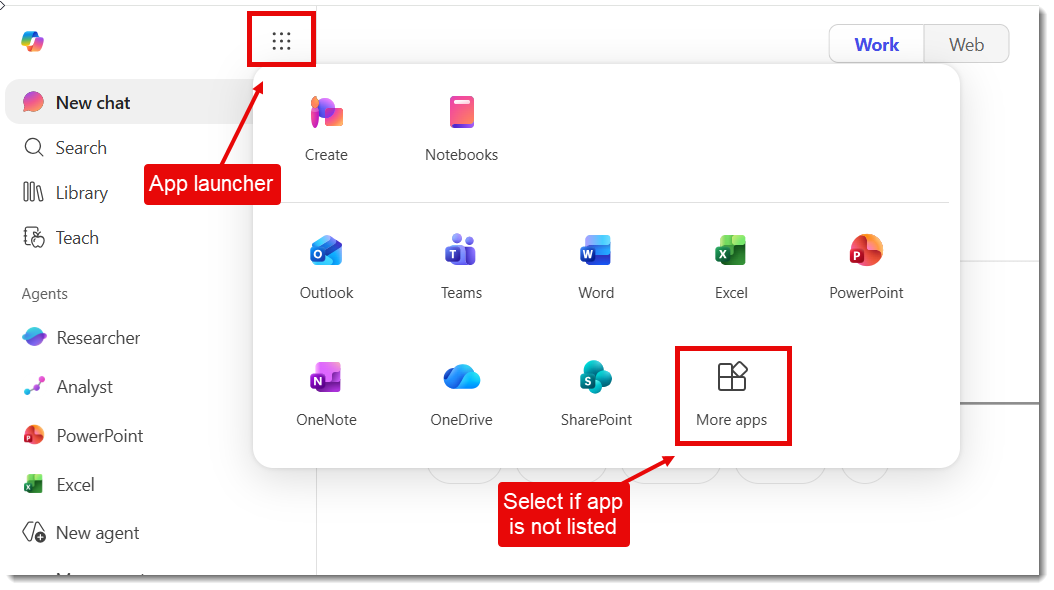
- Select the App launcher "waffle" icon from the top of the left menu, then select More Apps at the bottom right of the window.
View ScreenshotSelect All apps at bottom right area of window. - Select Forms tile from the display of apps, which are in alphabetical order.
- Select the New Form or New Quiz button.
Learn how to setup your form in the Create Form section of this page.
Forms in PowerPoint
PowerPoint has an option to include a poll in your slides. If you distribute your slides, users can take the poll in display mode.
- Open PowerPoint in the desktop app
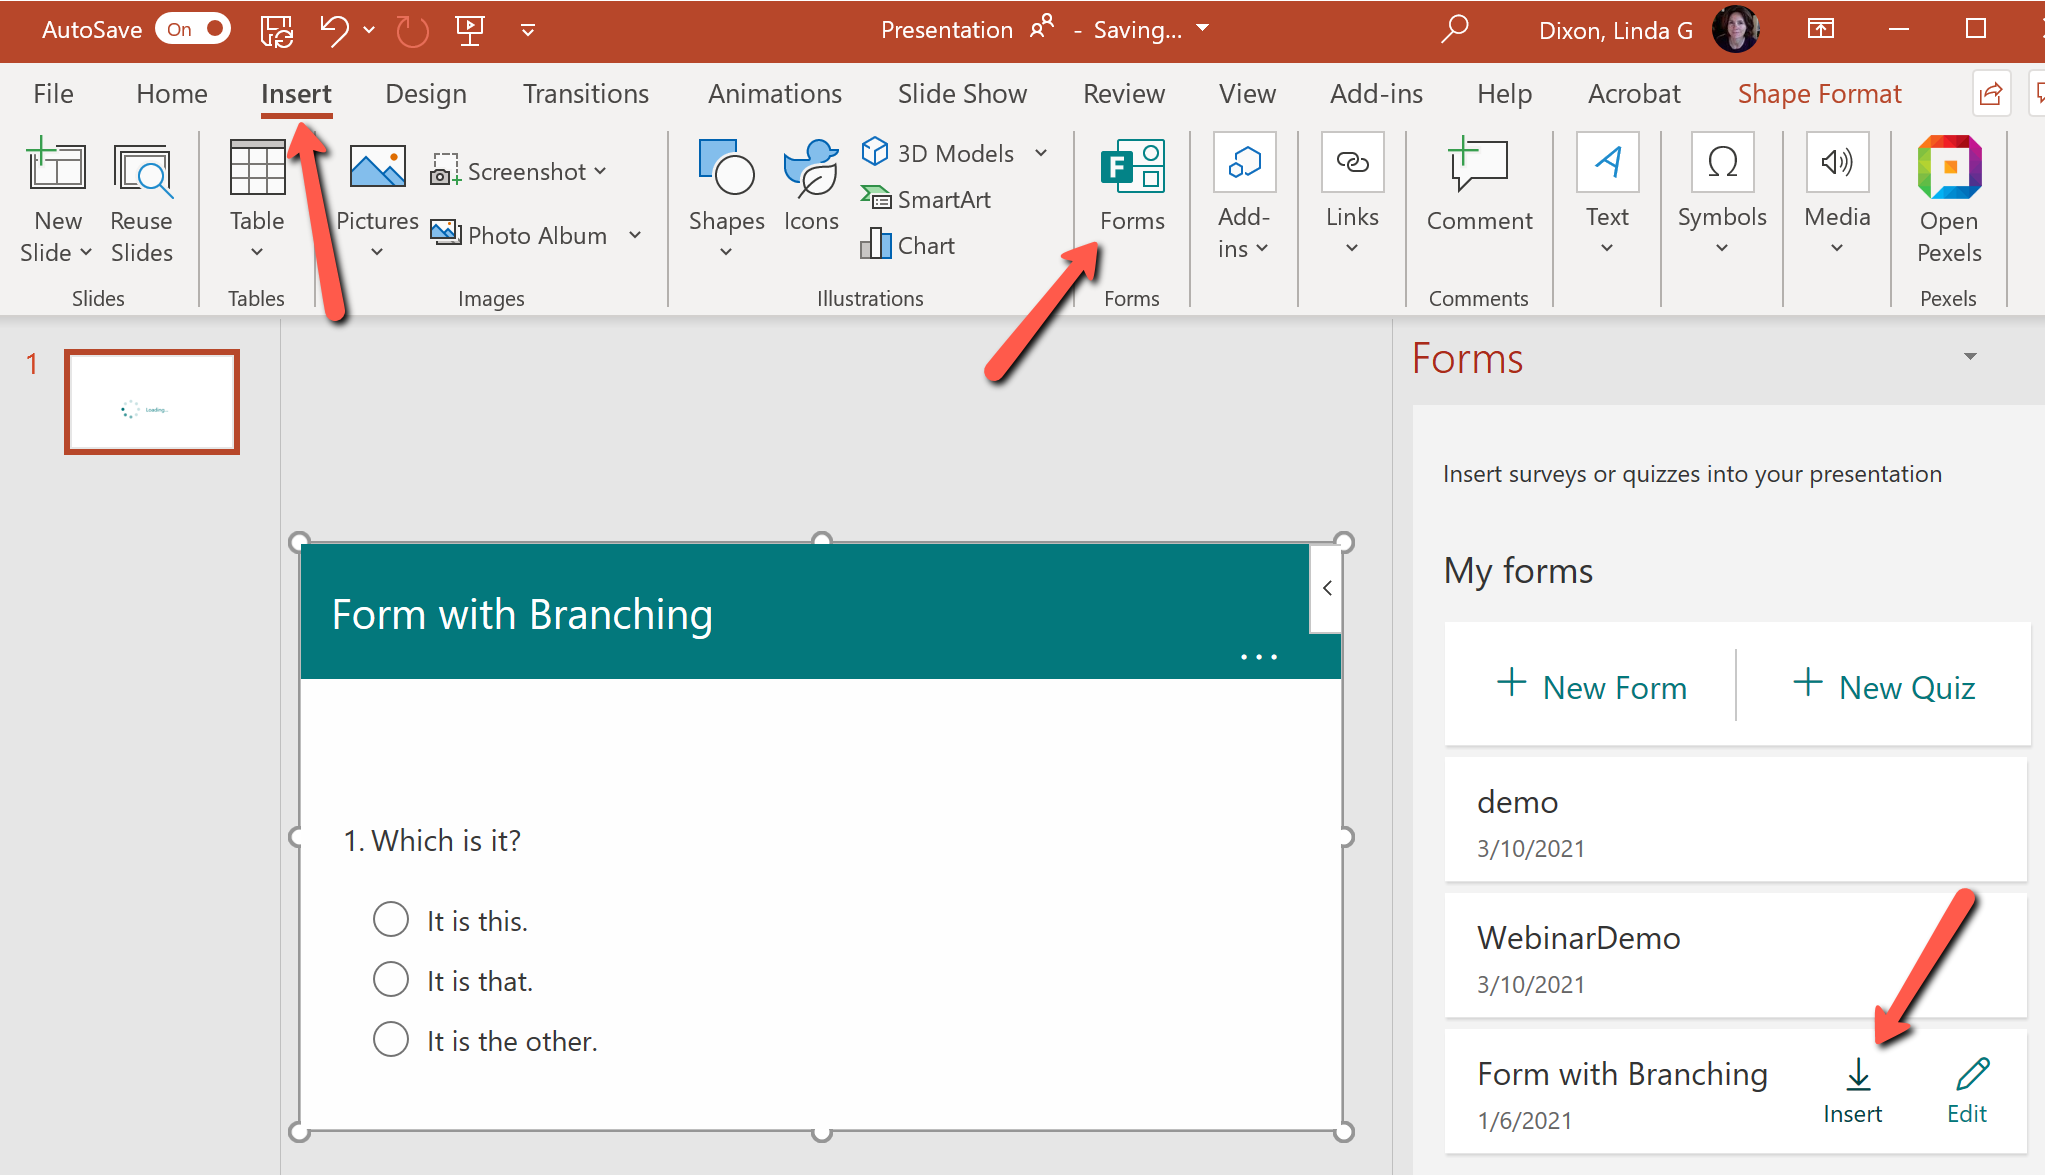
- Select Insert from your menu at the top
- Select Forms
View ScreenshotSelect Insert from the menu, then Forms from the ribbon.
Poll options will open to the right side of your PowerPoint interface. Create a new poll or hover over the list of polls you have already created and select Insert.
Forms in SharePoint
Add a survey or survey results to a web part on your SharePoint site:
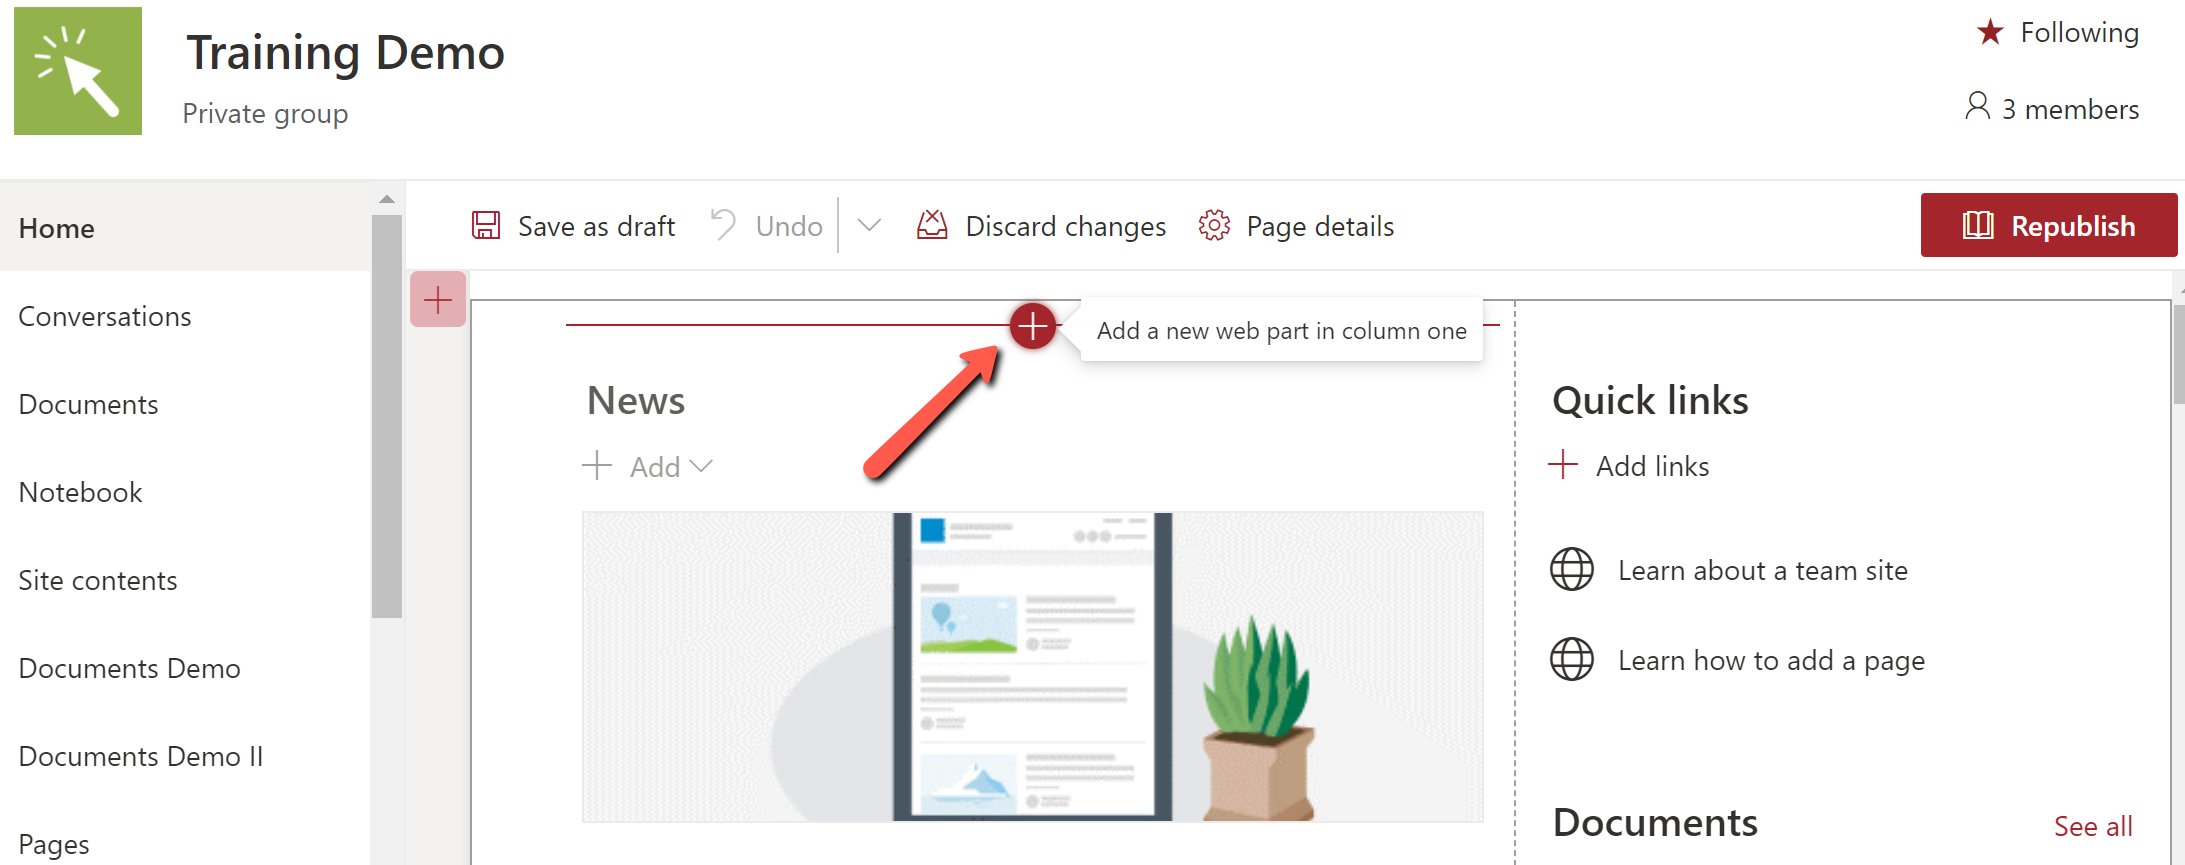
- Select Edit from the top-right menu.
- Hover your mouse over the web part where you want to place the form and select the line with a circled plus sign +.
View ScreenshotHover mouse over web part, select the plus sign to add. - Scroll and select Microsoft Forms from the options.
To create new form:
- Select New form button.
- Provide a name.
- Select Create.
To create existing form:
- Select the Add existing forms button
- Paste the form's web address in field provide.
- Choose whether you wan to Collect responses from your members or Show form results.
- Select OK
View ScreenshotSelect Insert from the menu, then Forms from the ribbon.
Forms for Excel: SharePoint and OneDrive for Business
You can create forms from Forms for Excel in SharePoint.OneDrive for Business, and from Excel online. All results from the form will populate in the Excel file automatically created in your SharePoint library or OneDrive for Business, depending on where you created the form.
Create Forms for Excel
Use any of the following entry points:
- OneDrive for Business: Select + New in the main menu and select Forms for Excel.
- Document library of modern SharePoint sites: Select + New in the main menu and select Forms for Excel.
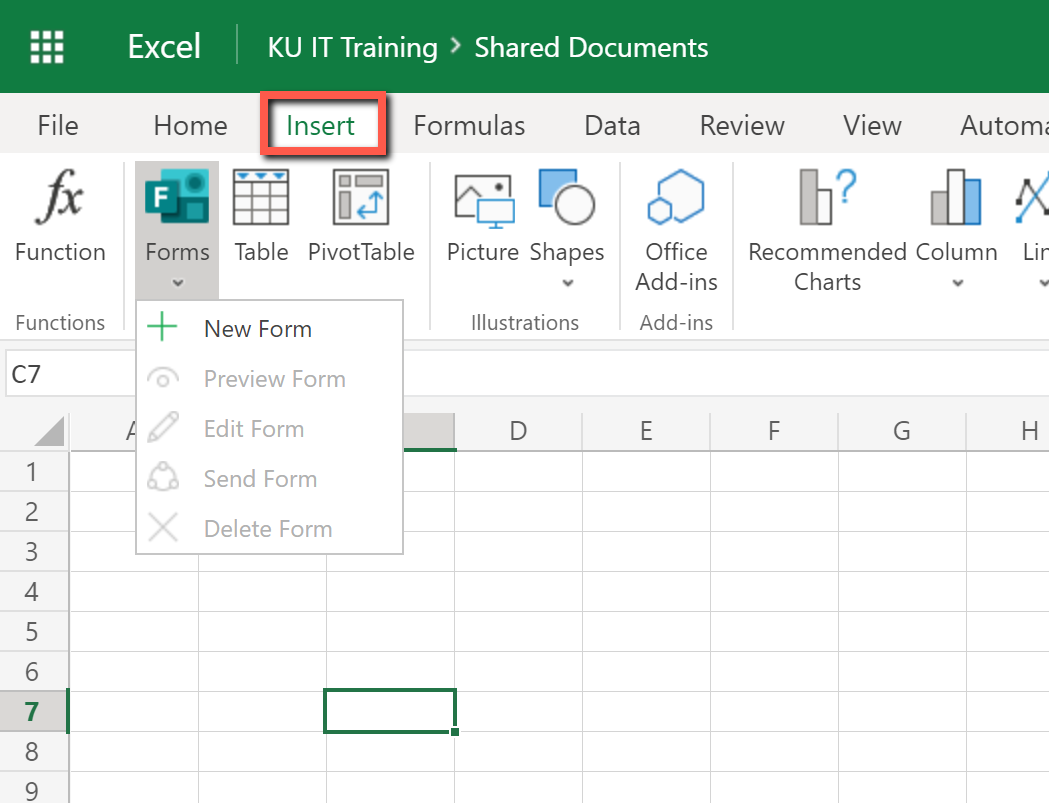
- Excel Online: Select the Insert tab > Forms > + New Form. The workbook is stored on OneDrive for Business or modern SharePoint team sites.
View ScreenshotChoose Insert from the menu, then select the Forms icon in the ribbon
Forms in Teams Channels
You can add forms to your channel tabs, post a poll in the posts, and add polls to meetings. You can collect responses from your team or survey results in your Teams tab:
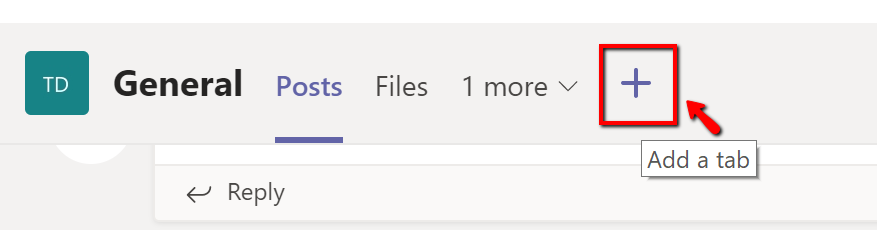
- Select the + plus sign in the tabs area at the top of your Teams interface and choose Forms.
View ScreenshotSelect plus sign in tabs area to add a tab.
If you remove the tab, you can still find the form at Microsoft 365 landing page > Forms > My groups.
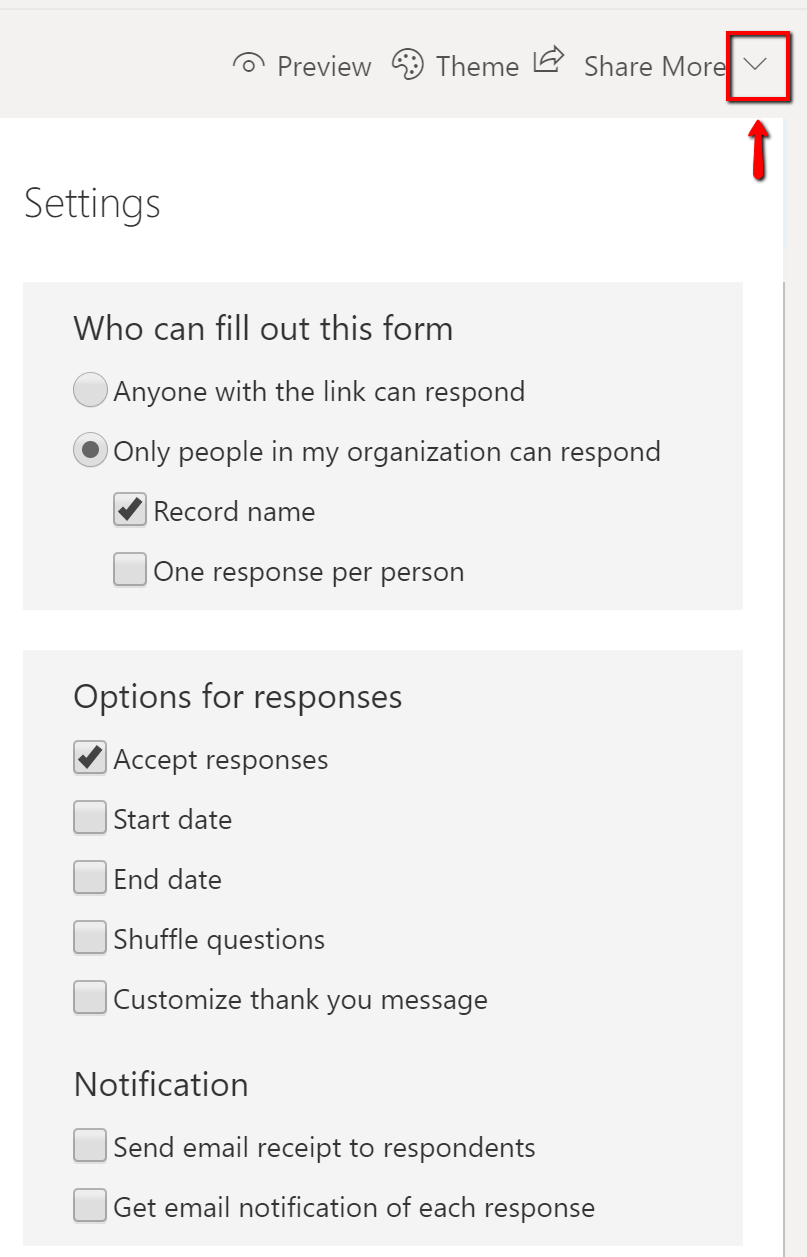
View ScreenshotTo remove tab, select down arrow, then remove. - Choose the Forms app.
- If creating new form, provide a title, select Save, and go to the Settings [down arrow] menu at top-right and select Settings to specify options.
View ScreenshotSelect down arrow next to Share to manage additional settings. - If adding an existing form, select title from the drop down list.
- Next, select the next drop down list to designate whether you want to collect responses from your team or view results.
- Select Save.
Create Forms
Building a Form
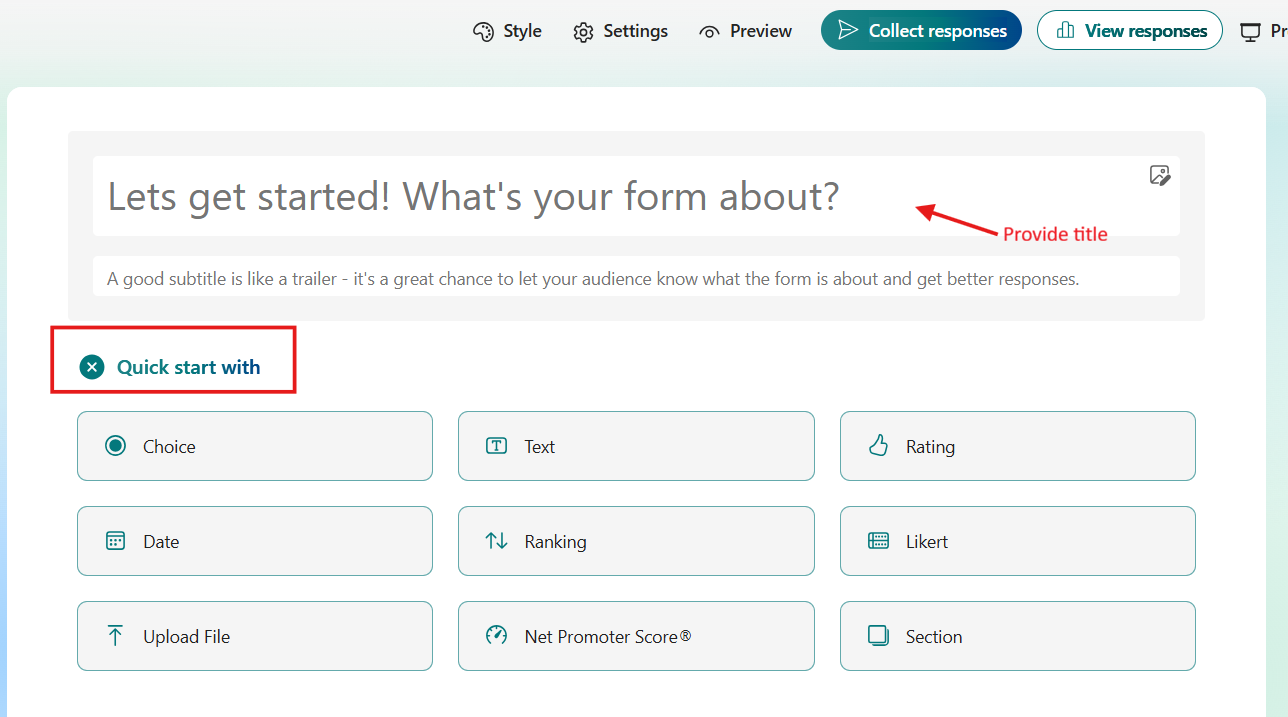
- Once you've started your, you will have the option to begin creating the form using Copilot prompts or you can close that option selecting the X in the top-right corner.
- Provide a title, then select Quick start with to choose the type of question you want to ask.
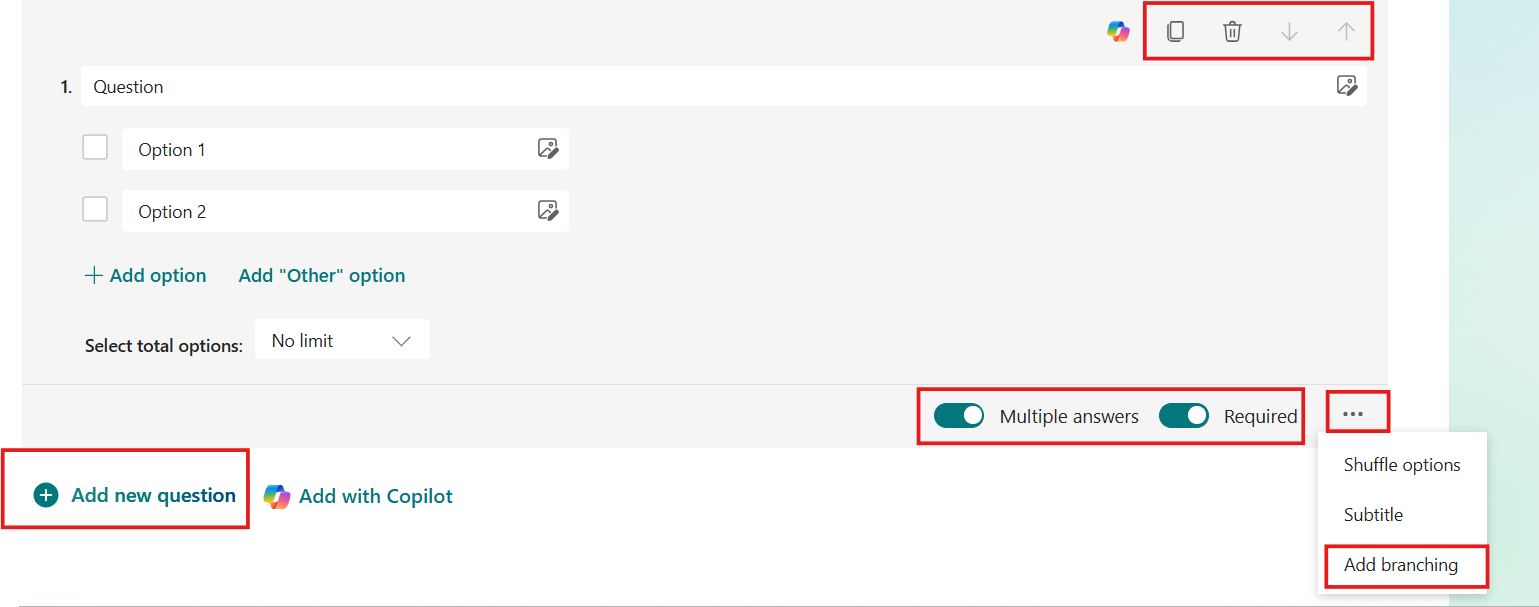
View ScreenshotSelect down arrow at right of question options. - Type your question and select options, such as a required answer, allow multiple answers. Select branching option from the 3-dot icon.
View ScreenshotSelect down arrow at right of question options.
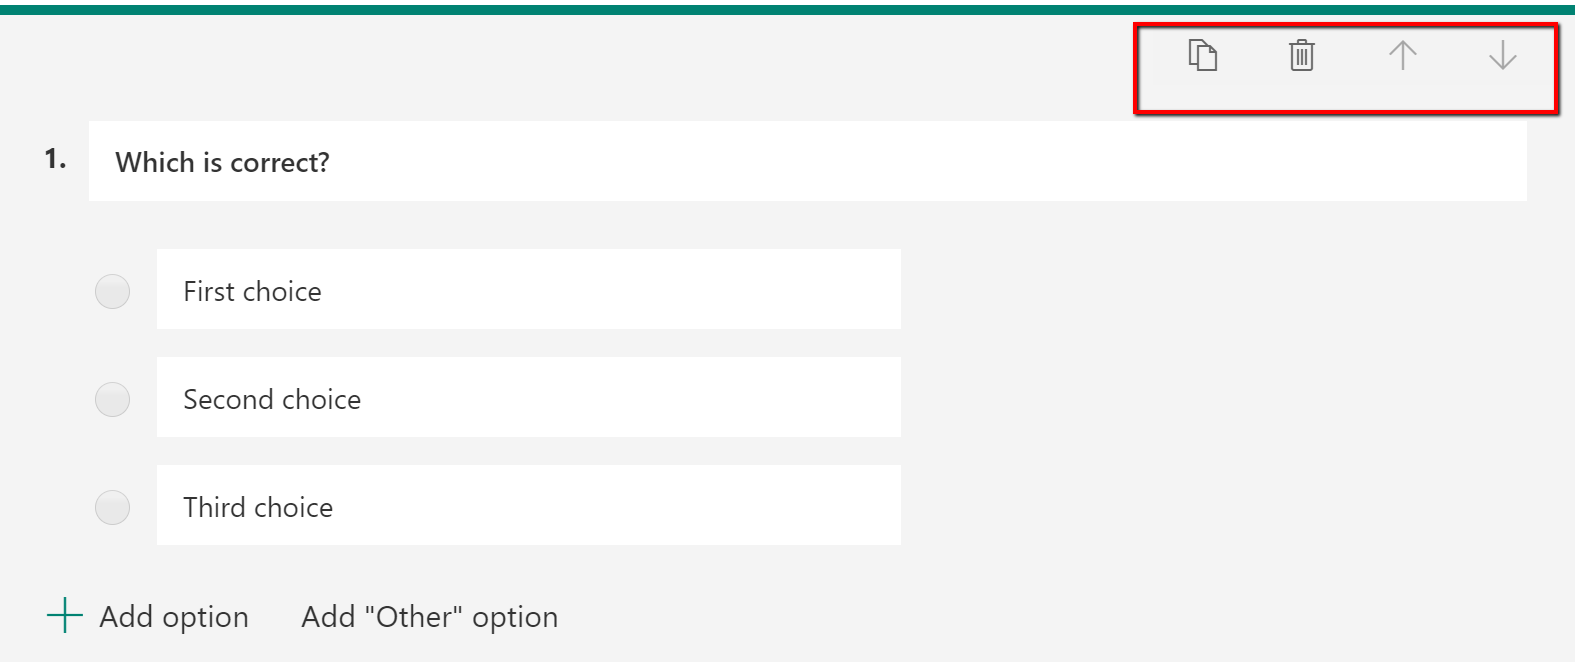
Tools to delete, copy, and reorder questions are located in the top-right area of each question.
View ScreenshotDelete and other options are at the top-right of each question.
Branching
Branching, also known as logic or if-then statements, is used to skip or add follow-up questions to your survey questions. For example, if you asked students if they are interested in a topic and they select no, they can move on to the next question. If they answer yes, you can create follow-up questions that ask them to choose the types of courses related to that topic they would be interested in taking.
To create branching:
- Create the question and all follow-up questions.
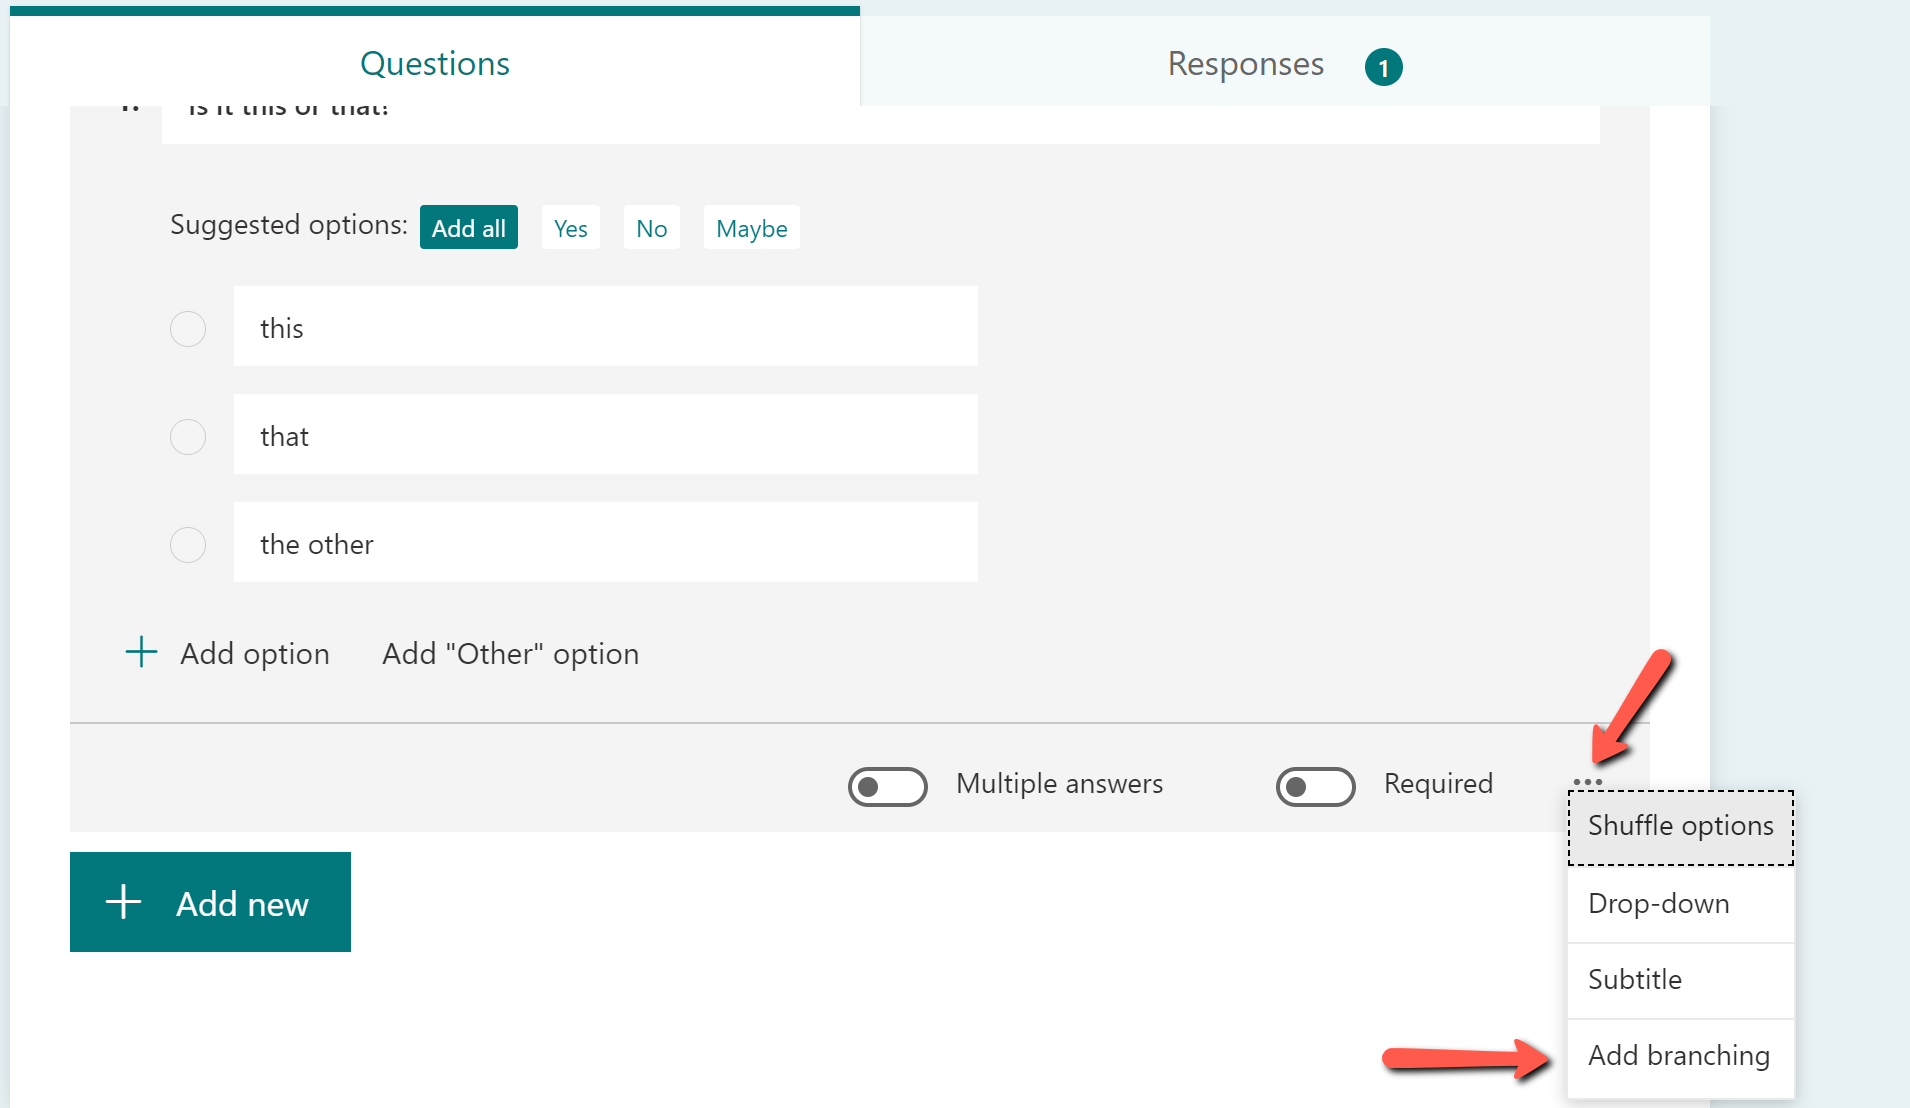
- Select the question and select the More settings [...] to the right of the Required toggle option.
View ScreenshotSelect the 3 dots at the bottom-right of a question, then select Add branching. - Choose Add Branching.
- Select the dropdown option next to Go to and select the appropriate follow-up question.
- If there is no follow-up to a specific question, choose End of the Form.
- Important: Each follow-up question must lead to another question or you must select End of the form to complete the branching.
Testing
To test the behavior of you form, select Preview in the top bar. You can view the form as the user and complete the form to ensure it works in the way you expect.
To remove reset the results:
- Select the Responses tab.
- Select the 3 dots to the lower right of Status.
- Select Delete all responses.
Create Polls
Polls and Forms are different apps and allow only one question vs. Forms allowing many questions. The exception to that is Polls in Outlook messages. Polls can be added to an Outlook message, Teams Posts, Chat, and Meetings.
Create a Poll Prior to a Meeting
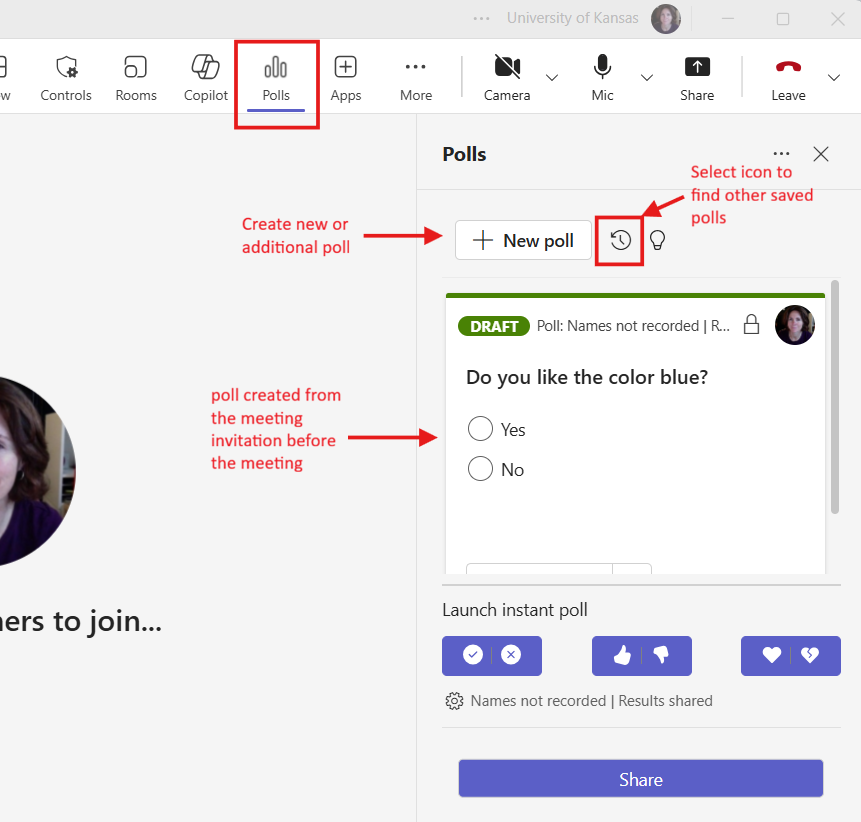
When you create a poll prior to a meeting the Polls icon will populate in the controls at the top of the interface.
- Schedule a Teams meeting from the Teams calendar app.
- From your calendar app in Teams, open the scheduled meeting.
- If you scheduled the meeting from your Teams calendar, select the Chat icon at the top-right menu.
View Screenshot - Select the +Add a tab in the top menu.
Search for and select Polls.
If you scheduled the meeting from your Channel or from Outlook, you will see a +Add a tab in the top menu.
View Screenshot- Follow the prompts to Add and Save.
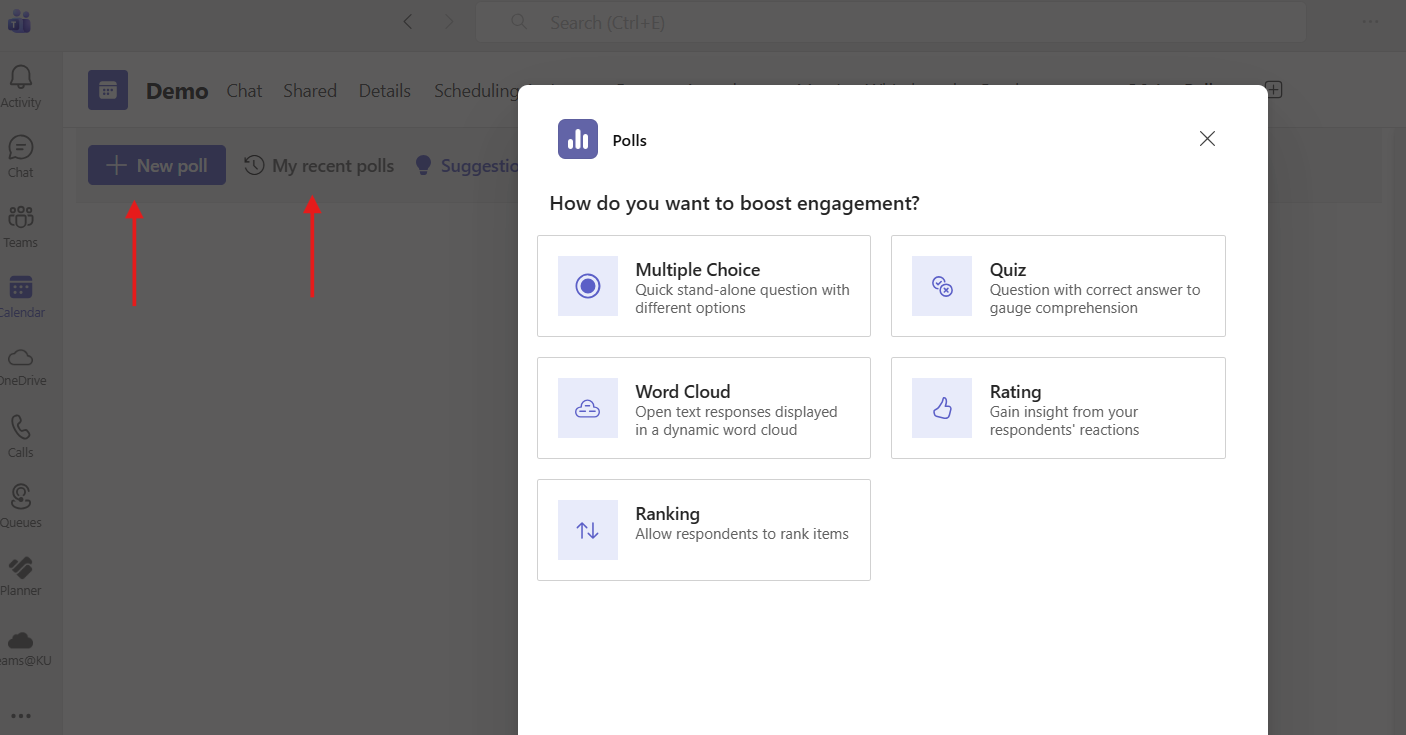
- From the the top left of interface, select the + New Poll or use My recent polls if you want to use a poll you've already created.
View ScreenshotFrom Teams calendar app, open meeting, select plus sign in top menu. - Decide the type of question, complete and select Save.
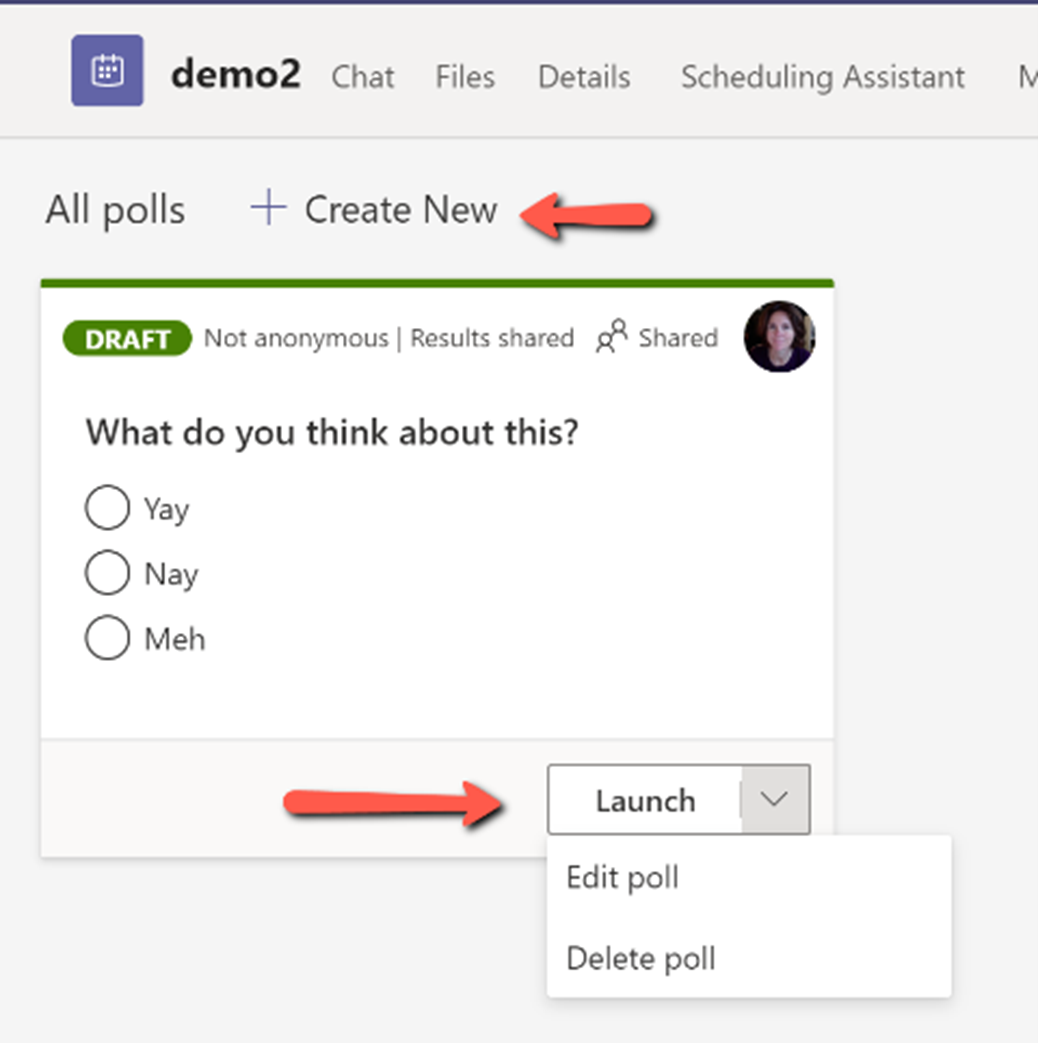
- If you want attendees to have access to poll prior to the meeting, select Launch. If you want launch during the meeting, select Draft.
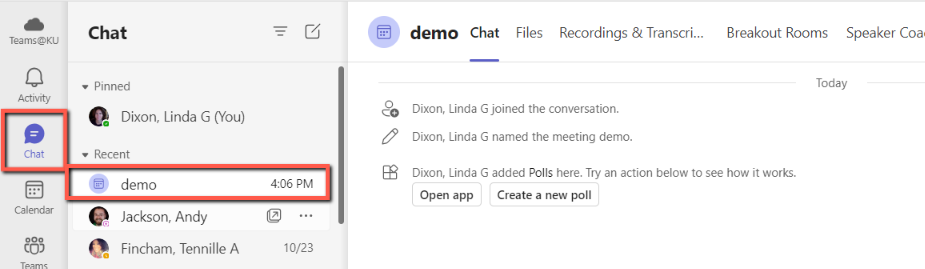
You can edit, delete or create additional polls for the same meeting by opening the meeting in your Teams calendar and selecting Polls from the top menu. Select your team meeting from Chat app and open app to edit/launch or select create.
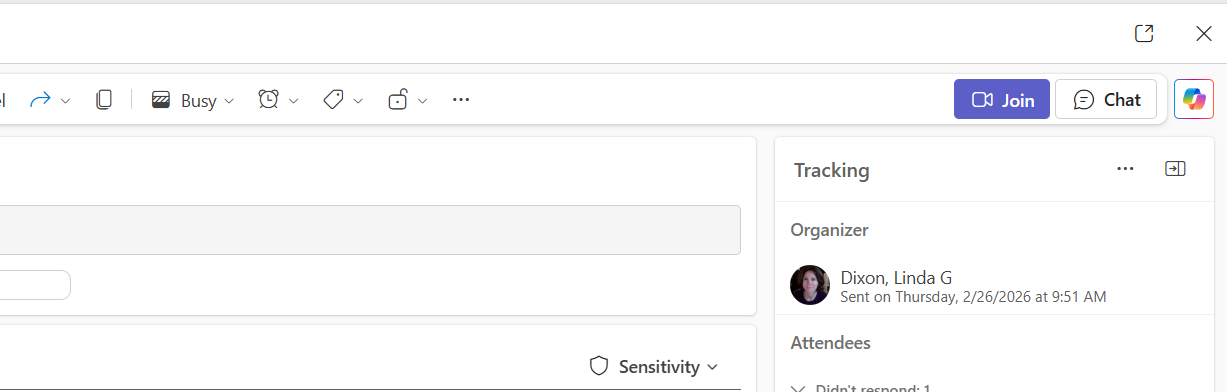
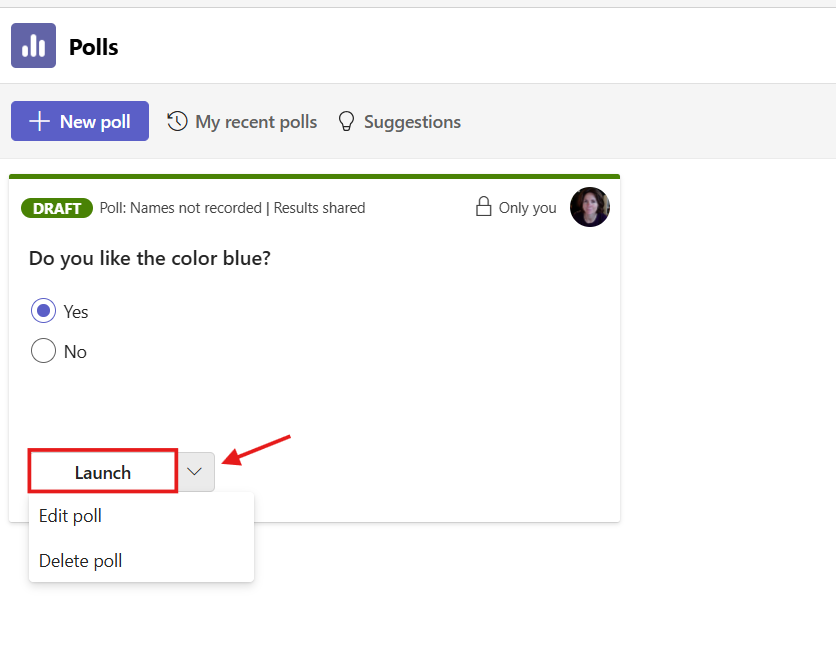
When you are ready to make the poll available, select Launch. You can launch before, during or after the meeting, so launch when it is needed.
View Screenshot
Launch, edit or delete your poll from here.
Create or Launch a Poll During a Meeting
If you created the poll prior to the meeting, select the Polls icon will be available in the top menu.
If you need to create a poll during the meeting:
- Select the +Add a tab icon in your controls to open.
- Search for and select Polls.
- You have the option to create a New poll or use a poll previously created. If you created a poll from the meeting invitation, it will show in the poll panel.
View ScreenshotTo open a poll in a meeting, select the Forms icon in your tools area. - Select Share at the bottom of the right Polls panel, then select Launch. You still have the option to edit or delete before launching by selecting the arrow next to the launch button.
View ScreenshotTo open a poll in a meeting, select the Forms icon in your tools area. - You will see results as they are submitted in the right panel
You can review poll results again from the meeting Chat area or in the Forms app.
Polls in Outlook Messages
Outlook has an option to send a poll in an email. This is not the same as the scheduling poll in the Outlook calendar.
- Open an email in Outlook.
- Select Insert from your menu at the top.
- Click in the body of the email or the poll icon will be greyed out.
- Select Poll.
View ScreenshotSelect Insert from the menu, then Forms from the ribbon.
Polls in a Teams Channel
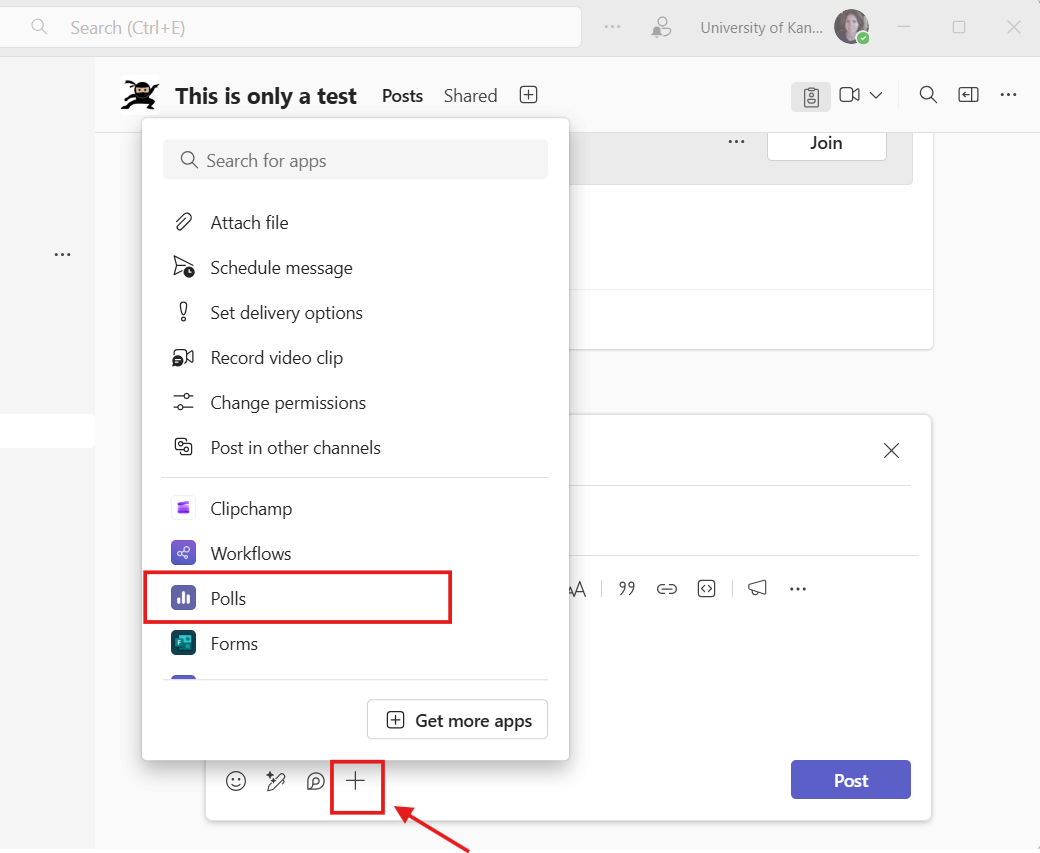
- In the Post area of your channel, create a new comment or reply to a posts.
- Select the + [plus sign] at the bottom of your options.
View Screenshot - Provide your question and optional answers.
- Select multiple answers, results, and anonymous options as needed.
- Select Save.
Access Poll After the Meeting
All polls from Meetings can be accessed via the Chat app in Teams or the Forms app.
From Chat
Select the Chat icon from the left app bar in Teams, then search for the title of the meeting.
From Forms App
Open the Forms app on the Microsoft 365 landing page. If you don't see the app in Recent, go to the bottom right of your selections and click on All forms and search for the name of team meeting.
Notifications
If you want to receive notifications for responses submitted on the form:
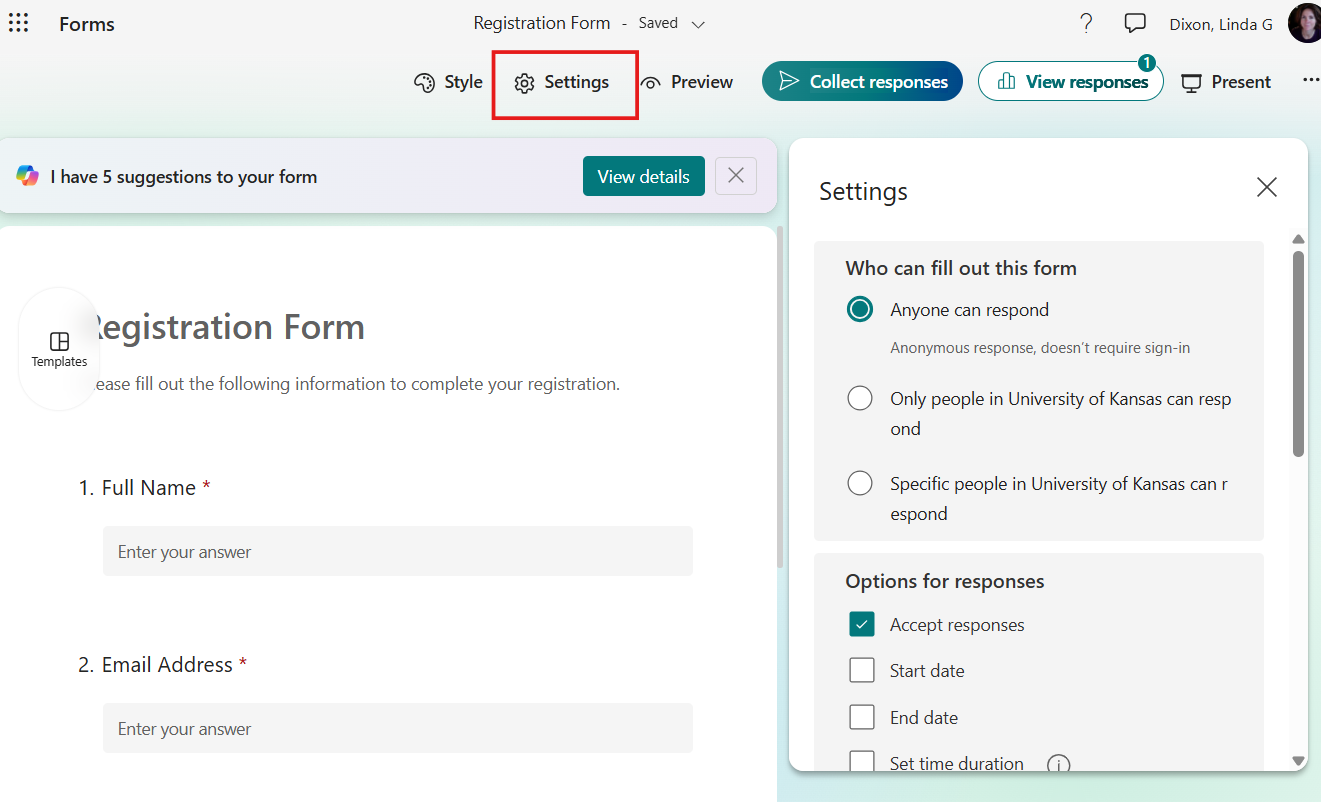
- Open your form and select More options […] located at the top-right area of the screen.
- Select Settings.
- Choose from the notification options at the bottom of the Settings panel.
Anonymous Users
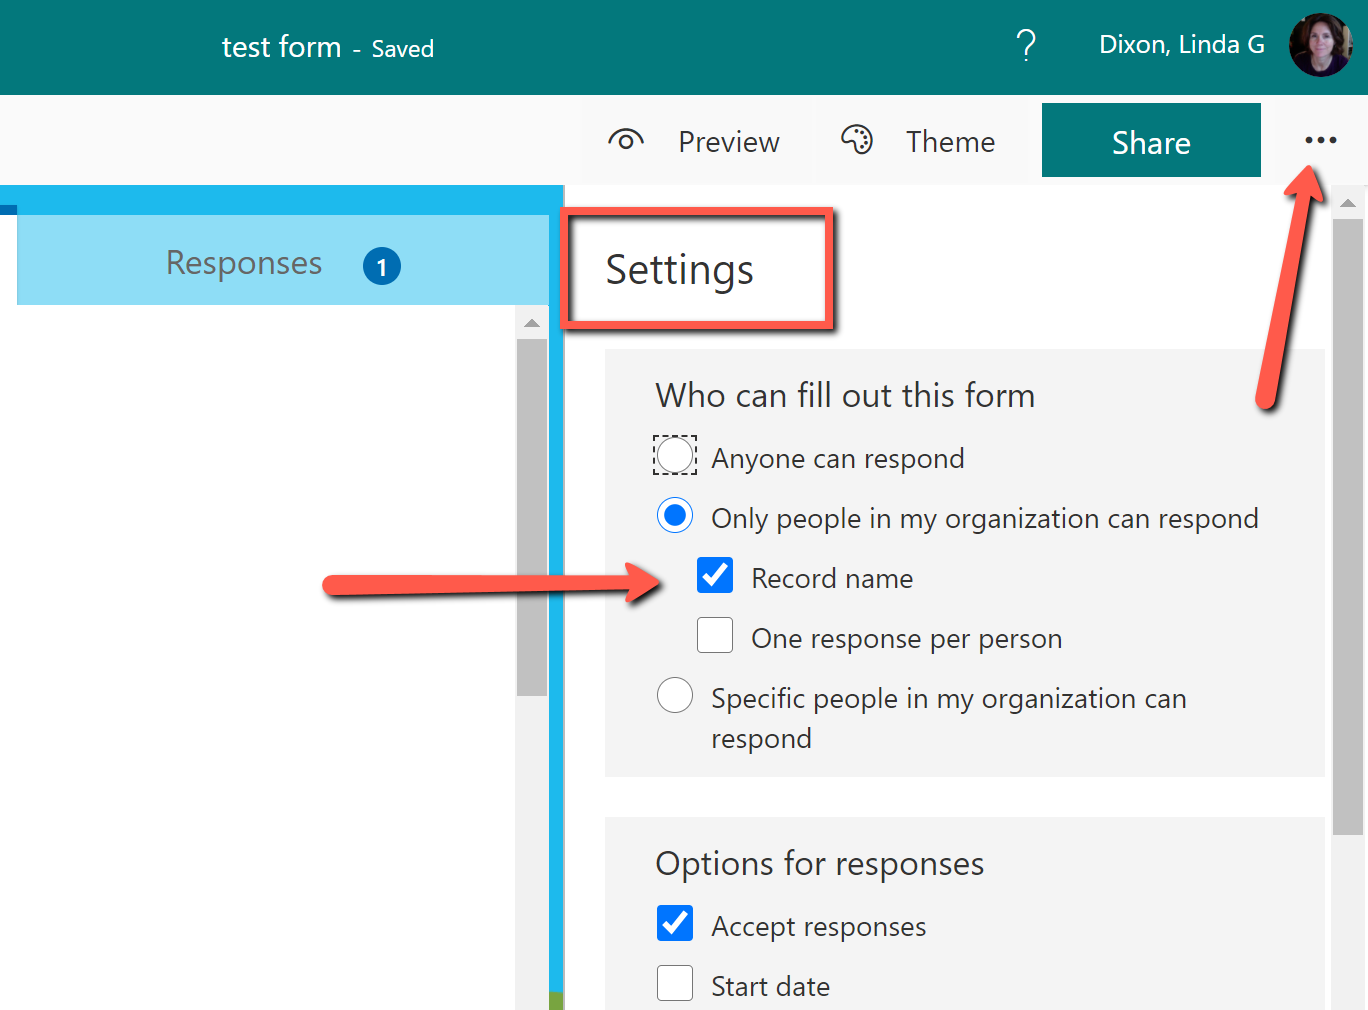
By default, each response submitted will include user information. To change this to anonymous responses:
- Select the three dots [...] at top-right.
- Select Settings.
- Deselect checkbox next to Record Name.
View ScreenshotSelect 3 dots to the right of the Share button, the choose your option next to Record name.
Sharing Forms
To share a form from the app:
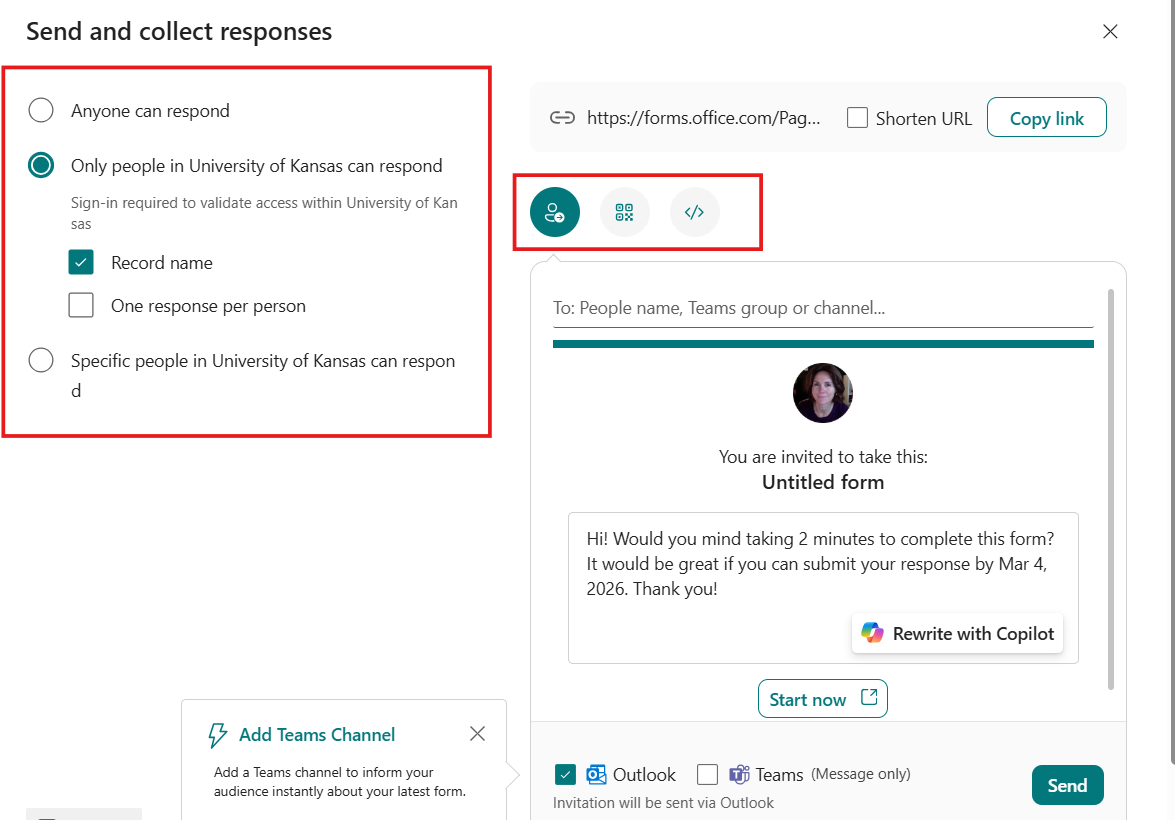
- Open the form and select the Collect Responses button located at the top menu of the interface.
- Choose whether you want to share only with those at KU, specific people, or with anyone with a link.
- Choose how you would like to share: copy link to put on your website, QR code, embed the link, or send via email.
View ScreenshotSelect down arrow at right of question options.
To stop sharing forms:
- Open the form that has been shared.
- Select Settings in the top menu.
- Deselect the box next to Accept Responses.
View Results
Results of your surveys and polls can be viewed from the Forms app or from SharePoint or Teams.
To find all of your forms in one place, go to Microsoft 365 landing page, then select the Forms app.
You will find three options: My forms, Shared with me, and Group forms. All forms you create from the Forms app will be located in My forms. If you created a form from SharePoint or Microsoft Teams, they will be found in Group forms.
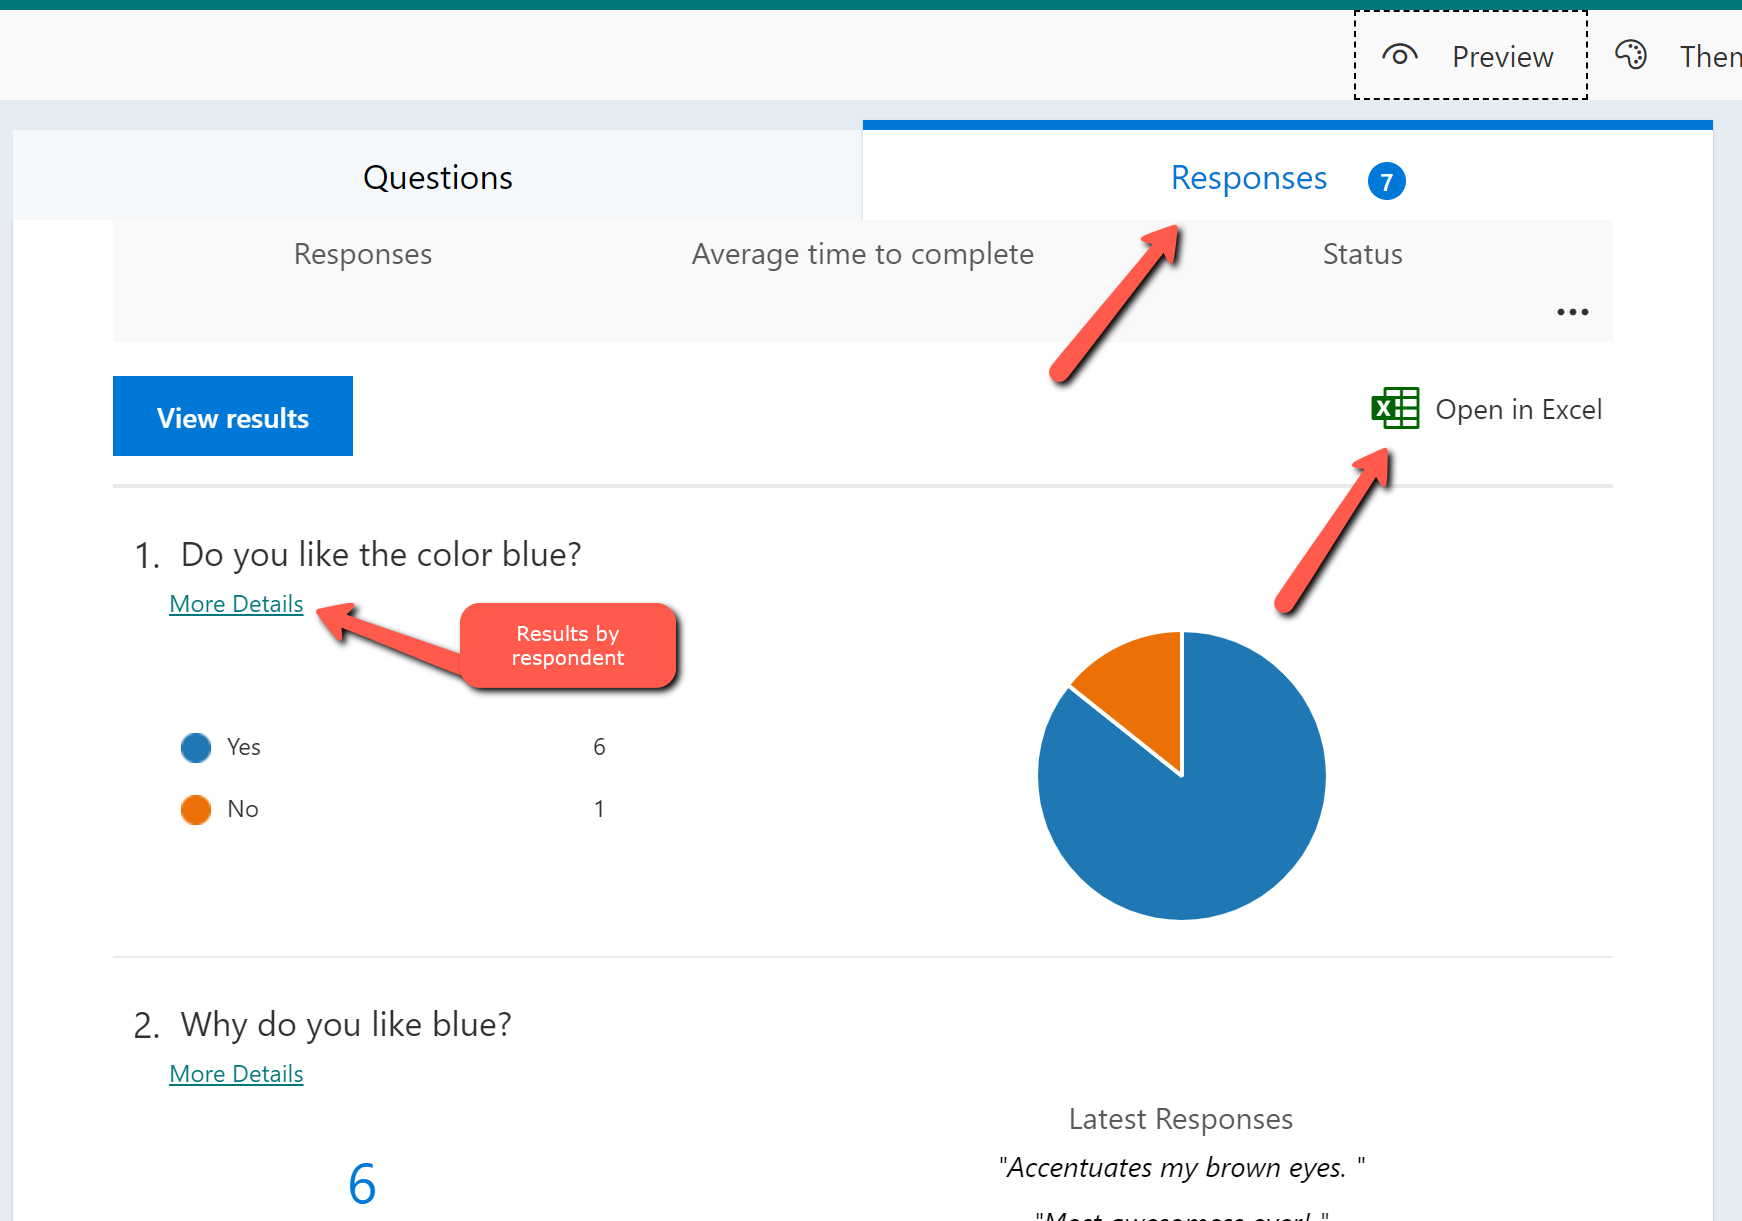
Open the form you want to view and select the Responses tab.
- See charts of results for each question.
- Select More Details under each question to view respondent answers.
View ScreenshotIn Responses tab, More Details is located under each question. Open in Excel is located at the top-right.Select 3 dots to the right of the Share button, the choose your option next to Record name.
Move and Delete Forms
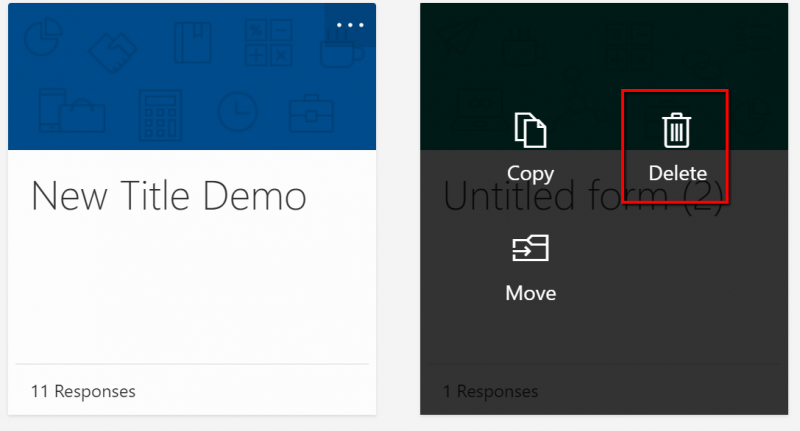
Select the 3 dots in the top right corner of the tile, select Delete.To move a form from My forms to your Microsoft Team:
- Select More options […] at the top-right corner of the tile, then select Move.
View ScreenshotSelect the 3 dots in the top right corner of the tile, select Move. - Choose a team from the expanded panel on the right.
- Go to your team channel you want to add the form to and add a tab by selecting the + in the tab area.
- Choose the Forms app.
- Select Add an existing form.
- Select the name of the form you want to add.
To Delete a form, select the More options […] at the top-right corner of the tile, then select Delete.
View Screenshot
Permissions
Editing permissions and ownership are set by where the form was initially created. If you create a form from SharePoint or Teams, it is considered a Group Form and all members can edit and ensure continuity if the creator leaves.
If the form is created in Forms online or an office app, such as PowerPoint, owners can manage edit permissions by adding collaborators via a shared link. When the owner leaves, the form must be shared with others as collaborators.
Support
Technical Support: ithelpdesk@ku.edu | 785-864-8080
Schedule an Overview or Training Support: training@ku.edu | 785-864-5155