SharePoint
Overview
With SharePoint, you can share documents, collaborate online, and store resources. Once a site collection is created, a site owner can create new sites in their collection as needed.
Access SharePoint by signing in to the Microsoft 365 Landing Page with your KU Online ID and password.
Compare OneDrive, SharePoint, and Teams
Some of Microsoft's apps have same or similar features and it can be challenging to know which app to use when. Check out our video to help explain the similarities and differences.
Create Your SharePoint Site
You can create a new top-level SharePoint site on your own by from the SharePoint landing page.
- Sign in at KU's App Landing page.
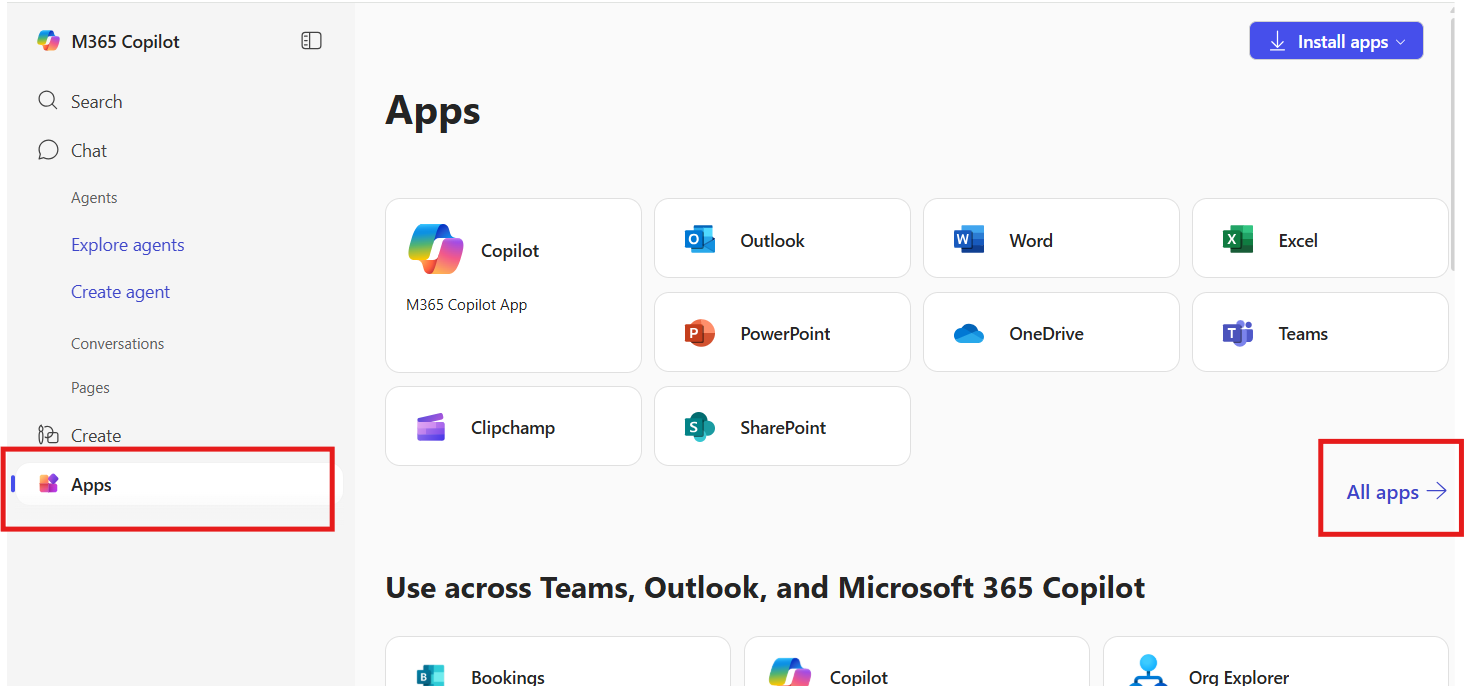
- Select Apps in the left menu, then select the SharePoint tile. Ifyou don't see SharePoint as one of your options, select All Apps to the far right of the interface.
View ScreenshotSelect all apps at right to view all. - Select the SharePoint tile from the display of apps, which are in alphabetical order.
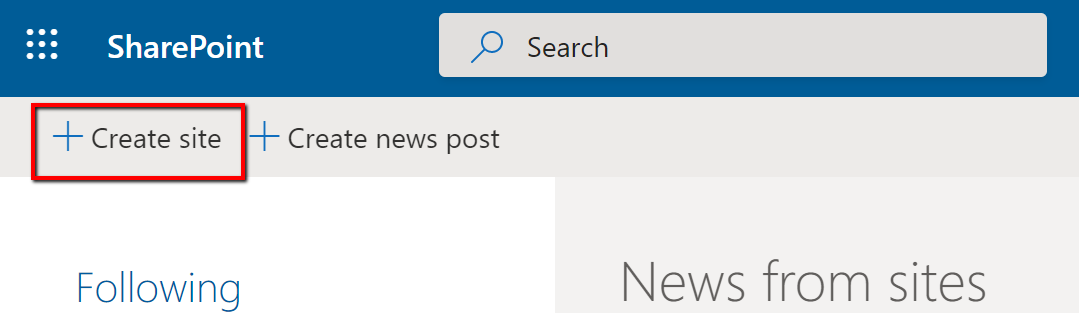
- Select +Create site at the top-left corner of the screen. From there, you will need to choose a team site or communication site based on your needs.
View ScreenshotSelect Create Site
Team sites are for those who want a place where the members of a work group or project team can collaborate on project deliverables, plan an event, track status, or exchange ideas.
Communication sites are for sharing news, reports, statuses, and other information in a visually compelling format. Unlike Team sites, you will not get a Quick Launch (left-hand-side menu) and you will not get apps like Planner or Teams.
Learn more about the differences between Microsoft's team and communication sites.
Membership and Permissions
Find explanation and instructions on SharePoint's memberships, permission levels, and how to add internal and external users to your site.
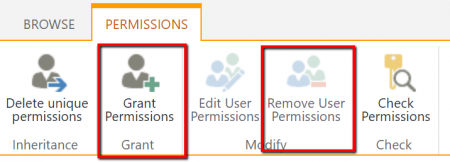
Other Site Management
Grant Permissions and Remove User Permission buttons in the top menu of page
Create a Subsite
After you create your top-level site, you can create additional subsites, as needed.
- Sign in to the Microsoft 365 Landing Page and go to the initial team site.
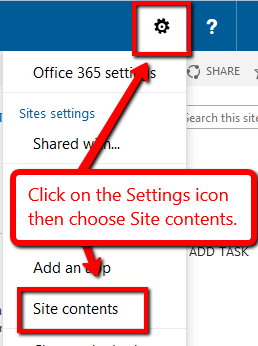
- Select the Settings icon and choose Site contents from the list.
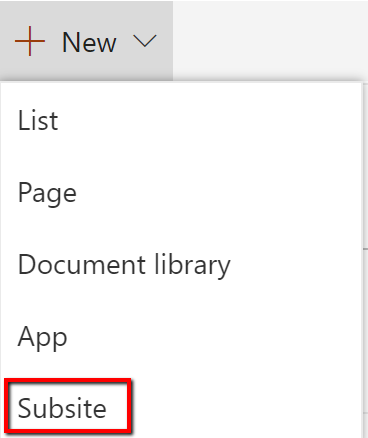
View ScreenshotSelect the Settings icon, then select Site contents - At the top-right menu, Select +New and choose Subsite.
View ScreenshotSelect the New link, then select Subsite - Enter the Title, Description and URL for the new site.
- Select Team Site (no Microsoft 365 group) for the template.
- Set up permissions as needed.
- Select Create.
Navigation
The navigation for the team site is located on the left side called Quick Launch. Any pages or apps that are added to the team site can be added to the Quick Launch area.
To edit the Quick Launch:
- Select the Edit link at the bottom of Quick Launch.
- To add a link, hover your mouse between links to bring up the + button.
View ScreenshotSelect the plus sign between two links to add a link - To edit the menu, select the More options [...] icon next to a link.
View ScreenshotSelect the 3 dots next to Documents to open the submenu - To change the order, use Move up or down tools or click and drag link to a new position.
- Select Save.
Manage Access Requests
If a user clicks on something they do not have access to, they are able to request access to that content. Site owners will receive an email for any access request submitted and also have the option to turn off access requests on the site.
How to turn on/off access requests:
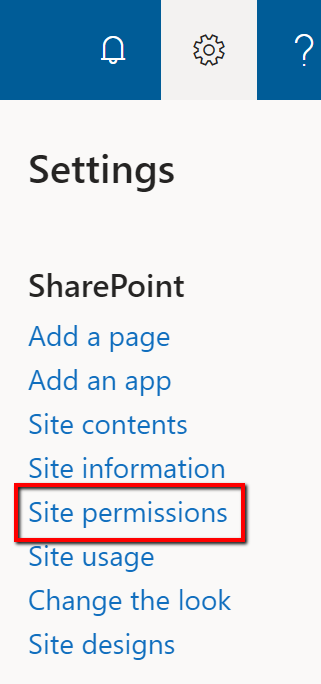
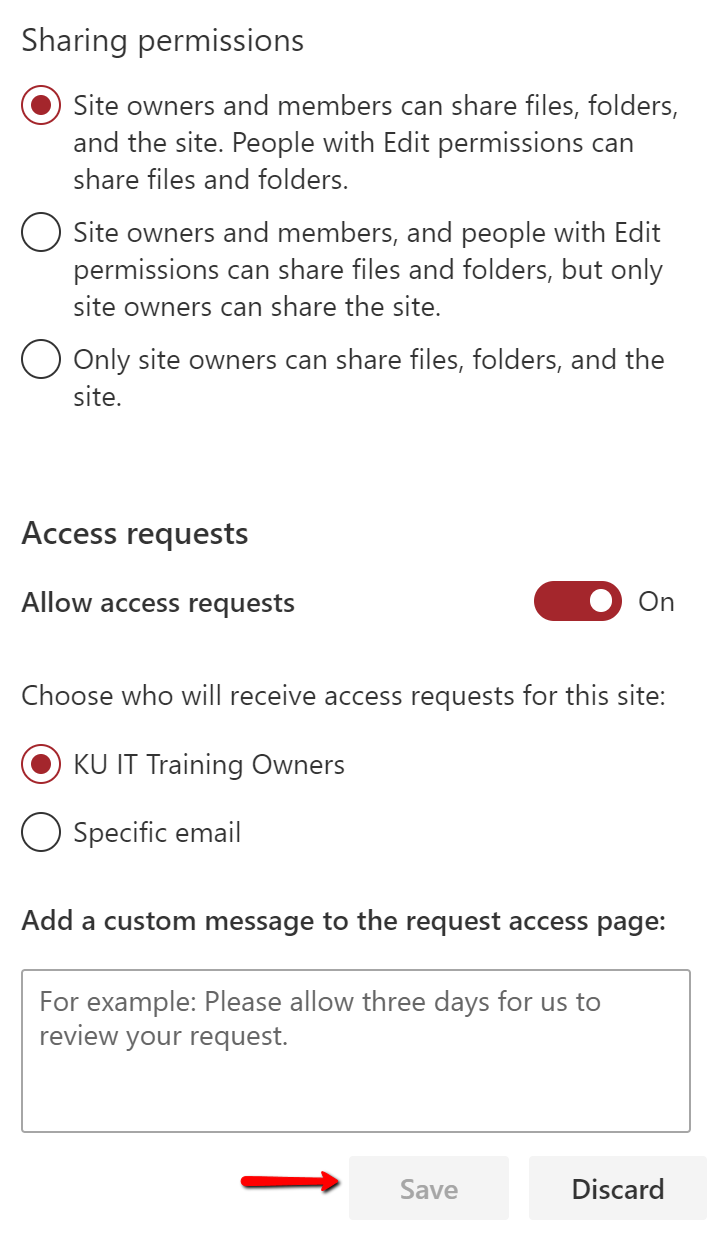
- Select the Settings icon and choose Site permissions.
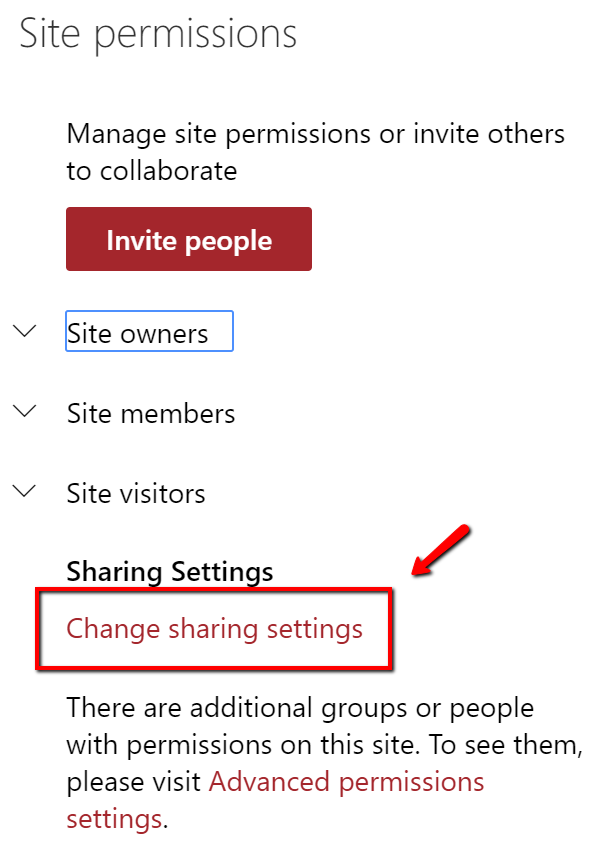
View ScreenshotSelect the Settings icon, then select Site permissions - Scroll down and choose Change sharing settings.
View ScreenshotSelect the Change sharing link - Choose who can share information from the site, disable access request, and who will receive notification of the access requests.
View ScreenshotEnable and disable selections to provide or restrict access - Select Save.
How to approve or decline access requests:
- Select the Settings icon > Site Contents.
- Select Access requests and invitations.
Note: The Access request button only appears if there are pending access requests.
- Under Pending Requests, find the request you want to update, select More options [...] to open the menu.
- Under Permissions, select the permission level you would like to assign the user if you plan to approve the request. You can optionally type a message to the person requesting access; this can be a useful way to document your decision.
- Select Approve or Decline.
Change Title and Look of Your Site
The title, description, URL*, logo, and theme of a site can be changed at any time by a site owner. Changing the look can help users differentiate a site from the other sites they may use.
*At this time, the URL can only be changed on a subsite, not the site collection.
Change the Look of a Site
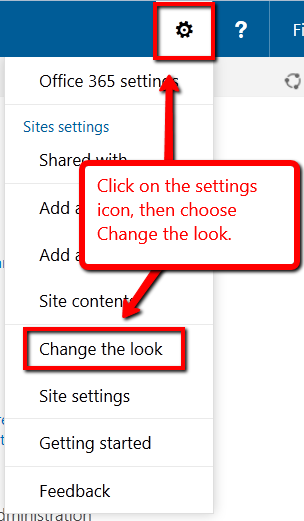
- Select the Settings icon and choose Change the look.
View ScreenshotSelect the Settings icon, then select Change the look - Choose from Header and Theme to change background image, site logo, colors, and fonts, etc.
- Select Save.
Change the Title, Description, Logo, and URL of a Subsite
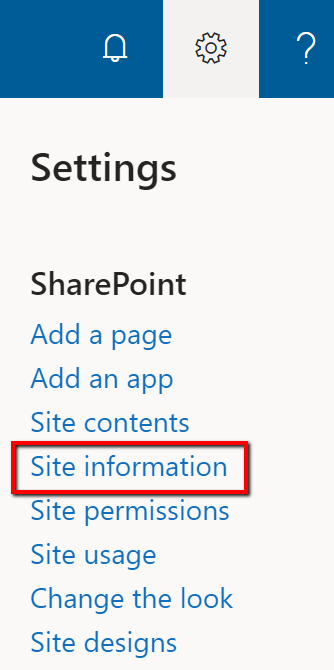
- Select the Settings icon and select Site Information.
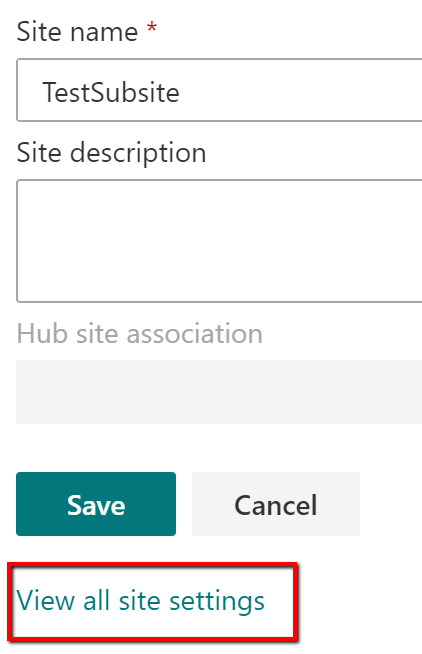
View ScreenshotSelect the Settings icon, then select Site information - At the bottom of the Edit site information panel, select View all site settings.
View ScreenshotSelect View all site settings at the bottom of the panel - Under Look and Feel, choose Title, description, and logo.
View ScreenshotUnder the Look and Feel category, select Title, description, and logo - In the Title field, enter or edit the title of the site.
- In the Description field, enter or edit the description of the site.
- In the Insert logo field, enter the URL or select From computer to use an image you have saved.
- In the URL field, edit the URL of the site. Please see the important notes below on changing a site's URL.
- Select Ok.
Caution! Important Notes on Changing a Site URL
- Changing the URL of a site will break any links pointing to it.
- When changing a URL, make sure no one is making edits and all data is saved.
- Communicate a URL change to the end users.
- When the URL change is completed, close your browser and reopen to clear the browser's cache.
- If the site is listed on the community sites landing page, please contact office365support_sn@ku.edu to update the link.
Document Libraries
When you create a team site, it comes with one document library. Additional document libraries can be added as needed, which is useful when a group of documents needs different permissions than another group.
Add a Document Library
- Select the +New icon in the top menu and select Document library.
- Type in the name for the library and choose whether or not to have a link to the library in the site navigation.
View ScreenshotSelect the New link from the menu, then select folder - If you deselect Show in site navigation, you will find the list in Site Contents [Settings > Site contents].
- Start adding columns and documents as needed.
Add Metatags to Files
- Open the document library
- Select + Add column.
- Select the type of field you need.
- Give the column a name and description then select Save.
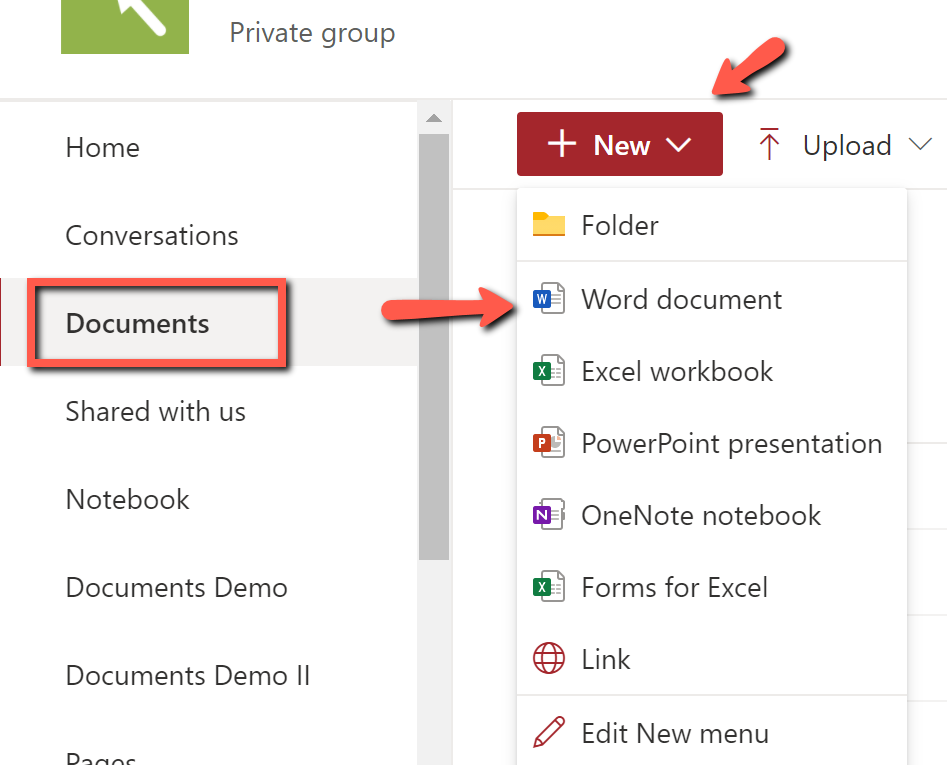
Add Folders and Files
- Open the library and select +New then select a file or folder.
View ScreenshotSelect New from the top menu, then select Folder - Next to +New, select Upload to add individual files or folders from your computer.
- Drag and drop files or folders from your computer into the library.
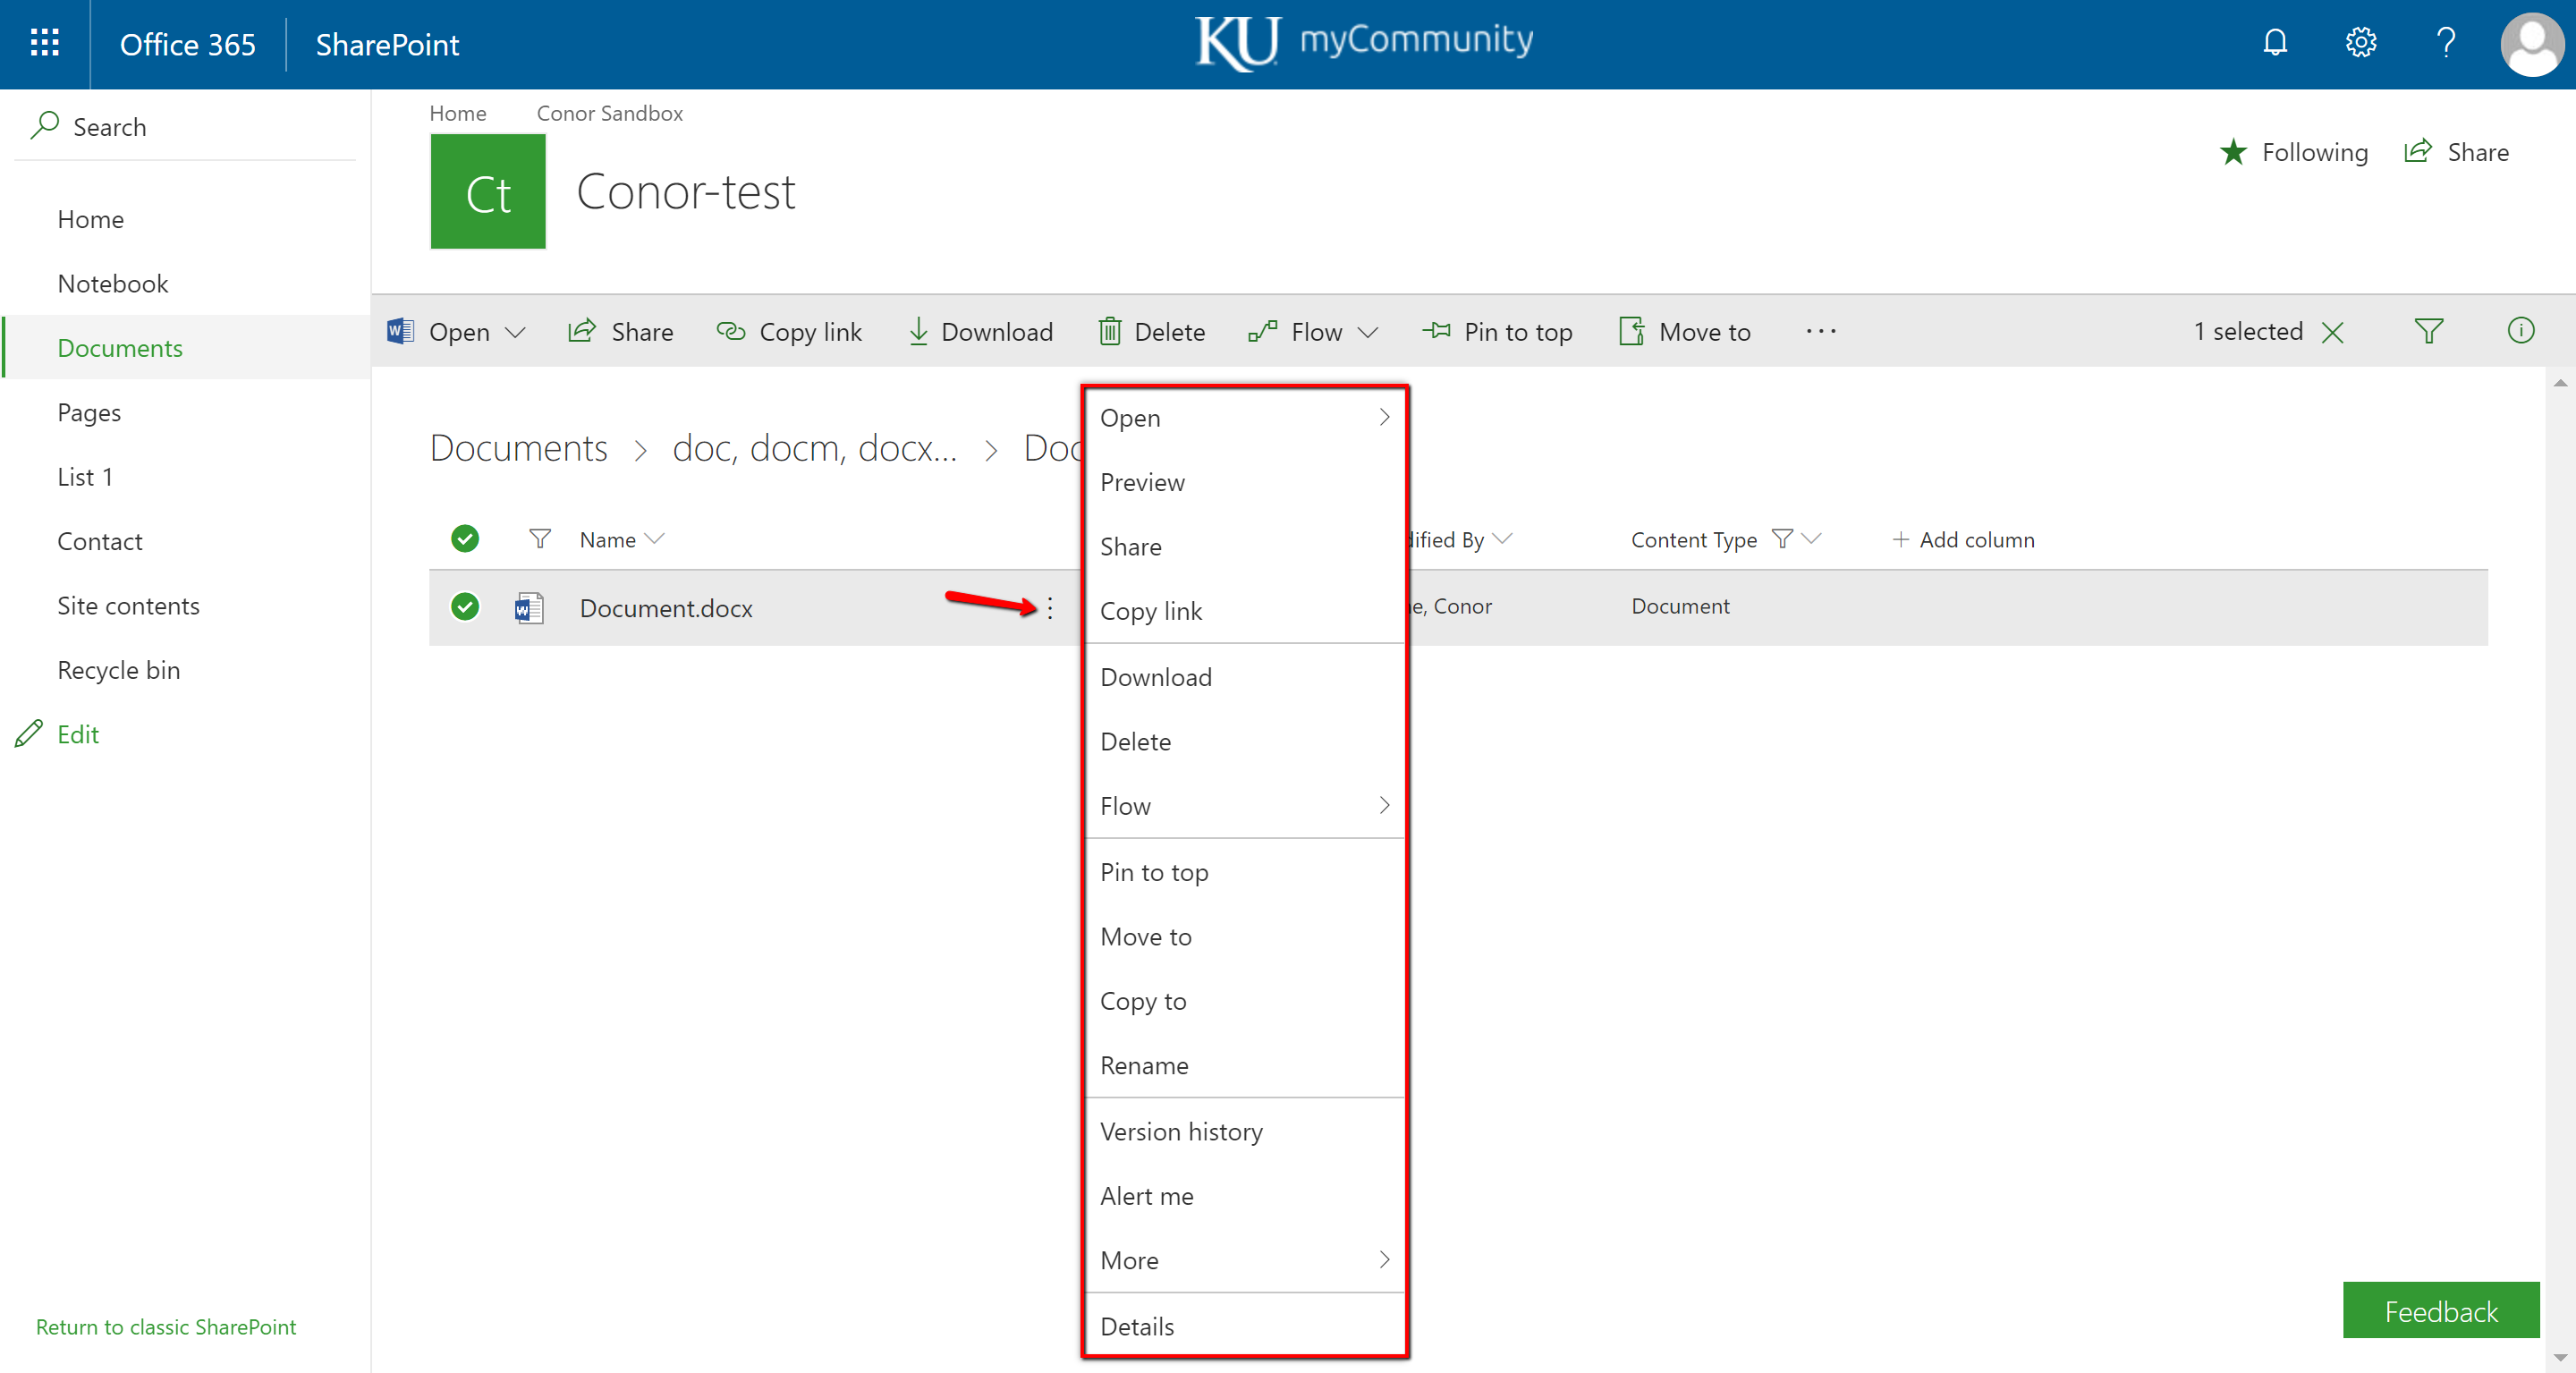
- To locate the menu to move the document, view version history, etc., hover your mouse over the document and select the More options [...] icon.
View ScreenshotHover over the file and select the 3 dots to the right of the file name
Create a Custom View of a Library
Document libraries offer the ability to sort and filter based on your columns. Custom views are a way to save those filtering conditions for easy access.
- Sort items together by selecting on column header and selecting Ascending or Descending.
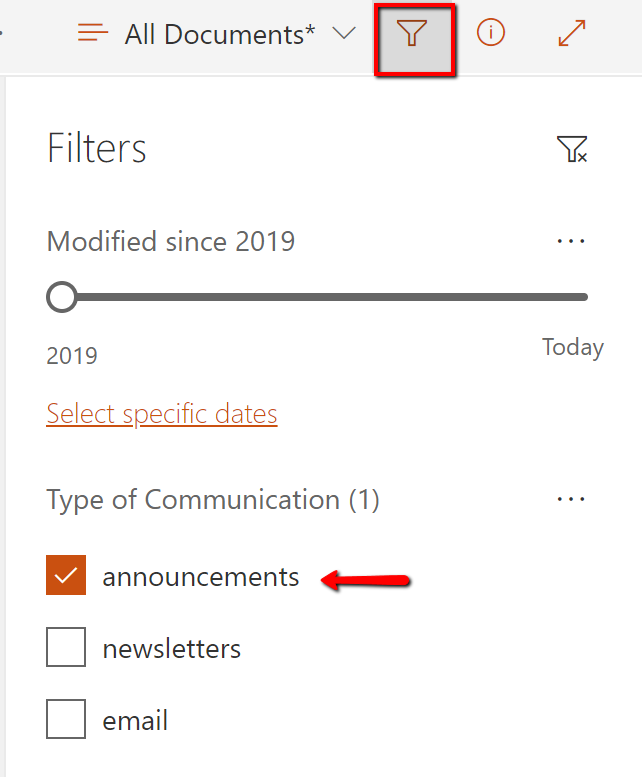
- Open the filter panel by selecting on the funnel icon and select the desired filter options which are based on your columns.
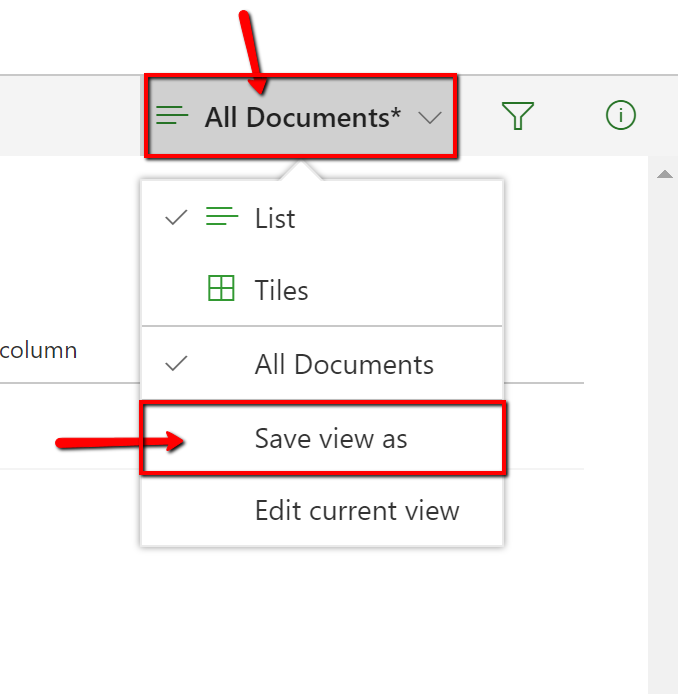
View ScreenshotTo filter, select the funnel icon and select the desired filter options which are based on your columns. - Select on the All Documents from the top-right gray bar and select Save view as.
View ScreenshotSelect All Documents from the top menu, then select Save view as - Give the custom view a name. Check the box for public view if you want the view to be available to all users of the site.
- Select Save.
- The view is now available to use anytime from the view panel of that document library.
Create Files
Upload Files
Share Files
Sync Folders
Request Files
With this feature, you can select a folder where others can upload files using a link that you send them. The users that you request files from do not need to have a Microsoft account to upload files, and they cannot see what's in the folder - they can only upload files to it.
Request Files from Others
- Open your SharePoint site.
- Hover over the folder you want to add files to and select the three dots to open the menu.
- Select Request files from the panel of options.
View Screenshot - Enter a descriptive name of the files you're collecting.
- Select Next.
- You can choose Copy link and send it via email to the people you need files from or enter their email addresses to send via OneDrive.
- Select Done.
Recipients will select a button to upload the file(s). If the recipient isn't signed in to Microsoft, they will need to add their first and last name as a way to identify the uploaded files. If they are signed in, the identity is recorded as part of the upload.
You will be notified via email when a file is uploaded.
Stop Requesting Files
Once you've received the files you need, you can delete the link.
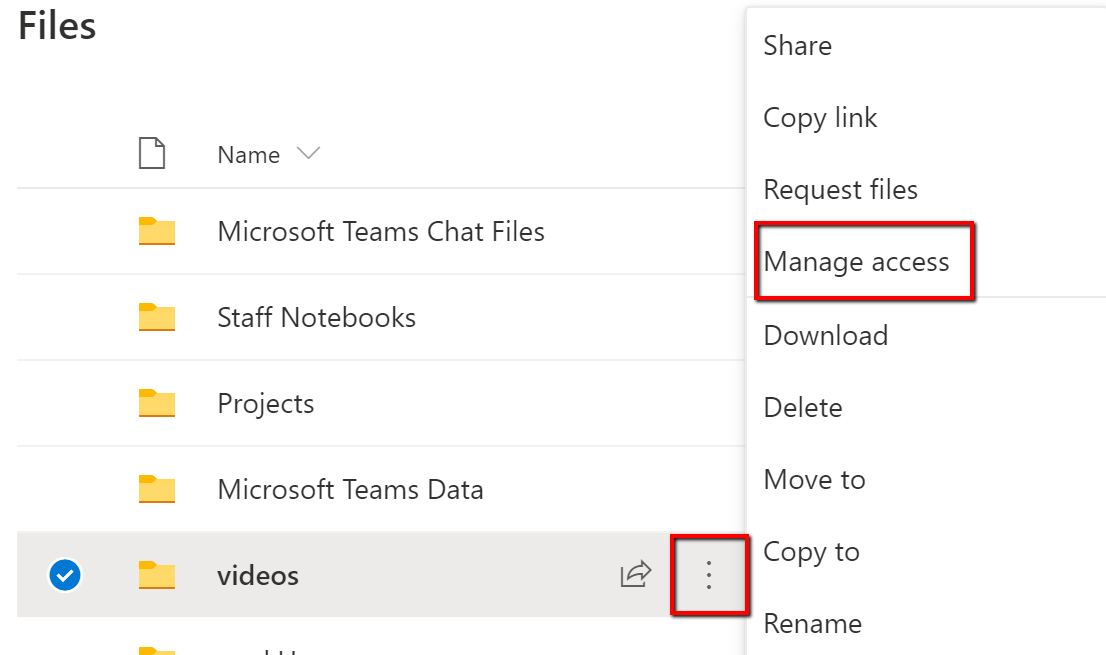
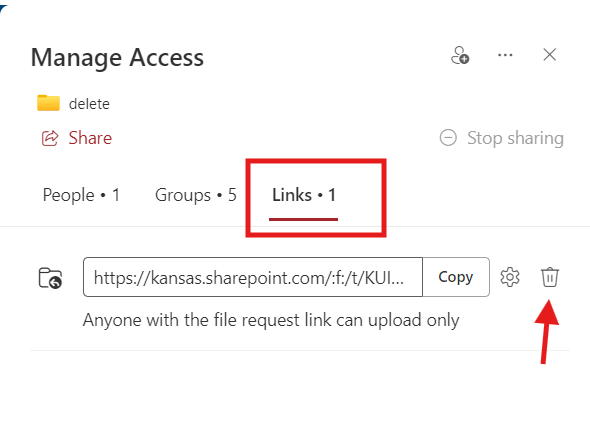
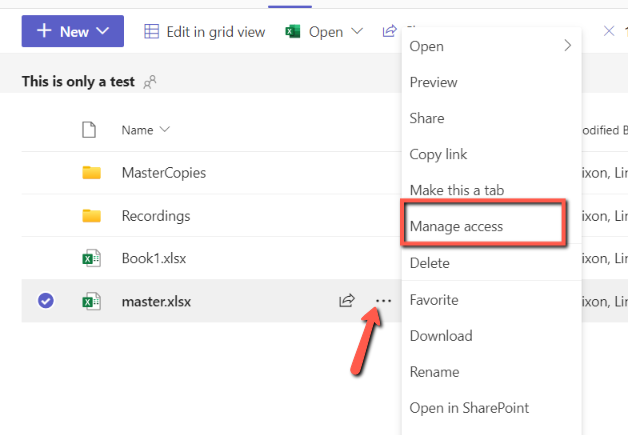
- Hover over the folder you want to remove the request link from and select More options [...].
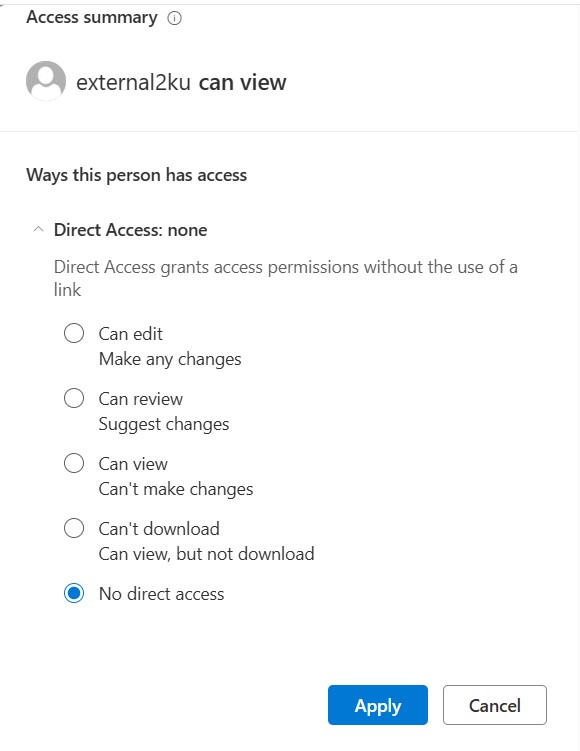
View ScreenshotHover over file, select 3 dots, then select Manage access from menu - Select Manage access.
- Select Links tab.
View Screenshot - Select trash can to the right of the link.
Lists in SharePoint
A custom list is a collection of information, such as contacts, resources, supplies lists, etc. With custom lists, you are able to sort and filter based on columns which you create. Multiple lists can be added to the team site.
Add a Custom List
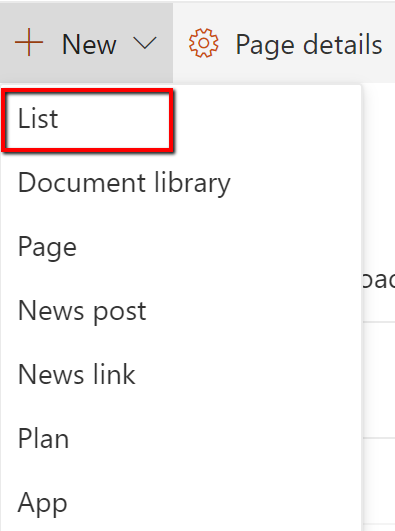
- Select the +New icon in the top menu and select List.
View ScreenshotSelect the New link from the menu, then select List from the dropdown menu - Give the list a name and choose whether or not to have the list link show in the site navigation.
View ScreenshotDeselect checkbox if you don't want list to show in navigation - If you deselect Show in site navigation, you will find the list in Site Contents [Settings > Site contents].
- Select Create.
Add Columns to a List
- Open the list, select +Add column, then select the type of column you want to add.
- Name the column, ensure Type the type of column you chose, and select More options to review additional selections.
- When done adding columns, select Save.
Edit a List
The two ways to edit a list are +New and Edit in Grid view tools found in the top menu.
To edit using the +New tool
- Select +New in the top menu.
- A panel will open and you can complete each column field as you would a form.
To edit using the Edit in grid tool
- Select Edit in grid in the top menu.
- Select the cell you wish to edit.
- Begin typing in the cells and use the tab key on your keyboard to move across cells.
- Data can be copied and pasted from Excel. Ensure the names and order of columns match before copying and pasting.
- To save, select Exit grid view.
Create a Custom View of a List
- Select the name of each column to sort and filter the information in a list.
- Select All items and select Save view as.
View ScreenshotSelect All Items in menu, then select Save view as from dropdown list - Name this view and select Save.
- The new name will now show instead of All items. Select the new view name and choose Edit current view.
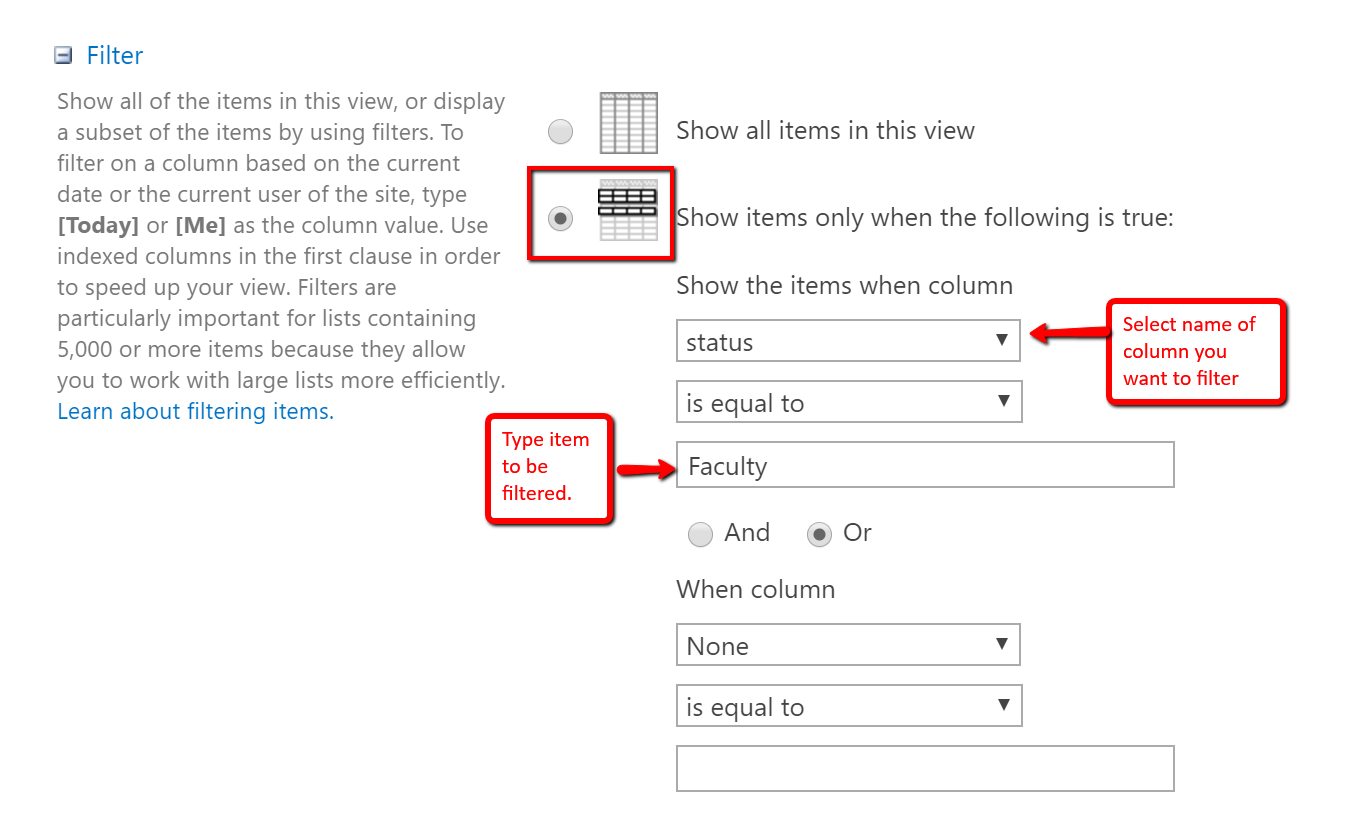
- Scroll down the filter section and select the button next to Show items only when the following is true.
- In the first drop down box, select the name of the column you want to filter.
- Leave the default is equal to, then type the item to be filtered.
View ScreenshotSelect name of column, then type item to be filtered - Once you are finished sorting and filtering, scroll to the bottom and select OK.
Create a Calendar from Lists
If you create a date/time column, you can create a calendar view of those items in the list. This calendar view is specific to this list and does not integrate with Outlook.
- Select All Items.
- Select Create view from drop down.
- Select Calendar and complete other pertinent information in the Create view panel.
View ScreenshotSelect Calendar button and complete pertinent information.
Delete a Custom View of a List
- Select the name of name of the view you want to delete.
- Select Edit current view.
- Select Delete located at the top-right of the page.
Pages
Pages in a team site are similar to pages in any website; the page consists of content and apps pieced together. A page is helpful as you are able to see multiple types of content and apps in one place rather than going to each specific place for that content or app.
Pages are made up of sections called web parts that can be added, removed, and reordered. Examples of the default web parts on your home page are News, Activities, and Quick Links.
Add a New Page
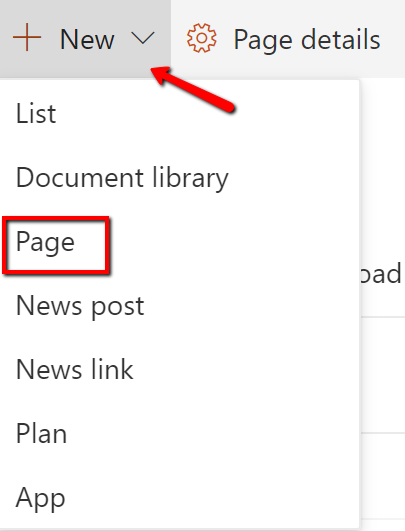
- Select the +New icon in the top menu and select Pages.
View ScreenshotSelect the New link from the menu, then select page from the dropdown list - Rename the page by selecting on Name your page in the top banner of the page and typing the new name.
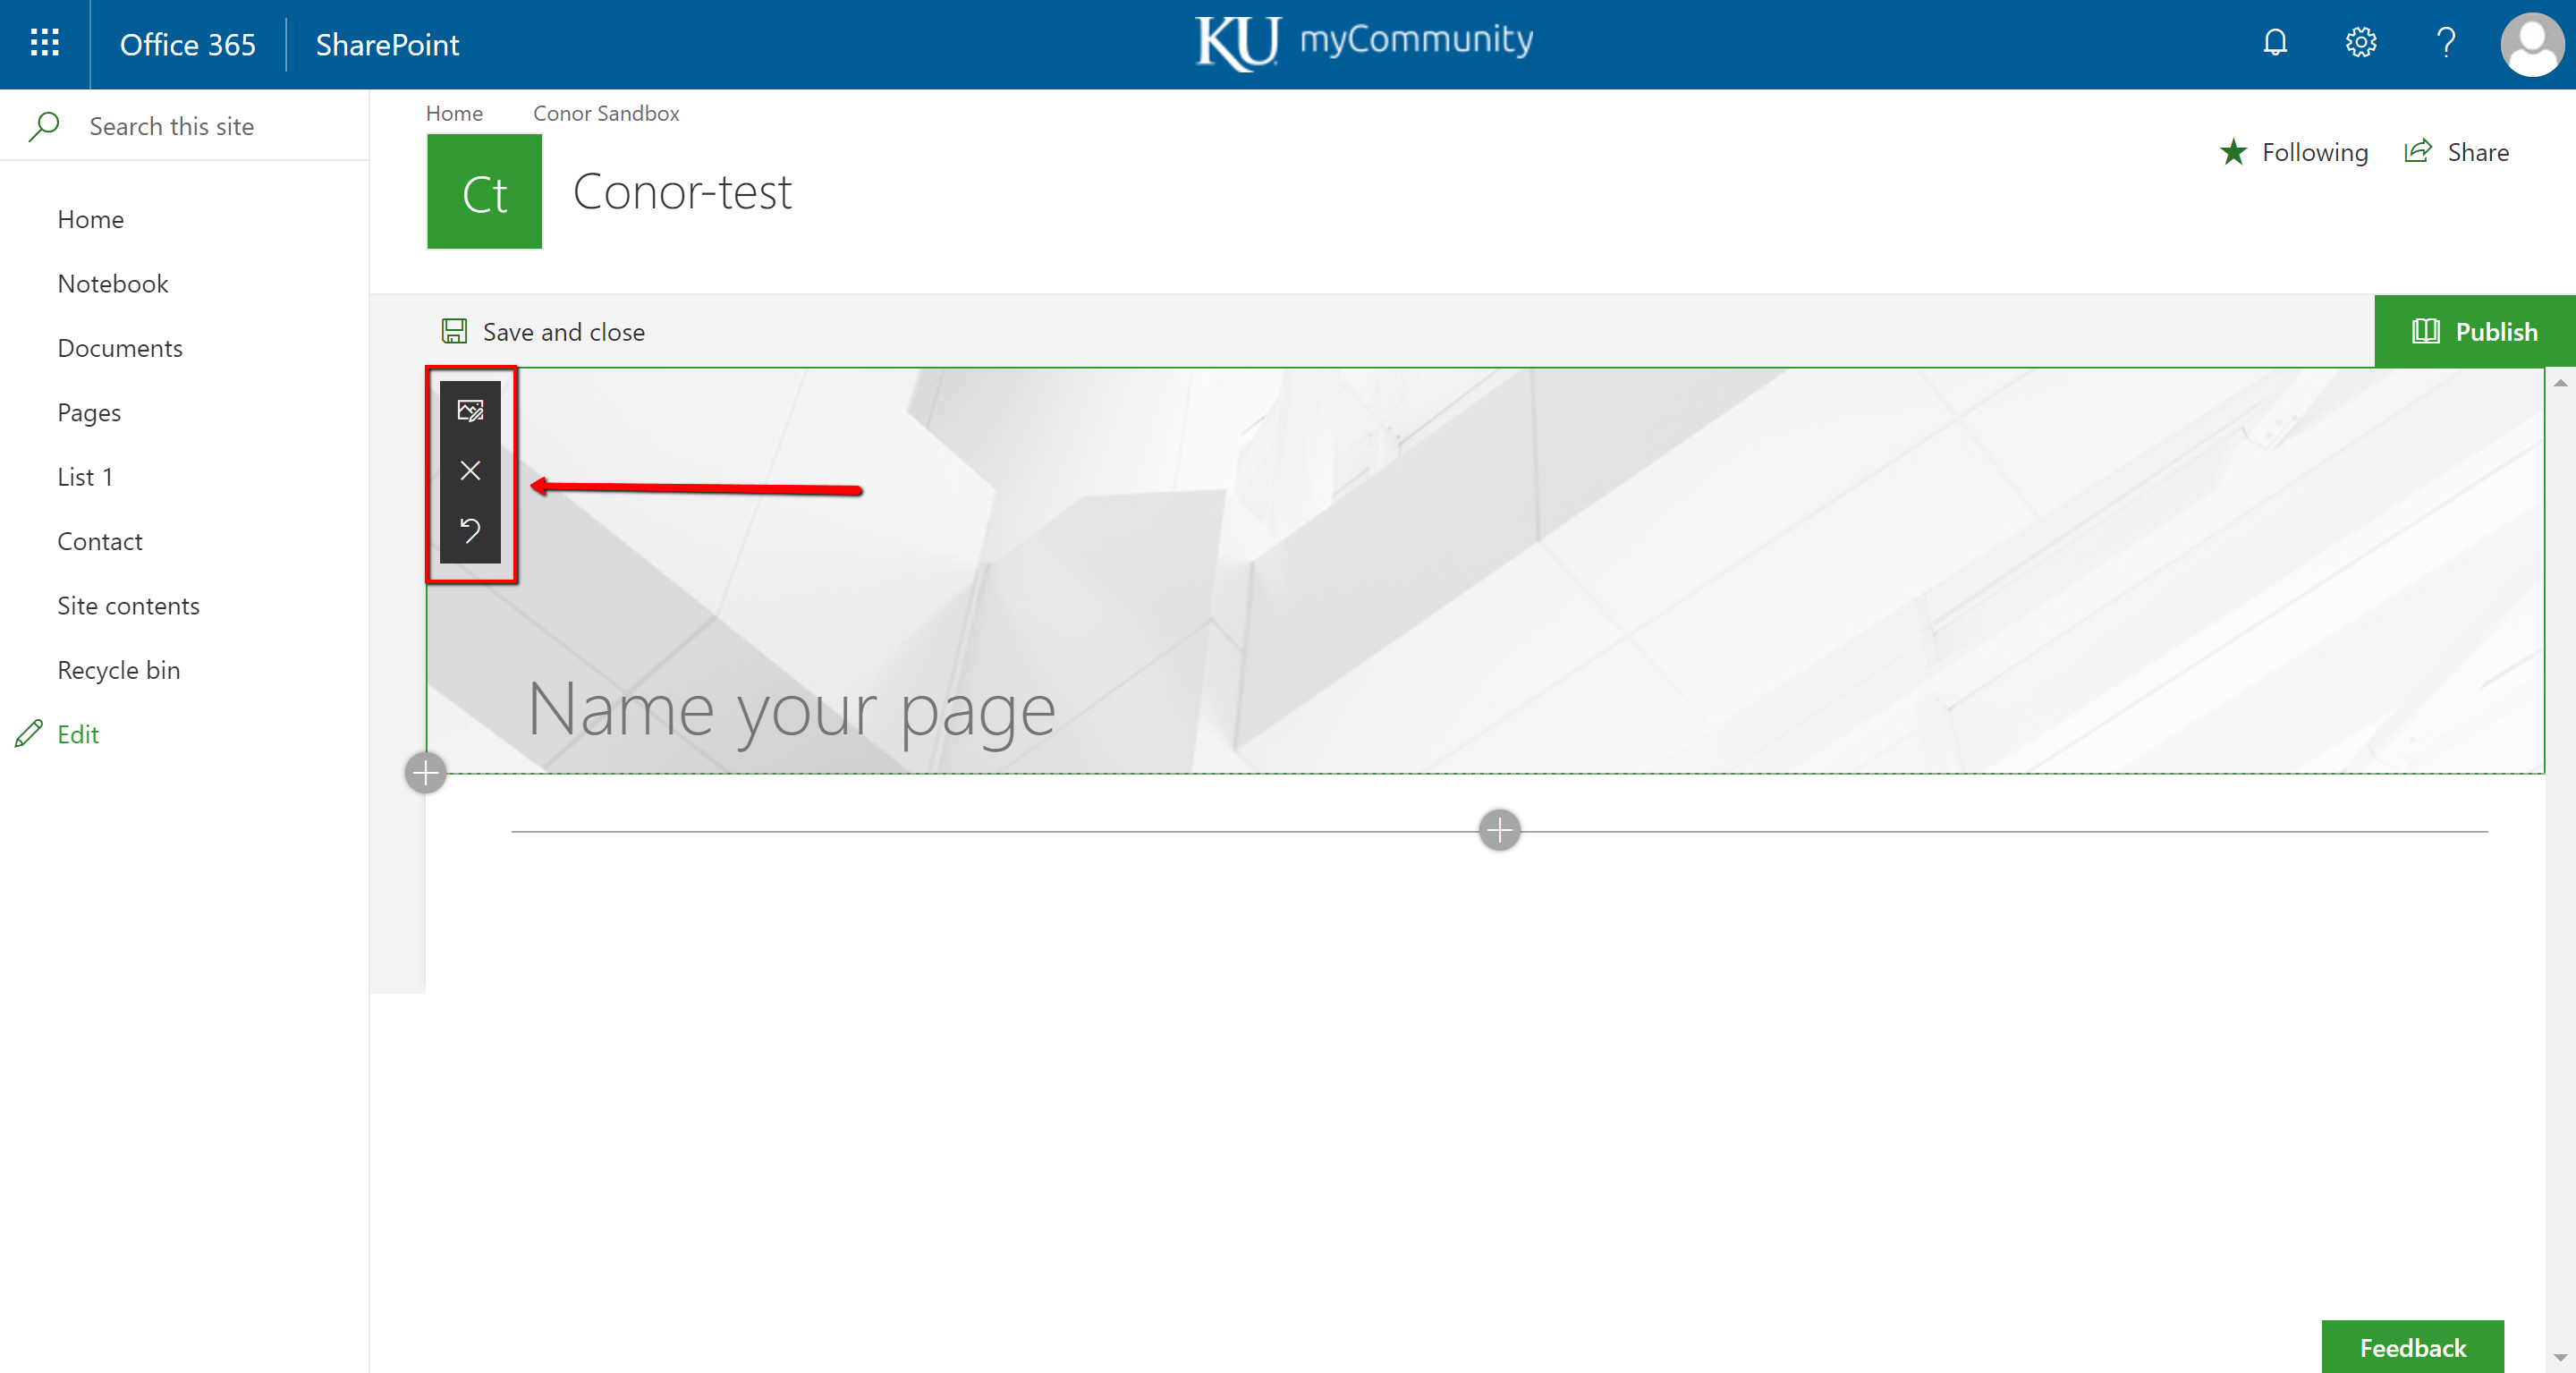
- To change or remove the background image, select the background to bring up edit options in the tools on the left edge of the background.
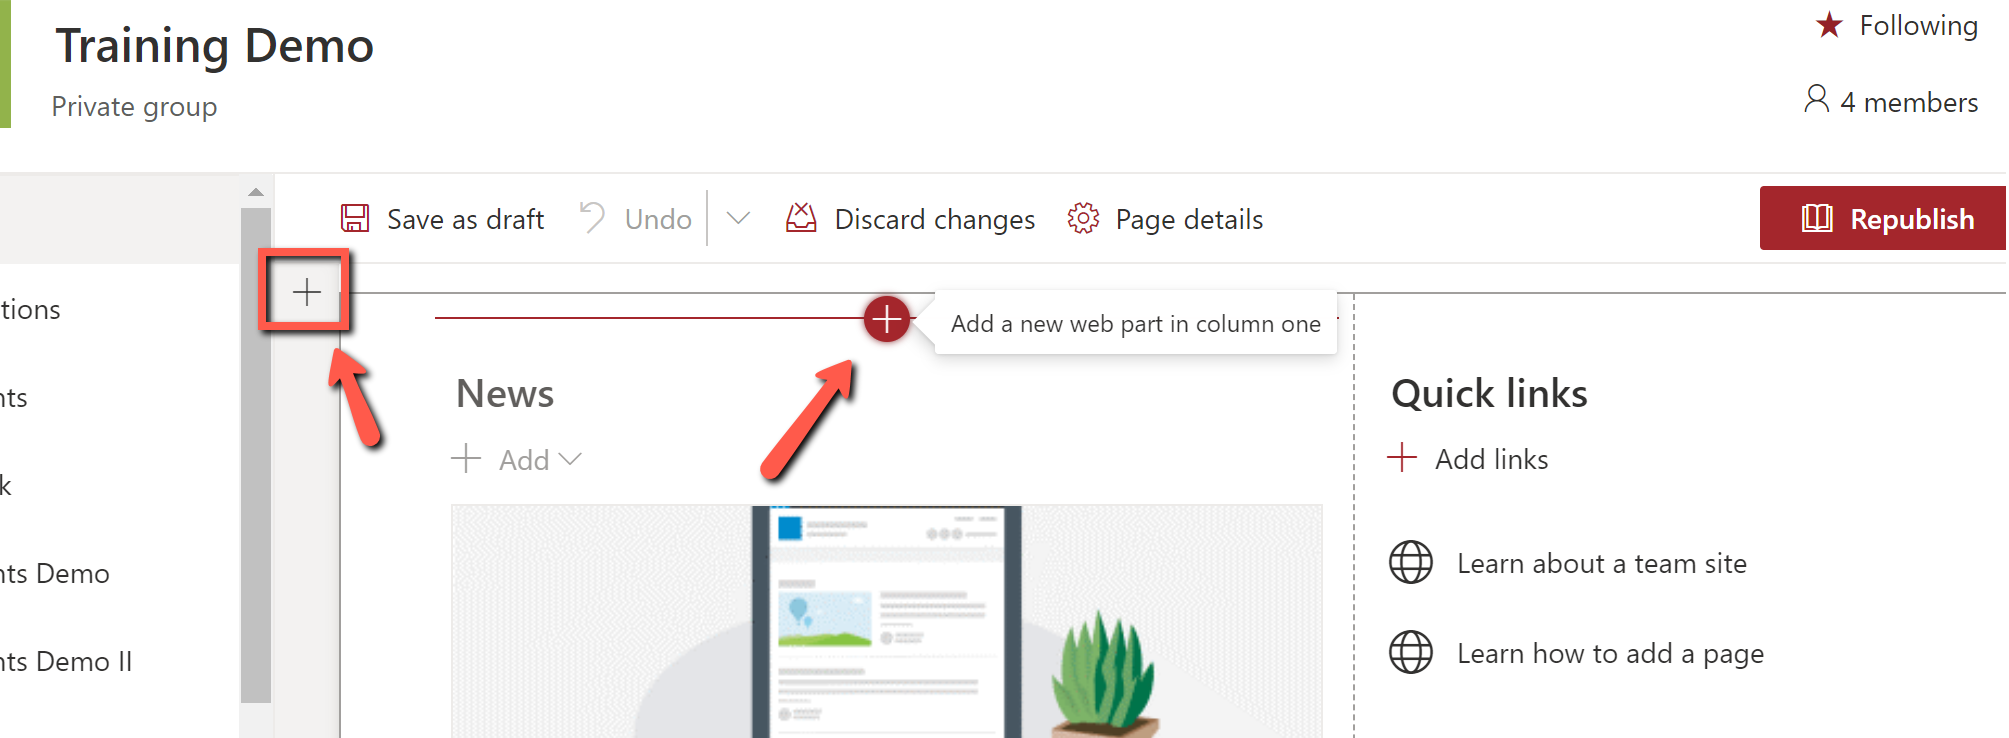
View ScreenshotTo bring up edit tools, select the background - Use the plus signs to add new sections and web parts to the page.
View ScreenshotSelect the plus signs to add web parts - When done, select Save as draft or Publish (Republish) in the main menu.
Edit an Existing Page
- Navigate to the page and select Edit located to the far right in the menu.
- Select inside the web part you want to edit and a tools bar will appear in the left edge of that web part.
View ScreenshotSelect the web part to show the edit tools - Make sure to select Publish (Republish) in the main menu when you have completed your edits.
Delete a Page
- In the Quick Launch (navigation in the left panel of your page), choose Pages. If the Pages link is not in the Quick Launch, go to Settings > Site contents.
- Hover your mouse over the page you want to delete and check the circle left of the page title.
- Either select Delete in the top menu or select the More options [...] icon then Delete.
View ScreenshotSelect the 3 dots, then select Delete from the menu
Tasks
Tasks is no longer included in Modern SharePoint sites, but you can add it by navigating to a Classic view. You can access instructions for Tasks on the Microsoft Support site.
For additional options, you can use SharePoint Lists or Tasks by Planner.
Calendar
Calendars are great for keeping track of team events, meetings, and projects. Multiple calendars can be added to the team site and can also be synced to your Outlook calendar.
How to add a calendar to a site
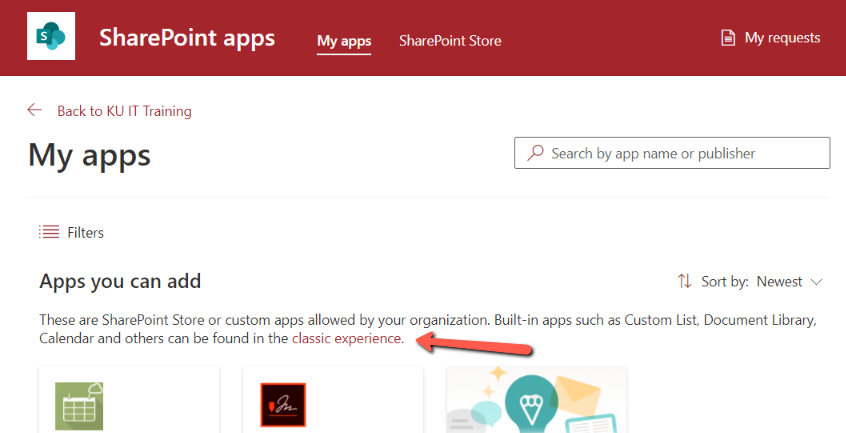
- Select New from the top and select App from the options or select the Settings icon and select Add an app from the options.
View ScreenshotSelect New or Settings, then add App from the options. - Select the Classic experience link.
View ScreenshotSelect the classic experience link. - From the list, click on Calendar icon.
- Give the calendar a name and click Create.
- This will take you to the Site Contents page. Find the calendar in the list and click the name of the calendar.
How to add events to a calendar
- Option one, click on the day and click the Add button.
- Option two, click the Events tab at the top and click New Event.
- Enter the details of the event. If it's a series check the box for recurring event.
- Click Save.
How to sync a calendar to Outlook
Note: the calendar only syncs from SharePoint to Outlook, it does not sync from Outlook to SharePoint.
- Click on the Calendar tab and select Connect to Outlook.
- Click Open Outlook from the pop-up.
Microsoft Updates & Tips
Support
Technical Support: ithelpdesk@ku.edu | 785-864-8080
Training Support: training@ku.edu | 785-864-5155